When using iTunes on your PC, it is important to ensure that your computer is authorized. This authorization allows you to access and play all the content you have purchased from the iTunes Store. However, if your computer is not authorized, you may encounter issues when trying to play your purchased items. In this article, we will discuss how to authorize or deauthorize your PC in iTunes.
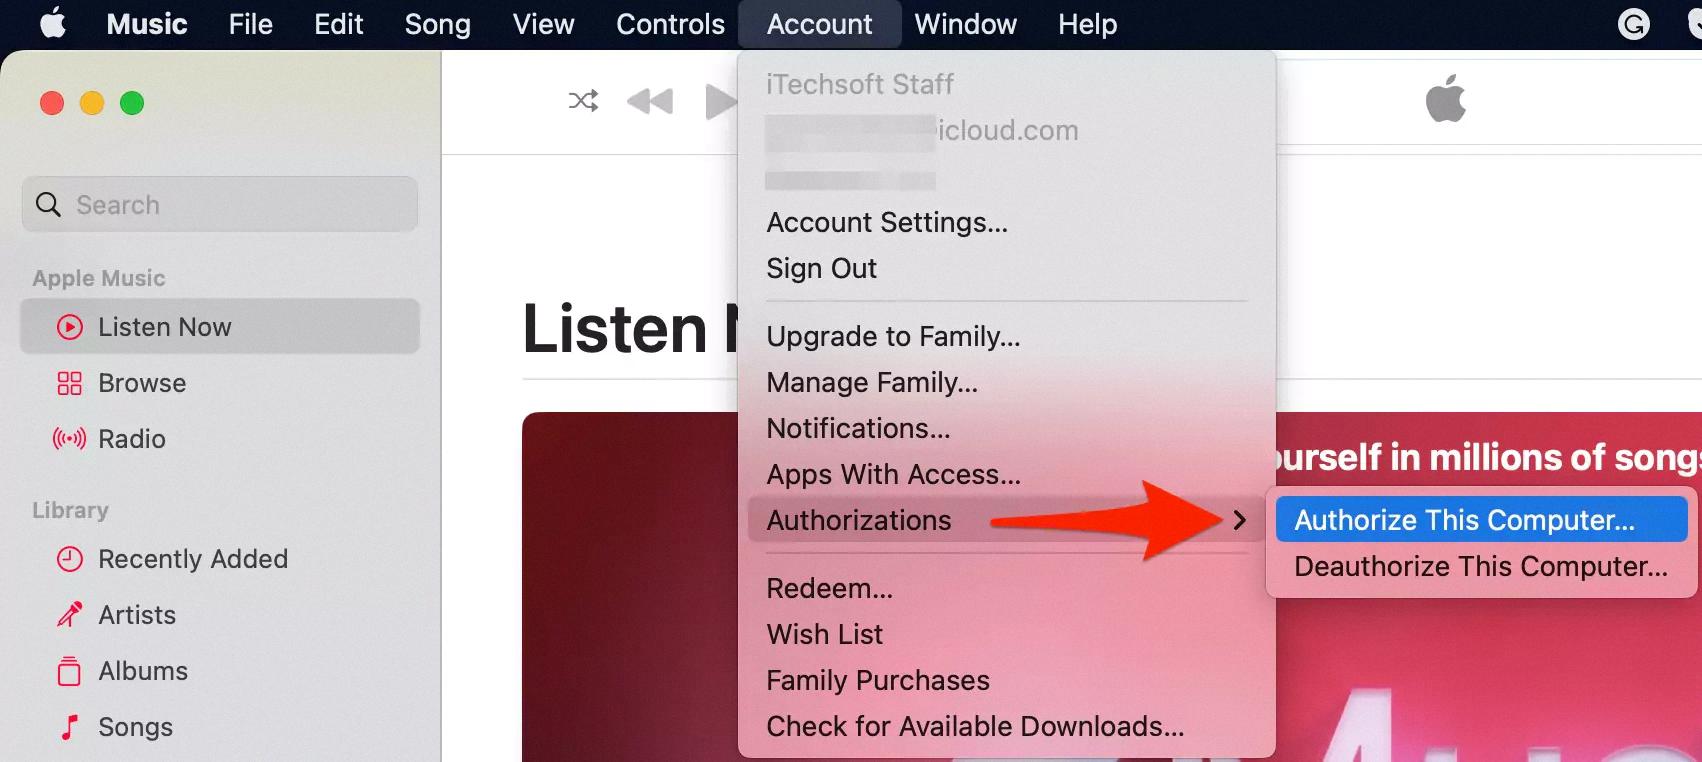
To begin, open iTunes on your computer. Once the application is launched, go to the top menu and click on “Account.” From the drop-down menu, choose “Authorizations.” Here, you will have the option to either authorize or deauthorize your computer.
If your computer is not authorized, select “Authorize This Computer.” You will then be prompted to sign in with your Apple ID and password. Enter the required information and click “Authorize.” This will grant your computer permission to access and play your purchased content.
On the other hand, if your computer is already authorized, but you want to remove the authorization, choose “Deauthorize This Computer” from the “Authorizations” menu. Again, you will need to sign in with your Apple ID and password to confirm the deauthorization.
It is worth noting that you can only authorize up to five computers with your Apple ID at a time. If you have reached this limit and want to authorize a new computer, you will need to deauthorize one of the previously authorized ones.
In some cases, you may find that the content you want to play is associated with a different Apple ID. To check if this is the case, right-click on the item and look for the option “Remove Download” in the menu. If you see this option, it means you are signed in with a different Apple ID. Select “Remove Download” and then redownload the item to access it with your current Apple ID.
If you are using the iTunes app on your Mac, the process is similar. Open iTunes, click on “Account,” and then choose “Authorizations” to authorize or deauthorize your computer.
Authorizing or deauthorizing your PC in iTunes is a straightforward process that ensures you have access to all the content you have purchased. By following the steps outlined in this article, you can easily manage the authorization status of your computer and enjoy your iTunes content without any issues.
How Do You Make Your Computer Authorized?
To authorize your computer, follow these steps:
1. Open iTunes on your computer.
2. In the menu bar at the top of the screen, click on “Account”.
3. From the drop-down menu, select “Authorizations”.
4. A sub-menu will appear, where you can choose between “Authorize This Computer” or “Deauthorize This Computer”.
5. If you want to authorize your computer, select “Authorize This Computer”.
6. You will be prompted to sign in with your Apple ID and password.
7. Enter your credentials and click “Authorize” to complete the process.
It’s worth noting that authorizing your computer allows you to access your iTunes purchases and content. This is particularly important if you have purchased music, movies, or other media from the iTunes Store. By authorizing your computer, you ensure that you can play, download, or sync your content without any issues.
In case you need to deauthorize your computer, simply follow the same steps as above, but instead of selecting “Authorize This Computer”, choose “Deauthorize This Computer”. This is useful if you no longer want your computer to have access to your iTunes content, or if you are planning to sell or transfer your computer to someone else.
Remember, it’s important to authorize your computer with your own Apple ID, as unauthorized access may lead to restrictions on accessing your purchased content.

Why Does iTunes Keep Saying Your Computer is Not Authorized?
There could be several reasons why iTunes keeps saying that your computer is not authorized. Here are some possible explanations:
1. Different Apple ID: It is possible that you are signed in to iTunes with a different Apple ID than the one used to authorize your computer. To check, right-click on the item causing the issue and look for “Remove Download” in the menu. If this option is available, it means you are signed in with a different Apple ID. In that case, select “Remove Download” and then try redownloading the item.
2. Deauthorized computer: If you have recently deauthorized your computer or reached the maximum limit of authorized computers (which is usually five), iTunes will prompt you to authorize your computer again. To do so, go to the Account menu in iTunes, select “Authorization,” and then click on “Authorize This Computer.”
3. Account issue: It’s possible that there might be an issue with your Apple ID or iTunes account. To resolve this, sign out of your iTunes account and then sign back in. Go to the Account menu, select “Sign Out,” and then sign in again using your Apple ID and password.
4. Outdated iTunes version: Sometimes, using an outdated version of iTunes can cause authorization issues. Make sure you have the latest version of iTunes installed on your computer. You can check for updates by going to the Help menu in iTunes and selecting “Check for Updates.”
5. Corrupted iTunes library: In some cases, a corrupted iTunes library can cause authorization problems. To fix this, you can try rebuilding your iTunes library. This can be done by moving your iTunes library files to a different location and then opening iTunes to create a new library.
If none of these solutions resolve the issue, it might be best to contact Apple Support for further assistance. They will be able to provide more specific guidance based on your situation.
How Do You Authorize Your iPhone For Your Computer?
To authorize your iPhone for your computer, you can follow these steps:
1. Open the iTunes app on your PC.
2. Look for the “Account” option in the menu bar at the top of the iTunes window and click on it.
3. From the drop-down menu, select “Authorizations.”
4. In the next menu, choose “Authorize This Computer” and click on it.
5. If prompted, enter your Apple ID password to confirm the authorization.
By completing these steps, you will authorize your iPhone to be connected and synced with your computer. This authorization allows you to transfer music, apps, and other content between your iPhone and your computer using iTunes.
It’s important to note that authorizing your computer is necessary for certain actions, such as transferring purchases from your iPhone to your computer or playing content that is protected by digital rights management (DRM) on your computer.
If you have multiple Apple IDs or multiple devices, it’s essential to make sure you authorize the correct Apple ID for each device individually. This way, you can ensure that you have access to all your purchased content and can manage your devices effectively.
Remember to keep your Apple ID password secure and not to share it with anyone to protect your account and personal information.
How Do You Authorize Your Computer For iBooks?
To authorize your computer for iBooks, you can follow these steps:
1. Open the Books app on your Mac.
2. In the menu bar at the top of the screen, click on “Account.”
3. From the dropdown menu, select “Authorizations.”
4. In the submenu, click on “Authorize This Computer.”
At this point, you may be prompted to sign in using your Apple ID. Make sure to use the same Apple ID that you use on your other devices, such as your iPhone or iPad.
Once you’ve signed in, your computer will be authorized for iBooks, allowing you to access your purchased books, sync your reading progress, and enjoy the full functionality of the app.
It’s worth noting that authorizing your computer for iBooks is important if you want to access your purchased content across multiple devices. By authorizing your computer, you ensure that your books are available on all your Apple devices, providing a seamless reading experience.
If you encounter any issues during the authorization process, double-check your Apple ID credentials and ensure you have a stable internet connection. If problems persist, you may need to contact Apple Support for further assistance.
Conclusion
Authorizing or deauthorizing your PC on iTunes is a simple process that ensures you have access to all your purchased items and can play them without any issues. By following the steps outlined above, you can easily authorize your computer and enjoy your music, movies, books, and other content seamlessly.
To authorize your PC, open iTunes and go to the Account menu. From there, choose the Authorizations option and then select “Authorize This Computer.” Enter your Apple ID and password when prompted, and click on the Authorize button. This will grant your computer permission to access and play your purchased content.
On the other hand, if you need to deauthorize your PC, follow the same steps but select “Deauthorize This Computer” instead. This will remove the authorization from your current computer, allowing you to authorize a different one if needed.
It’s important to note that if you’ve used a different Apple ID to purchase any of your items, you may encounter issues. In such cases, right-click on the item in question and look for the option to “Remove Download” in the menu. If this option is available, it means you’re signed in with the wrong Apple ID. Select “Remove Download” and then redownload the item.
Additionally, it’s worth mentioning that the process may slightly vary depending on the version of iTunes or the specific device you’re using. However, the general steps outlined above should guide you in the right direction regardless.
By authorizing or deauthorizing your PC on iTunes, you can ensure that you have the necessary access and permissions to enjoy your purchased content hassle-free. So, go ahead and authorize your computer to make the most out of your iTunes experience.


