In theory, editing a Word document should be simple, but it can turn challenging very quickly if you can’t change it for whatever reason. Understanding the most common reasons for Microsoft Word editing issues would save you time and much of your frustration.
Occasionally, users get their document locked in Word, and this happens to them due to a variety of reasons: the read only mode, permission by the file’s owner, etc.
If you are wondering why your Word document cannot be edited, then you might find that the answer lies in these settings, and even possible compatibility problems, updates in the software, or limitations due to the location of the file. To regain control over your document quickly, knowing what to check first can make life simpler.
Checking If the Document Is Locked
Sometimes, your Word document can suddenly feel off-limits, as if it’s got a virtual lock on it, making editing impossible. If you’ve run into this, don’t worry—there’s a quick way to check if the document is locked and how to fix it.
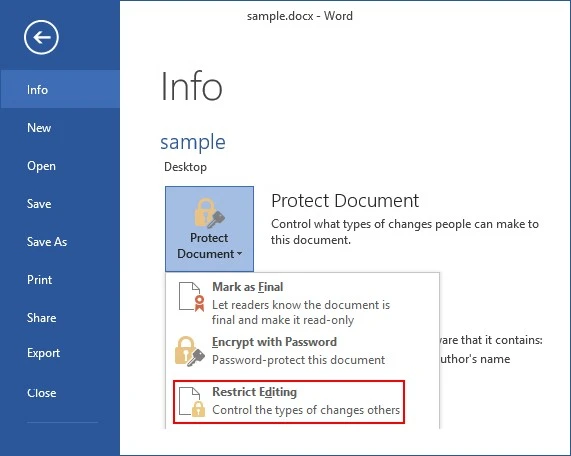
Start by opening your document and heading to the “File” menu. Select “Info” from the options on the left, and you’ll see a section labeled “Protect Document.”
This is where Word keeps its settings on restrictions and protection. Look specifically for the option that says “Restrict Editing.”

If restrict editing in Word is active, it means that Word has applied certain limitations, which can be why the document isn’t letting you make changes.
To unlock Word document restrictions, simply uncheck “Restrict Editing” in that section. This should be enough to free the document and allow editing as usual. In many cases, this quick locked Word file fix will get you back to editing smoothly, without any hassle.
Enabling Editing in Microsoft Word
Don’t panic if you’ve opened a document in Microsoft Word and it’s locked with restrictions — it’s fairly straightforward to remove them in just a few quick steps.
The first thing you should do is head over to the “Review” tab of your workspace and open the “Restrict Editing” option. Click and see any active restrictions in a sidebar. In order to add or edit the document, you will need to disable these settings if your document is in read only mode or password protected.
Sometimes entering the appropriate password will instantly unlock the document and let you change it. This simple way allows you to edit a locked Word file and regain full control over your document.
Understanding “Selection Is Locked” Error
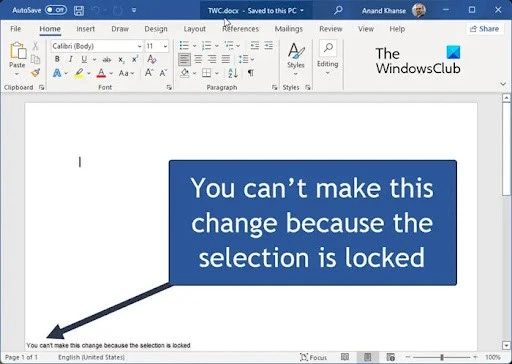
If you’ve ever tried to edit a Word document only to find that your selection is locked, you know how frustrating it can be.

The “selection is locked” error usually means that Word has restricted the editing functions, often due to the document’s protection settings. Fortunately, there are a few straightforward steps you can take to unlock final Word document settings and regain full editing access.
One common reason for this issue is that the document is marked as “Final.” This setting is designed to signal to others that the document is ready for viewing and not meant for further changes. To resolve this, you’ll need to remove the “Mark as Final” designation. Here’s how:
1. Open the Word document in question.
2. Go to the File tab, then select Info.
3. In the Protect Document dropdown menu, check if Mark as Final is selected. If it is, click on it to uncheck this setting. This action will lift the “final” status, allowing you to edit the document.
Sometimes, Word might also lock editing because of password protection. To check for this:
1. Go to the File tab and choose Info.
2. Under Protect Document, look for any password restrictions and, if necessary, enter the password to lift the restriction.
Following these steps should enable you to edit locked Word selection without issues. With the document unlocked, you’ll be free to make the changes you need.
Troubleshooting Protected View
Imagine opening a Word document, only to find it’s in Protected View—a security measure Microsoft uses to keep your system safe from potentially harmful files, especially those downloaded from the internet or received via email.
This feature helps prevent malware from running if a document is opened without permission. But if the document is from a trusted source and you need to make changes, you might want to disable Protected View. To do this, go to the “File” tab, select “Options,” and go to the “Trust Center.”
From there, click “Trust Center Settings,” find the Protected View tab, and uncheck the boxes that apply to documents you trust. Now, you can edit protected Word document files confidently, knowing that Trusted Center settings keep your edits secure.
Resetting Microsoft Word to Fix Editing Issues
If you can’t change a Word document in any way, oftentimes just resetting Word settings or reinstalling Microsoft Word can take care of any lingering issues. You can use this to reset your Word settings just to clear out corrupted files and/or misconfigurations that might be causing editing problems. Then you get a fresh start without losing your documents.
To accomplish this, first close Word and delete the Normal.dotm template that stores customized settings. Reinstalling Microsoft Word through the official site can, most of the time, do the trick for Word editing issues, as it gives you a decent installation free from previous glitches or file corruption.
Conclusion
Dealing with Microsoft Word access issues and can’t edit a document? It is frustrating, and often all you need to do is change a few settings. The use of these Word editing solutions will help you gain back complete control of your documents.
Check the document settings to see if you’ll be able to make changes, and then use our Word document tips to get around any restrictions that prevent changes. When creating documents within Word, it’s also worth exploring the built-in settings that allow you to enable editing access, so you can manage and update your content freely without any resistance.


