Uninstalling Office from your Mac can seem like a daunting task, but with the rigt guidance, it’s actually quite straightforward. In this blog post, we’ll take you through the steps of completely uninstalling Microsoft Office from your Mac.
First, you’ll want to make sure that all Office applications are closed. Find any open Office apps in the Dock and quit them by right-clicking on their icon and selecting Quit.
Next, open up Finder and navigate to /Applications/. Locate any Microsoft Office applications you may have installed (such as Word, Excel, or PowerPoint) and drag them from the Applications folder to the Trash bin.
After that, open up Launchpad. Scroll through until you locate any remaining Microsoft Office icons and drag them to the Trash bin as well.
Now open up System Preferences and select Accounts. Click on Login Items tab at the top of the window and locate any Microsoft programs listed thre (such as Outlook or OneNote). Select each one in turn and click on the minus sign at the bottom of the window to remove it from your login items list.
Finally, empty the Trash bin to permanently delete all files associted with Microsoft Office from your Mac.
And that’s all there is to it! Uninstalling Microsoft Office from your Mac is easy with these simple steps. If you have any questions or need more help with uninstalling Office from your Mac, please don’t hesitate to reach out for support.
Uninstalling Microsoft Office for Mac
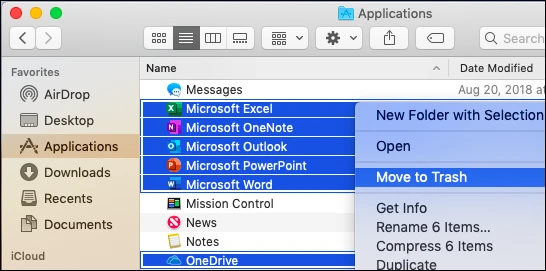
To uninstall Office for Mac, open Finder and navigate to the Applications folder. Once there, press Command+click to select all of the Office for Mac applications. Next, Ctrl+click an application you selected and click Move to Trash to delete the applications. Be sure to empty your trash can when you are done. Finally, if you have any Office-related folders in the root library folder on your Mac (such as ~/Library/Preferences/Microsoft), you should delete them as well. That should complete the uninstallation process for Office for Mac.
Completely Uninstalling Microsoft Office
To completely uninstall Microsoft Office, you must first open the Control Panel. To do this, press Start and then select Control Panel. In the Control Panel, click Programs and then click Programs and Features. Then, right-click the Microsoft Office application that you want to remove and select Uninstall. This will completely uninstall the application from your computer. You may also need to remove any associated programs such as Outlook or OneDrive for Business in order to fully uninstall Microsoft Office.
Deleting Office 365 from a Mac
Deleting Office 365 from your Mac is a simple process. First, open Outlook on your Mac and select the “Preferences” option from the Outlook menu. Once in the Preferences window, select the “Accounts” tab. This will show you a list of all the accounts you have connected to Outlook on your Mac. Select the Office 365 account you want to delete, and then press the “-” button at the bottom of the list to remove it. Confirm your selection when prompted and your Office 365 account will be deleted from your Mac. Don’t worry – all of your data is safely stored in the Office 365 Cloud!
Uninstalling Microsoft Office 2011 for Mac
To uninstall Office 2011 for Mac, follow these steps:
1. Open the Applications folder and locate the “Microsoft Office 2011” folder.
2. Right-click on the Microsoft Office 2011 folder and select “Move to Trash” from the pop-up menu.
3. Empty your trash can to finalize the removal of Office 2011 from your Mac.
4. If there are any remaining Dock icons or folders related to Office 2011, right-click on them and select “Remove from Dock” or “Move to Trash” depending on which option is available.
5. Finally, search for any remaining files associated with Office 2011 using Spotlight and delete them if they are found.
Manually Uninstalling Office 365
Manually uninstalling Office 365 requires a few steps, but it can be done easily. Before you begin, make sure that all Office programs are closed.
First, open the Control Panel by pressing the Start button, typing “control panel” in the search field and pressing Enter. Then click Uninstall a program under Programs and select Microsoft 365 from the list of installed programs. Select Uninstall and follow the instructions on the screen to complete the uninstallation process.
Once Microsoft 365 is uninstalled, you may need to clean up any remaining files or settings related to Office365. To do this, search for “Programs and Features” in your Start menu and open it. Scroll though the list of programs to see if any Microsoft 365 components remain installed (e.g., Skype for Business). If so, select them and click Uninstall to remove them from your system.
Finally, delete any remaining Office files from your computer by searching for “%programfiles%\Microsoft Office” in your Start menu and deleting any folders with Office-related names (e.g., “Office15”).
If you have followed these steps correctly, you shold have successfully removed Office365 from your system!
Uninstalling and Reinstalling Office 365
To uninstall Office 365 from your computer, open the Control Panel and select ‘Uninstall a program’ under Programs. From the list of programs, select Office 365 and click Uninstall. Follow the prompts to complete the uninstall.
To reinstall Office 365, you’ll need to go to office.com/setup. From there, you can choose the version of Office 365 you want to install or reinstall. Once you’ve chosen your version, click Install and follow the on-screen directions to finish setting up Office on your device.
Does Uninstalling Microsoft Office Delete Files?
No, uninstalling Office does not delete any of your files. When you uninstall Office, it will only remove the Office applications and asociated files from your computer. Any personal files you created using the Office applications will remain on your computer, even after Office has been uninstalled.
Deleting a Microsoft Account on a Macbook Pro
To delete your Microsoft account on your Macbook Pro, you’ll need to open the System Preferences app. Select the Apple menu in the top left corner of the screen, then select System Preferences. Click on iCloud and select the Sign Out button. Enter your Apple ID password if prompted and then select Turn Off. This process will delete any data associated with your Microsoft account from your Macbook Pro.
Uninstalling Office 2016 for Mac
To uninstall Office 2016 for Mac completely, open Finder and click Applications. Select all your Office 2016 for Mac applications. Hold the COMMAND key + click on each app to select multiple items at once/ Press ctrl+click (or right-click) the selected apps and click Move to Trash. This will remove all of the Office 2016 for Mac applications from your computer.
Next, you need to delete any remaining Office files that were not removed when you moved the applications to the trash. To do this, go to Finder and select Go > Go to Folder in the menu bar at the top of your screen. Type “/Library/Preferences” into the text box and hit enter. Look for any files with the name “com.microsoft.” These are configuration files asociated with Office 2016, so delete them by pressing ctrl+click (or right-click) and selecting Move to Trash.
Finally, you need to clear out any leftovers in your user Library folder. To do this, agan go to Finder and select Go > Go to Folder in the menu bar at the top of your screen. Type “~/Library” into the text box and hit enter. Search for any files or folders with names related to Microsoft or Office 2016 (e.g., com.microsoft…) and delete them by pressing ctrl+click (or right-click) and selecting Move to Trash.
Once you have completed these steps, Office 2016 for Mac sould be completely uninstalled from your computer!
Deleting Old Microsoft Office Before Installing New
Yes, it is recommended that you uninstall any previous versions of Microsoft Office, including Visio and Project, prior to installing a newer version. This helps to ensure that all of the new programs run properly without any conflicts from outdated files. To uninstall the old version of Office, open your Control Panel and select “Uninstall a Program” under the Programs section. Select each version of Office that you wish to uninstall and click on the “Uninstall” button. You may also need to delete any reated files or folders associated with the previous version in order for this process to be successful. Once all previously installed versions are removed, you can install the new version of Microsoft Office on your computer.
Uninstalling Office 2011 for Mac Before Installing Office 365
Yes, it is important to uninstall Office 2011 for Mac before installing Office 365. If you don’t uninstall Office 2011 first, the new version of Office may not install correctly and could cause conflicts with existing Office files. To ensure a smooth transition to Office 365, it is best to remove any older versions of Office applications first. To do this, open your Applications folder and delete any Microsoft Office programs. Then restart your computer and you will be ready to install the new version of Office 365.
Uninstalling Microsoft Office 2016
To uninstall Office 2016, fist open the ‘Add or remove programs’ application on your computer. This will open the ‘Apps & features’ window. In the list of applications, select ‘Microsoft Office Professional Plus 2016’. Click ‘Uninstall’ and follow the instructions in the uninstall wizard to complete the process.
Is Microsoft Office Free for Mac Users?
No, Microsoft Office is not free for Mac. To use Microsoft Office on your Mac, you will need to purchase a Microsoft 365 subscription or a one-time purchase of Office 2021. Microsoft 365 subscriptions cost $69.99/year for the Home/Personal version and up. With a subscription, you can access all of the Microsoft Office apps such as Word, Excel, PowerPoint and Outlook on any device with an internet connection. Additionally, you can access 1TB of OneDrive storage and 60 minutes of Skype calling per month. If you opt for a one-time purchase of Office 2021 instead, you will receive the same applications but withot the cloud storage or Skype minutes.
Should I Uninstall Microsoft 365?
Yes, you can safely uninstall Microsoft 365. To do so, open the Control Panel, select Programs > Uninstall a program and then select the Microsoft 365 application that you want to uninstall. Follow the on-screen instructions to completely uninstall it from your computer. After uninstalling, make sure to restart your computer to ensure all components of Microsoft 365 have been removed.
Uninstalling Microsoft Teams on Mac
To uninstall Microsoft Teams on your Mac, open the Applications folder and locate the Microsoft Teams app. Right-click it and select Move to Trash. You may need to enter your password. After the app is in the trash, empty the trash to fully remove it from your computer. If you are haing trouble uninstalling Teams, you can also try force quitting it by right-clicking on its icon in the Dock and then holding down Option and clicking Force Quit. Once you have done this, move the Microsoft Teams app from your Applications folder to the Trash. Finally, empty the Trash to completely remove Microsoft Teams from your Mac.
Changing Office 365 Account on Mac
Changing your Office 365 account on Mac is a simple process. First, open Outlook and select the ‘Preferences’ menu at the top of the screen. Next, select the ‘Accounts’ tab and then click on the ‘+’ sign to add a new account. You will need to enter your Office 365 login credentials in order to sign in, then choose ‘Exchange or Office 365’ as the account type. Once you are logged in, you can access all of your mail, calendar and contact information asociated with your Office 365 account. If you wish to switch to a different Office 365 account, simply repeat this process and enter the new credentials when prompted.
Conclusion
Uninstalling Microsoft Office from a Mac computer is a straightforward process. Once the Office application has been uninstalled, all associated files and folders will also be removed from the system. Before beginning the uninstallation process, it is important to ensure that all documents and other data associated with Office have been savd or backed up. After that, users can access the Uninstaller tool from their Applications folder and follow the prompts to complete the uninstallation. Once completed, Microsoft Office will no longer be available on the Mac computer.


