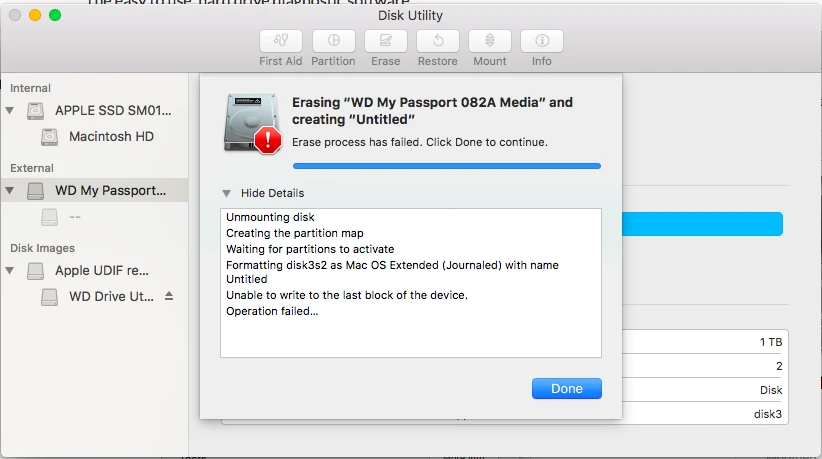
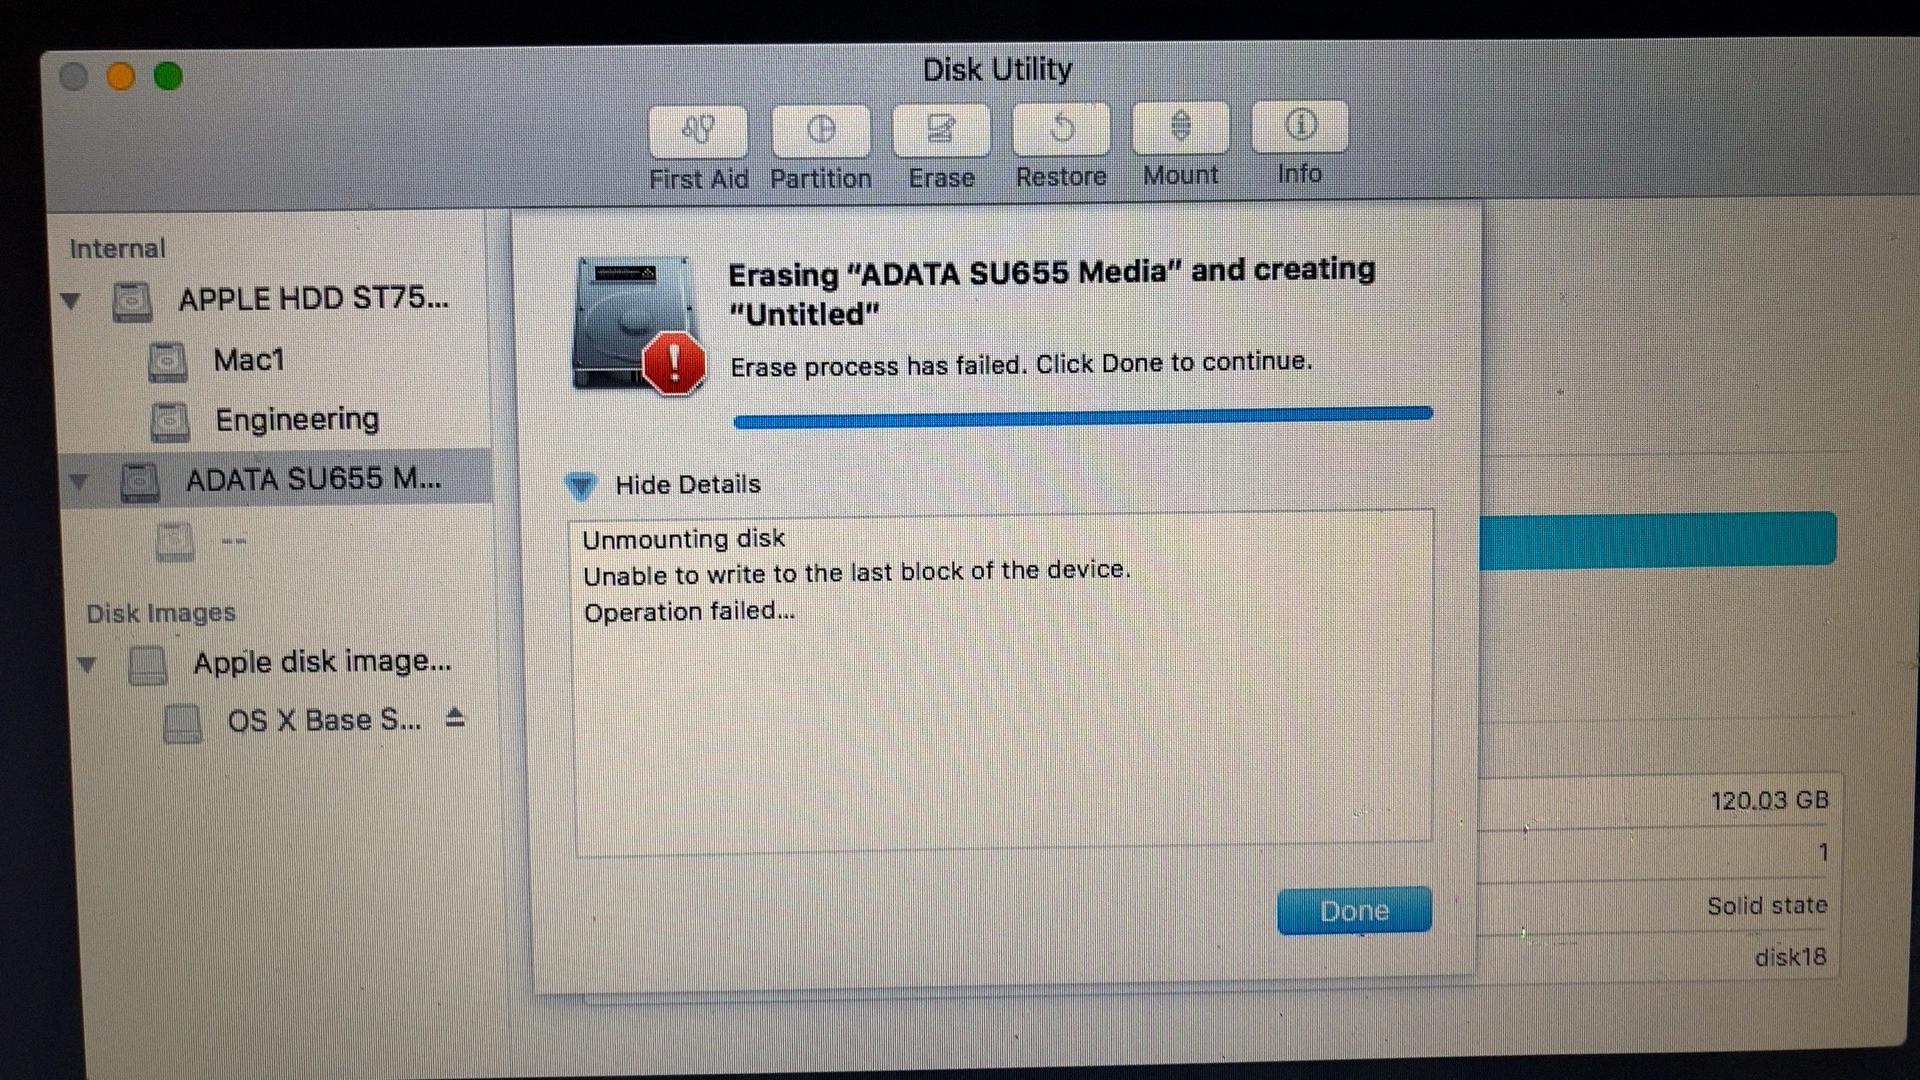
When it comes to managing and using external hard drives on a Mac, certain issues can arise. One common problem is encountering the error message “Unable to write to the last block of the device (-69760)” when trying to erase the external drive. This error can be frustrating, but there are several potential solutions to try.
1. Check the cable and port: Sometimes, the issue may simply be a faulty cable or a problematic port on your Mac. Try using a different cable or connecting the drive to a different port to see if the error persists. This simple step can often resolve the problem.
2. Securely erase the external drive: If the issue persists, you can try securely erasing the external drive. This process will erase all data on the drive, so make sure you have a backup if necessary. To securely erase the drive, go to “Applications” > “Utilities” > “Disk Utility.” Select the external drive from the list on the left, click on the “Erase” tab, choose a format (such as Mac OS Extended (Journaled)), and enable the “Security Options” button. From there, choose the desired level of security, such as “Most Secure” or “Fastest,” and click “Erase.”
3. Format the drive on a different computer: If the previous steps didn’t work, you can try formatting the drive on a different computer. Connect the drive to another Mac or even a Windows computer and attempt to format it. This may help determine if the issue is specific to your Mac or the external drive itself.
4. Erase the drive in Terminal: If you’re comfortable with using the Terminal application, you can try erasing the drive using command-line commands. Open Terminal from “Applications” > “Utilities” and type in the command “diskutil list” to identify the external drive. Once you have the correct identifier (e.g., “/dev/disk2”), type in the command “diskutil eraseDisk JHFS+ NewDiskName /dev/disk2” (replace “NewDiskName” with your desired name for the drive).
5. Format the drive in Recovery Mode: Another option is to format the drive in Recovery Mode. Restart your Mac and hold down Command + R until the Apple logo appears. In the macOS Utilities window, select “Disk Utility” and proceed to format the external drive as desired. This method can sometimes overcome certain issues that occur in regular macOS.
6. Restore from a disk image: If you have a disk image of the drive, you can try restoring it to the external drive. Open Disk Utility, select the external drive, go to the “Restore” tab, and choose the disk image as the source. This process will copy the contents of the disk image to the external drive and may help resolve the error.
7. Enter the recovery key in the disk password dialog: If the external drive is encrypted, you may need to enter the recovery key to unlock the disk. When prompted with the disk password dialog, enter the recovery key associated with the drive. This should unlock the disk and allow you to proceed with erasing or formatting it.
Alternatively, if you’re comfortable using the Terminal application, you can use the command “diskutil apfs unlockVolume” followed by the recovery key to unlock the disk. This method can be useful if the disk password dialog doesn’t appear or if you prefer a command-line approach.
Encountering the error message “Unable to write to the last block of the device” when trying to erase an external hard drive on a Mac can be frustrating. However, by trying different solutions like checking the cable and port, securely erasing the drive, formatting on a different computer, using Terminal commands, formatting in Recovery Mode, restoring from a disk image, or entering the recovery key, you can potentially overcome this issue and successfully manage your external drive.
How Do You Fix Error 69760?
To fix the “Unable to write to the last block of the device (-69760)” error on a Mac when erasing an external hard drive, you can follow these steps:
1. Try a different cable or port: Sometimes, the issue may be with the cable or the port you are using to connect the external hard drive. Try using a different cable or connecting the drive to a different USB or Thunderbolt port on your Mac.
2. Securely erase the external drive: Open Disk Utility on your Mac by going to Applications > Utilities > Disk Utility. Select the external drive from the left sidebar, click on the “Erase” tab, and choose the format you want (e.g., Mac OS Extended or APFS). Make sure to select “Security Options” and choose “Most Secure” to perform a secure erase. Click on “Erase” to start the process.
3. Format the drive on a different computer: If you have access to another Mac or a Windows PC, try connecting the external drive to that computer and format it using the appropriate file system. This can help rule out any compatibility issues with your Mac.
4. Erase the drive in Terminal: Open Terminal on your Mac by going to Applications > Utilities > Terminal. Type the command “diskutil list” to view the list of connected drives and identify the identifier of your external drive (e.g., disk2). Then, use the command “diskutil eraseDisk JHFS+ NewName diskX” (replace NewName with the desired name for the drive and diskX with the identifier of your external drive) to format and erase the drive.
5. Format the drive in Recovery Mode: Restart your Mac and hold down the Command + R keys until you see the Apple logo. This will boot your Mac into Recovery Mode. Open Disk Utility from the Utilities menu, select the external drive, and choose the “Erase” tab. Format the drive with the desired file system and click on “Erase” to proceed.
6. Restore from a disk image: If you have a disk image of the external drive, you can try restoring it to the drive. Open Disk Utility, select the external drive, go to the “Restore” tab, choose the disk image as the source, and the external drive as the destination. Click on “Restore” to start the restoration process.
It’s important to note that by performing these actions, you may lose any data stored on the external drive. Therefore, it’s crucial to have a backup of your important files before proceeding with any of these steps.
These methods should help you resolve the “Unable to write to the last block of the device (-69760)” error and allow you to erase or format your external hard drive successfully.
How Do You Unlock a Disk in a Mac Terminal?
To unlock a disk in Mac Terminal, follow these steps:
1. Open the Terminal application on your Mac. You can find it in the Utilities folder within the Applications folder, or you can simply use the Spotlight search (Command + Space) and type “Terminal” to locate it.
2. Once the Terminal window is open, type the following command: diskutil apfs unlockVolume
3. Press the Enter key to execute the command.
4. You will be prompted to enter the recovery key for the disk. The recovery key is a unique alphanumeric string provided when you encrypted the disk. Ensure you have the correct recovery key before proceeding.
5. Copy and paste the recovery key into the Terminal window and press Enter.
6. If the recovery key is correct, the disk will be unlocked, and you will see a message confirming the successful unlocking of the volume.
It is important to note that unlocking a disk in the Terminal requires administrative privileges. Ensure that you have the necessary permissions or are logged in as an administrator before attempting to unlock the disk.
In summary, to unlock a disk in Mac Terminal, use the “diskutil apfs unlockVolume” command, enter the recovery key when prompted, and confirm the successful unlocking of the volume.
Conclusion
The error message “Unable to write to the last block of the device (-69760)” on a Mac when erasing an external hard drive can be quite frustrating. However, there are several potential solutions to this issue.
Firstly, it is recommended to try using a different cable or port to connect the external hard drive to the Mac. Sometimes, a faulty cable or port can cause communication issues, leading to the error message. By using a different cable or port, you can rule out any potential hardware problems.
If that doesn’t resolve the issue, the next step is to securely erase the external drive. This can be done through the Disk Utility application on your Mac. Securely erasing the drive will ensure that any existing data on the drive is completely wiped, allowing you to start fresh.
If the problem persists even after securely erasing the drive, you can try formatting the drive on a different computer. Sometimes, compatibility issues between the Mac and the external drive can cause errors during formatting. By formatting the drive on a different computer, you can determine if the issue lies with the Mac or the drive itself.
Another option is to erase the drive in Terminal. This involves using command-line commands to perform the erase operation. This method can be more advanced and requires some knowledge of Terminal commands, so it is recommended for more experienced users.
If none of the above solutions work, you can try formatting the drive in Recovery Mode. This mode allows you to perform disk-related tasks without booting into the main operating system. Formatting the drive in Recovery Mode may help resolve any underlying issues that are preventing the normal formatting process.
In some cases, restoring from a disk image can also help resolve the error. If you have a backup of the drive in the form of a disk image, you can restore it to the external drive and see if that fixes the issue.
Lastly, if you have enabled FileVault encryption on the external drive, you may need to enter the recovery key in the disk password dialog to unlock the disk. Alternatively, you can use the command “diskutil apfs unlockVolume” and enter the recovery key in the Terminal application to unlock the disk.
Encountering the “Unable to write to the last block of the device (-69760)” error message when erasing an external hard drive on a Mac can be frustrating, but there are several potential solutions to try. By following the steps outlined above, you can hopefully resolve the issue and successfully erase and format your external drive.


