The iPad is a versatile device that allows users to do a multitude of tasks, including watching videos. If you have a collection of videos on your computer that you want to transfer to your iPad, you can do so easily using the VLC app. In this article, we will guide you through the process of transferring videos from your PC to your iPad using VLC.
Firstly, ensure that your iPhone/iPad and your Mac/PC are connected to the same Wi-Fi network. This is important as it enables seamless wireless transfer between the devices.
Now, open the VLC app on your iOS device. Tap on the “Network” tab, which can be found at the bottom of the screen. This will bring up the network options within VLC.
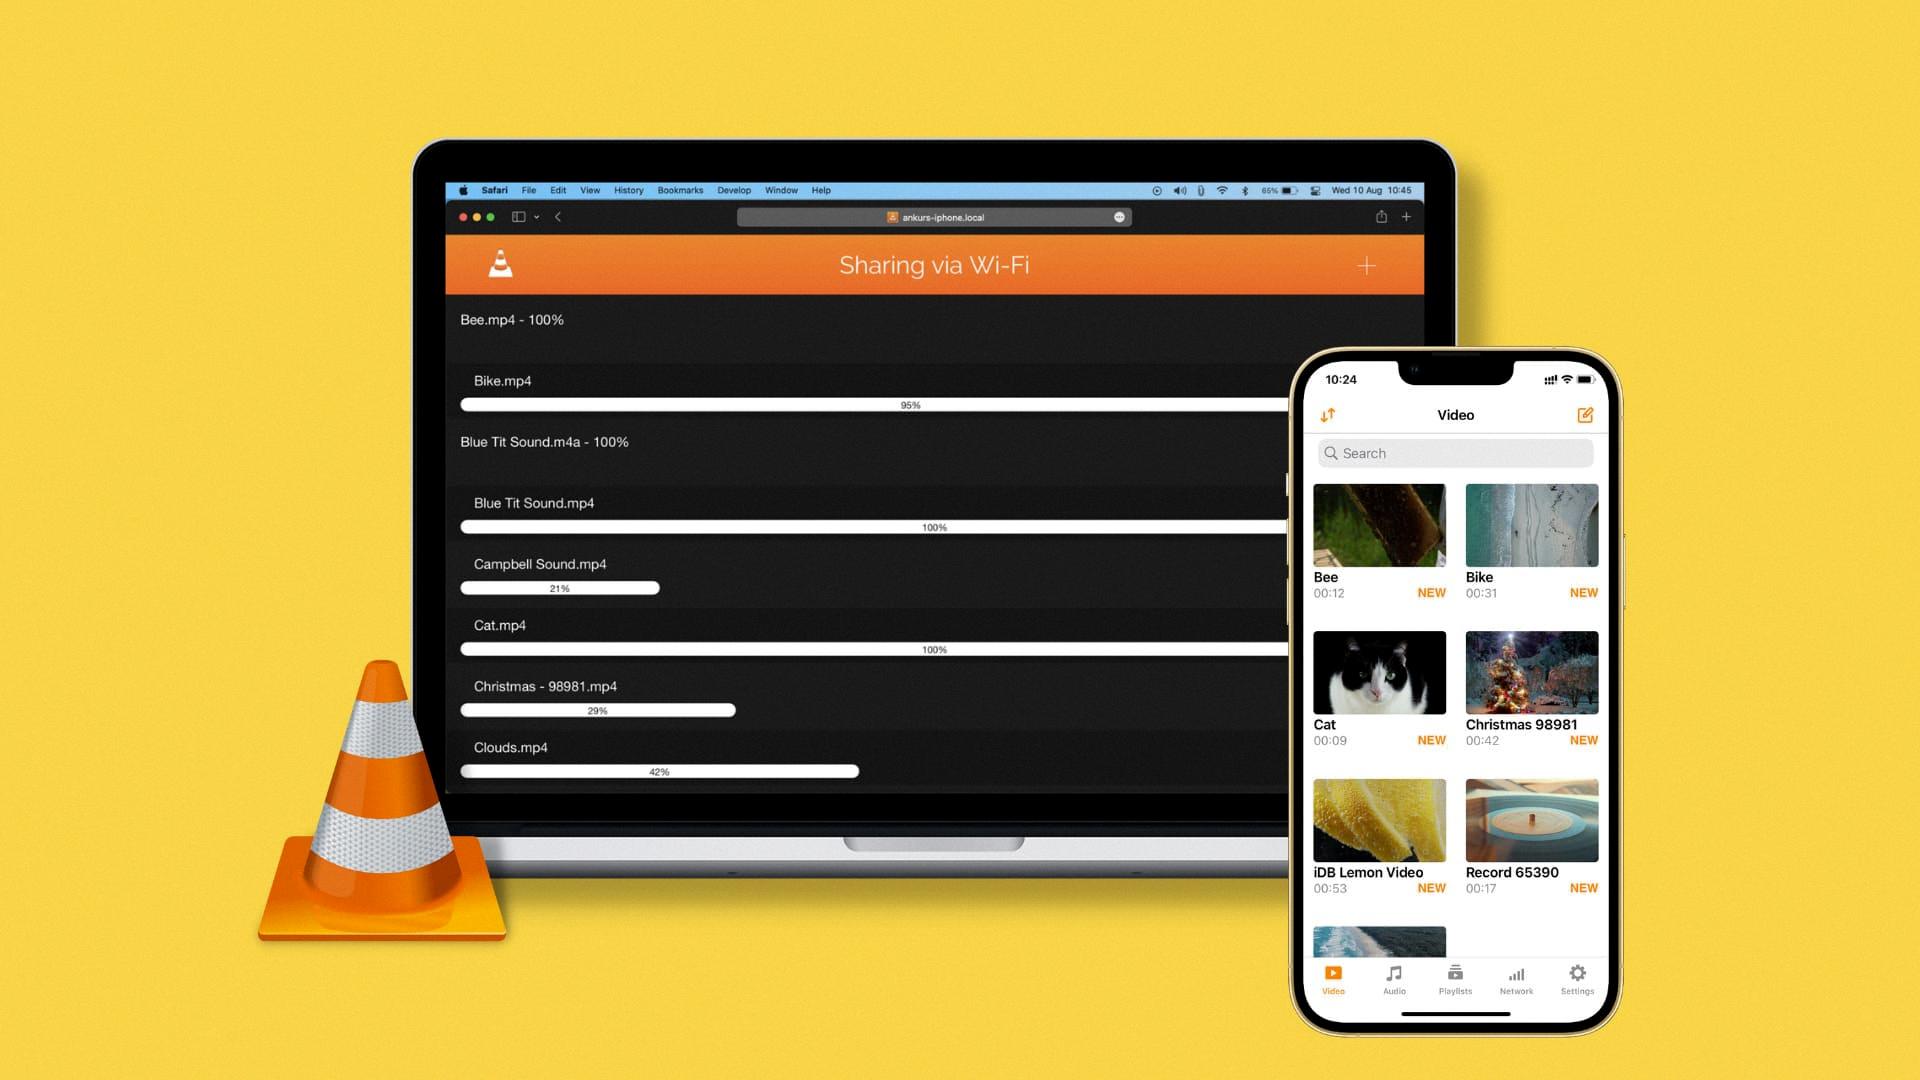
On your computer, open a web browser like Chrome, Safari, or Firefox. In the address bar, type in the IP address that is displayed on the VLC app on your iOS device. This will take you to VLC’s Sharing via Wi-Fi screen on your computer.
Once you are on the Sharing via Wi-Fi screen, you will see a list of options to transfer files to your iOS device. You can drag and drop the videos you want to transfer into the designated area on the screen. Alternatively, you can click on the “Upload files” button and select the videos from your computer’s file explorer.
Once you have selected the videos you want to transfer, VLC will start the transfer process. This may take a few minutes depending on the size of the videos and the speed of your Wi-Fi network.
After the transfer is complete, you can access the transferred videos on your iPad by opening the VLC app. The transferred videos will be available in the VLC library, ready for you to watch and enjoy.
Alternatively, if you have iCloud set up on your PC, you can use it to transfer videos from your PC to your iPad. To do this, open iCloud on your PC and go to Photos. Choose the iCloud Photo Library option and enable the “Upload new photos and videos from my PC” setting.
Next, select all the videos that you want to transfer from your PC to your iPad. Move those files to the iPad’s “Uploads” folder within the iCloud Photos directory.
On your iPad, go to “Settings” > [your name] > “iCloud” > “Photos” and enable the “iCloud Photos” option. This will sync the videos from your PC to your iPad via iCloud.
Once the syncing process is complete, open the Photos app on your iOS device to check the transferred videos. They should be available in your iCloud Library, ready to be viewed and enjoyed.
Transferring videos from your PC to your iPad is a simple process, thanks to apps like VLC and iCloud. Whether you prefer wireless transfer via VLC or using iCloud to sync your videos, you can easily enjoy your favorite videos on your iPad. So go ahead and transfer those videos, grab some popcorn, and enjoy a movie night on your iPad!
How Do You Import a Video From VLC to Your iPad?
To import a video from VLC to your iPad, you can follow these steps:
1. Ensure that both your iPhone/iPad and your Mac/PC are connected to the same Wi-Fi network.
2. Open the VLC app on your iOS device.
3. Tap on the “Network” tab in the bottom navigation bar of the VLC app.
4. On the Network screen, you will find a web address listed under “Sharing via Wi-Fi.” Make a note of this address.
5. Now, on your computer, open a web browser such as Chrome, Safari, or Firefox.
6. In the address bar of your browser, type in the web address that you noted from the VLC app on your iOS device.
7. Press Enter to access VLC’s Sharing via Wi-Fi screen.
8. On the Sharing via Wi-Fi screen, you will see a list of files available for transfer. Select the video file that you want to import to your iPad.
9. Click on the “Download” button or the file name to start downloading the video file to your computer.
10. Once the video file is downloaded to your computer, connect your iPad to your computer using a USB cable.
11. Open iTunes on your computer (or Finder on macOS Catalina or later).
12. Select your iPad from the list of devices in iTunes or Finder.
13. Go to the “Movies” tab (or “Files” tab on macOS Catalina or later).
14. Drag and drop the downloaded video file from your computer into the iTunes/Finder window.
15. The video file will now be synced to your iPad.
16. Disconnect your iPad from your computer.
17. Open the VLC app on your iPad and go to the “Media Library” tab.
18. You should now see the imported video listed in the Media Library.
By following these steps, you can successfully import a video from VLC to your iPad.
How Do You Transfer Videos From Your PC to Your iPad?
To transfer videos from your PC to your iPad, you can follow these steps:
1. Ensure that iCloud is installed on your PC. If not, download and install it from the official Apple website.
2. Open iCloud and navigate to the Photos section.
3. Choose the option for iCloud Photo Library. This will allow you to sync your photos and videos across all your Apple devices.
4. Next, you need to upload the videos from your PC to iCloud. To do this, click on the “Upload” button or drag and drop the videos into the iCloud Photos window.
5. Select all the videos that you want to transfer to your iPad. You can do this by holding down the Ctrl key and clicking on each video.
6. Once you have selected the videos, right-click on any of them and choose the option to move or copy them.
7. A window will appear with the available destinations. Locate and select the iPad’s “Uploads” folder.
8. The videos will now be transferred from your PC to your iPad. The time it takes to complete the transfer will depend on the size of the videos and your internet connection speed.
9. Once the transfer is complete, you can access the videos on your iPad by opening the Photos app and navigating to the “Uploads” folder.
10. If you want to organize the videos into specific albums or folders, you can do so within the Photos app on your iPad.
By following these steps, you should be able to successfully transfer videos from your PC to your iPad using iCloud.
How Do You Transfer Videos to Your iPad Without iTunes?
To transfer videos to your iPad without using iTunes, you have a few alternative methods available. Here are some options:
1. Use Third-Party File Transfer Apps:
– Install file transfer apps like Documents by Readdle, iMazing, or AnyTrans on your computer and iPad.
– Connect your iPad to your computer using a USB cable.
– Open the file transfer app on your iPad and follow the instructions to establish a connection with your computer.
– Locate the videos on your computer and use the file transfer app to transfer them to your iPad.
2. Use Cloud Storage Services:
– Upload your videos to cloud storage services like Google Drive, Dropbox, or OneDrive from your computer.
– Install the corresponding cloud storage app on your iPad from the App Store.
– Sign in to your cloud storage account in the app and locate the uploaded videos.
– Download the videos to your iPad for offline access.
3. Use AirDrop (for Mac users):
– Ensure both your Mac and iPad are connected to the same Wi-Fi network and have Bluetooth enabled.
– On your Mac, right-click on the video file and choose “Share” > “AirDrop”.
– Select your iPad from the list of available devices.
– On your iPad, accept the AirDrop transfer and the video will be transferred wirelessly.
4. Use a Wireless Hard Drive:
– Purchase a wireless hard drive like the WD My Passport Wireless Pro or Seagate Wireless Plus.
– Connect the wireless hard drive to your computer and transfer the videos to the drive.
– Install the corresponding app for the wireless hard drive on your iPad.
– Connect your iPad to the wireless hard drive’s Wi-Fi network and access the videos through the app.
5. Use a Video Transfer App:
– Install video transfer apps like VLC or Infuse on your iPad.
– Connect your iPad to your computer using a USB cable.
– Open iTunes on your computer, go to the “Apps” section, and scroll down to the “File Sharing” section.
– Select the video transfer app from the list and click “Add” to locate and transfer the videos to the app on your iPad.
Remember to check the compatibility of the methods with your specific iPad model and iOS version. Each method offers a different approach to transferring videos without iTunes, so choose the one that suits your preferences and requirements best.
Conclusion
The iPad offers a seamless and convenient way to transfer videos from your PC to your device. By utilizing the VLC app and Wi-Fi network, you can easily share and stream videos from your computer to your iPad, ensuring that you have all your favorite content readily available on the go.
Additionally, iCloud provides another option for transferring videos from your PC to your iPad. By enabling iCloud Photos and uploading your video files to the iCloud library, you can effortlessly sync and access your videos across all your Apple devices.
Both methods offer simple and efficient ways to transfer videos, allowing you to enjoy your favorite content on your iPad with ease. Whether you prefer using the VLC app or utilizing iCloud, you can rest assured that your videos will be readily available for viewing on your iPad whenever and wherever you desire.
The iPad’s ability to seamlessly transfer videos from your PC makes it a versatile and user-friendly device for enjoying multimedia content. With its sleek design, powerful performance, and intuitive interface, the iPad continues to be a popular choice for those seeking a reliable and convenient way to access and enjoy their videos.

