Syncing your iPhone, iPad, or iPod touch with iTunes has never been easier thanks to the Wi-Fi sync feature available on iOS 5 and later. With this feature, you can sync your device with your computer without the need for a physical connection, as long as both devices are connected to the same Wi-Fi network.
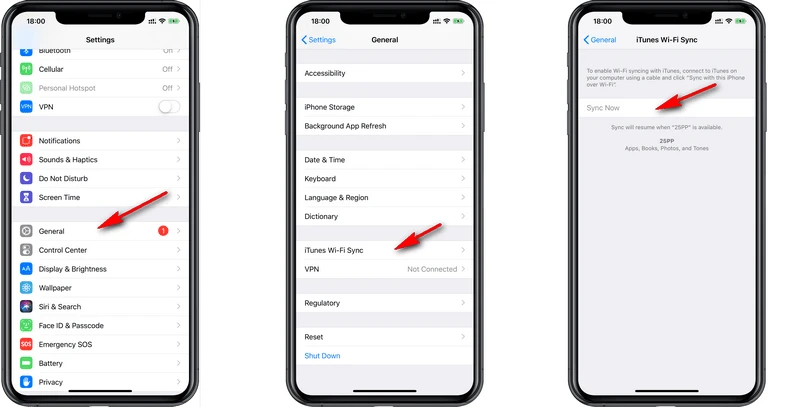
To get started, make sure you have iOS 5 or later installed on your device and that it is connected to the Wi-Fi network you want to use for syncing. On your iPhone, iPad, or iPod touch, open the Settings app and tap on “General.” Scroll down and tap on “iTunes Wi-Fi Sync.”
In the iTunes Wi-Fi Sync screen, you will see a list of computers you can sync your device with, along with the last sync date and a “Sync Now” button. To set up Wi-Fi syncing, you first need to connect your device to your computer using a USB or USB-C cable.
Once your device is connected, open iTunes on your computer. If you don’t see the device icon in the upper-left corner of the iTunes window, refer to the troubleshooting tips provided by Apple. From the list under Settings on the left side of the iTunes window, click on the type of content you want to sync or remove.
To enable Wi-Fi syncing for a specific content type, simply select the checkbox next to “Sync.” This will allow you to sync that content wirelessly when your device is connected to your computer over Wi-Fi. You can also choose to enable automatic syncing if you want your device to sync automatically whenever it is connected to your computer’s Wi-Fi network.
Once you have set up Wi-Fi syncing, you can disconnect your device from the USB or USB-C cable. From now on, whenever your device is connected to the same Wi-Fi network as your computer, you can select it in the iTunes sidebar and initiate a sync.
Wi-Fi syncing offers a convenient way to manage your device’s content without the need for cables or physical connections. It allows you to add new music, videos, apps, and other items to your device directly from your computer, as well as remove or modify existing content.
Wi-Fi syncing with iTunes provides a seamless way to manage your iOS device’s content wirelessly. By following the simple steps outlined above, you can easily set up and use this feature to keep your device in sync with your computer without the hassle of cables. Enjoy the freedom and convenience of wireless syncing with iTunes!
Can You Sync iTunes to Your iPhone Over Wi-Fi?
It is possible to sync iTunes to your iPhone over Wi-Fi if you have iOS 5 or a later version installed on your device. This feature allows you to add items to your iPhone, such as music, apps, and other media, from your computer without physically connecting your device to it.
To sync your iPhone over Wi-Fi, both your computer and iPhone must be connected to the same Wi-Fi network. Here are the steps to enable Wi-Fi syncing:
1. Connect your iPhone to your computer using the USB cable.
2. Open iTunes on your computer.
3. Select your iPhone from the Devices section in iTunes.
4. Go to the Summary tab for your iPhone.
5. Scroll down to the Options section and check the box that says “Sync with this iPhone over Wi-Fi.”
6. Click the Apply button to save the changes.
Once you have enabled Wi-Fi syncing, you can disconnect your iPhone from your computer. From now on, whenever your iPhone is connected to the same Wi-Fi network as your computer, it will be automatically detected by iTunes, and you can sync your content wirelessly.
To initiate a Wi-Fi sync, follow these steps:
1. Ensure your iPhone and computer are connected to the same Wi-Fi network.
2. Open iTunes on your computer.
3. Your iPhone should appear in the Devices section of iTunes, even if it is not physically connected.
4. Click on your iPhone to access its settings.
5. You can now manage and sync your content, such as music, videos, apps, and more, just like you would when connected via USB.
It’s important to note that both your computer and iPhone must be powered on and connected to the Wi-Fi network for the syncing process to work. Additionally, make sure that iTunes is open on your computer whenever you want to sync wirelessly.
Wi-Fi syncing provides convenience and flexibility, allowing you to manage your iPhone’s content without the need for a physical connection.
How Do You Sync Your iPhone Over Wi-Fi?
To sync your iPhone over Wi-Fi, follow these steps:
1. On your iPhone, open the Settings app.
2. Scroll down and tap on “General.”
3. Look for and tap on “iTunes Wi-Fi Sync.”
4. On the iTunes Wi-Fi Sync screen, you will see a list of computers that you can sync your iPhone with. It will also show you the last time your iPhone was synced.
5. To initiate a sync, tap on the “Sync Now” button.
By following these steps, you can easily sync your iPhone with a computer over Wi-Fi without the need for a physical connection. This allows you to transfer and update your data, such as music, apps, photos, and more, wirelessly.
How Do You Get All Your Apple Devices to Sync Wirelessly?
To enable wireless syncing for all your Apple devices, follow these steps:
1. Start by connecting your device (iPhone, iPad, or iPod) to your Mac using a USB or USB-C cable. Ensure that both devices are powered on and unlocked.
2. Open iTunes on your Mac. If you have a Mac running macOS Catalina (10.15) or later, use Finder instead.
3. In iTunes or Finder, locate your device in the sidebar. Click on it to select it.
4. Look for the “Summary” tab in the main window and scroll down until you find the “Options” section.
5. Check the box next to “Sync with this [device] over Wi-Fi”. This will enable Wi-Fi syncing for your device.
6. Once you’ve enabled Wi-Fi syncing, you can customize your sync settings. Scroll down to the “Settings” section in the same window.
7. Here, you can choose to automatically sync when your device is connected to Wi-Fi, or manually sync whenever you prefer. Select the option that suits your needs.
8. Additionally, you can choose to sync your entire music library or selected playlists, albums, artists, and genres. You can also sync TV shows, movies, podcasts, audiobooks, photos, and more.
9. After customizing your sync settings, click on the “Apply” or “Sync” button in the lower-right corner of iTunes or Finder to save your changes.
10. Now, disconnect your device from the USB or USB-C cable. It should remain connected to your Mac wirelessly.
11. To initiate a wireless sync, make sure both your device and Mac are connected to the same Wi-Fi network. Your device will automatically appear in the sidebar of iTunes or Finder.
12. Simply select your device in the sidebar and click on the “Sync” button to start syncing wirelessly. If you’ve enabled automatic syncing, your device will sync automatically when connected to Wi-Fi.
Remember, for wireless syncing to work, your Mac and device need to be connected to the same Wi-Fi network. If you encounter any issues, ensure that both devices are on the same network and that Wi-Fi syncing is still enabled on your device.
By following these steps, you can easily set up wireless syncing for all your Apple devices, allowing you to conveniently sync and manage your content without the need for a physical connection.
How Do You Sync iTunes?
To sync iTunes, follow these steps:
1. Open iTunes on your computer.
2. Look for the device icon in the upper-left corner of the iTunes window. It typically looks like an iPhone or iPad.
3. If you don’t see the device icon, make sure your device is connected to your computer using a USB cable. If it’s still not appearing, try restarting your computer and device.
4. Once you see the device icon, click on it to select your device.
5. On the left side of the iTunes window, you’ll find a list of settings. Click on the type of content that you want to sync or remove. This could be music, movies, TV shows, podcasts, books, or other options.
6. To turn syncing on for a specific content type, select the checkbox next to “Sync.”
7. If you want to sync all content of a particular type, choose the option that says “All [content type].”
8. If you prefer to manually select which items to sync, choose the option that says “Selected [content type]” and then check the boxes next to the specific items you want to sync.
9. Once you’ve made your selections, click the Apply or Sync button in the bottom-right corner of the iTunes window.
10. iTunes will start syncing your selected content to your device. The time it takes will depend on the amount of content and the speed of your computer and device.
11. Once the sync is complete, you can disconnect your device from the computer and enjoy your synced content on your device.
Note: Make sure you have the latest version of iTunes installed on your computer for the best syncing experience.
Conclusion
Syncing your iPhone, iPad, or iPod touch with iTunes over Wi-Fi offers a convenient and hassle-free way to manage your device’s content. With iOS 5 or later installed, you can easily sync your device without the need for a physical connection to your computer. By simply connecting your device to your Mac using a USB or USB-C cable and enabling Wi-Fi syncing, you can choose the settings you want and enjoy seamless synchronization whenever your device connects to your Mac over Wi-Fi.
The iTunes Wi-Fi Sync screen provides you with a list of computers you can sync your device with, along with the last sync date and a Sync Now button for instant synchronization. You can also opt for automatic syncing if you prefer a hands-off approach.
To access the Wi-Fi syncing feature, navigate to the Settings app on your iPhone, tap General, scroll down, and tap iTunes Wi-Fi Sync. From there, you can manage your syncing preferences.
Once connected, you can select your device in the iTunes sidebar and choose the type of content you want to sync or remove. Whether it’s music, videos, apps, or other media, you can easily control what gets synced to your device by checking the corresponding checkboxes.
ITunes Wi-Fi Sync offers a convenient and efficient way to manage your device’s content without the need for a physical connection. It simplifies the syncing process and allows you to keep your device up to date and organized with ease.

