If you have a desktop or laptop computer with a dedicated graphics processing unit (GPU), you may encounter a problem where the device manager of your operating system (such as Windows) does not detect the GPU or the second GPU if you have a multi-GPU configuration. This issue can be caused by various factors, such as hardware failure, driver corruption, power supply deficiency, or BIOS settings. In this article, we will explore some possible solutions for this problem, assuming that your GPU is properly installed and connected.
Reinstall the GPU Driver
One common reason why the GPU or the second GPU is not showing up in the device manager is due to a faulty or outdated driver. To fix this, you can try reinstalling the driver by following these steps:
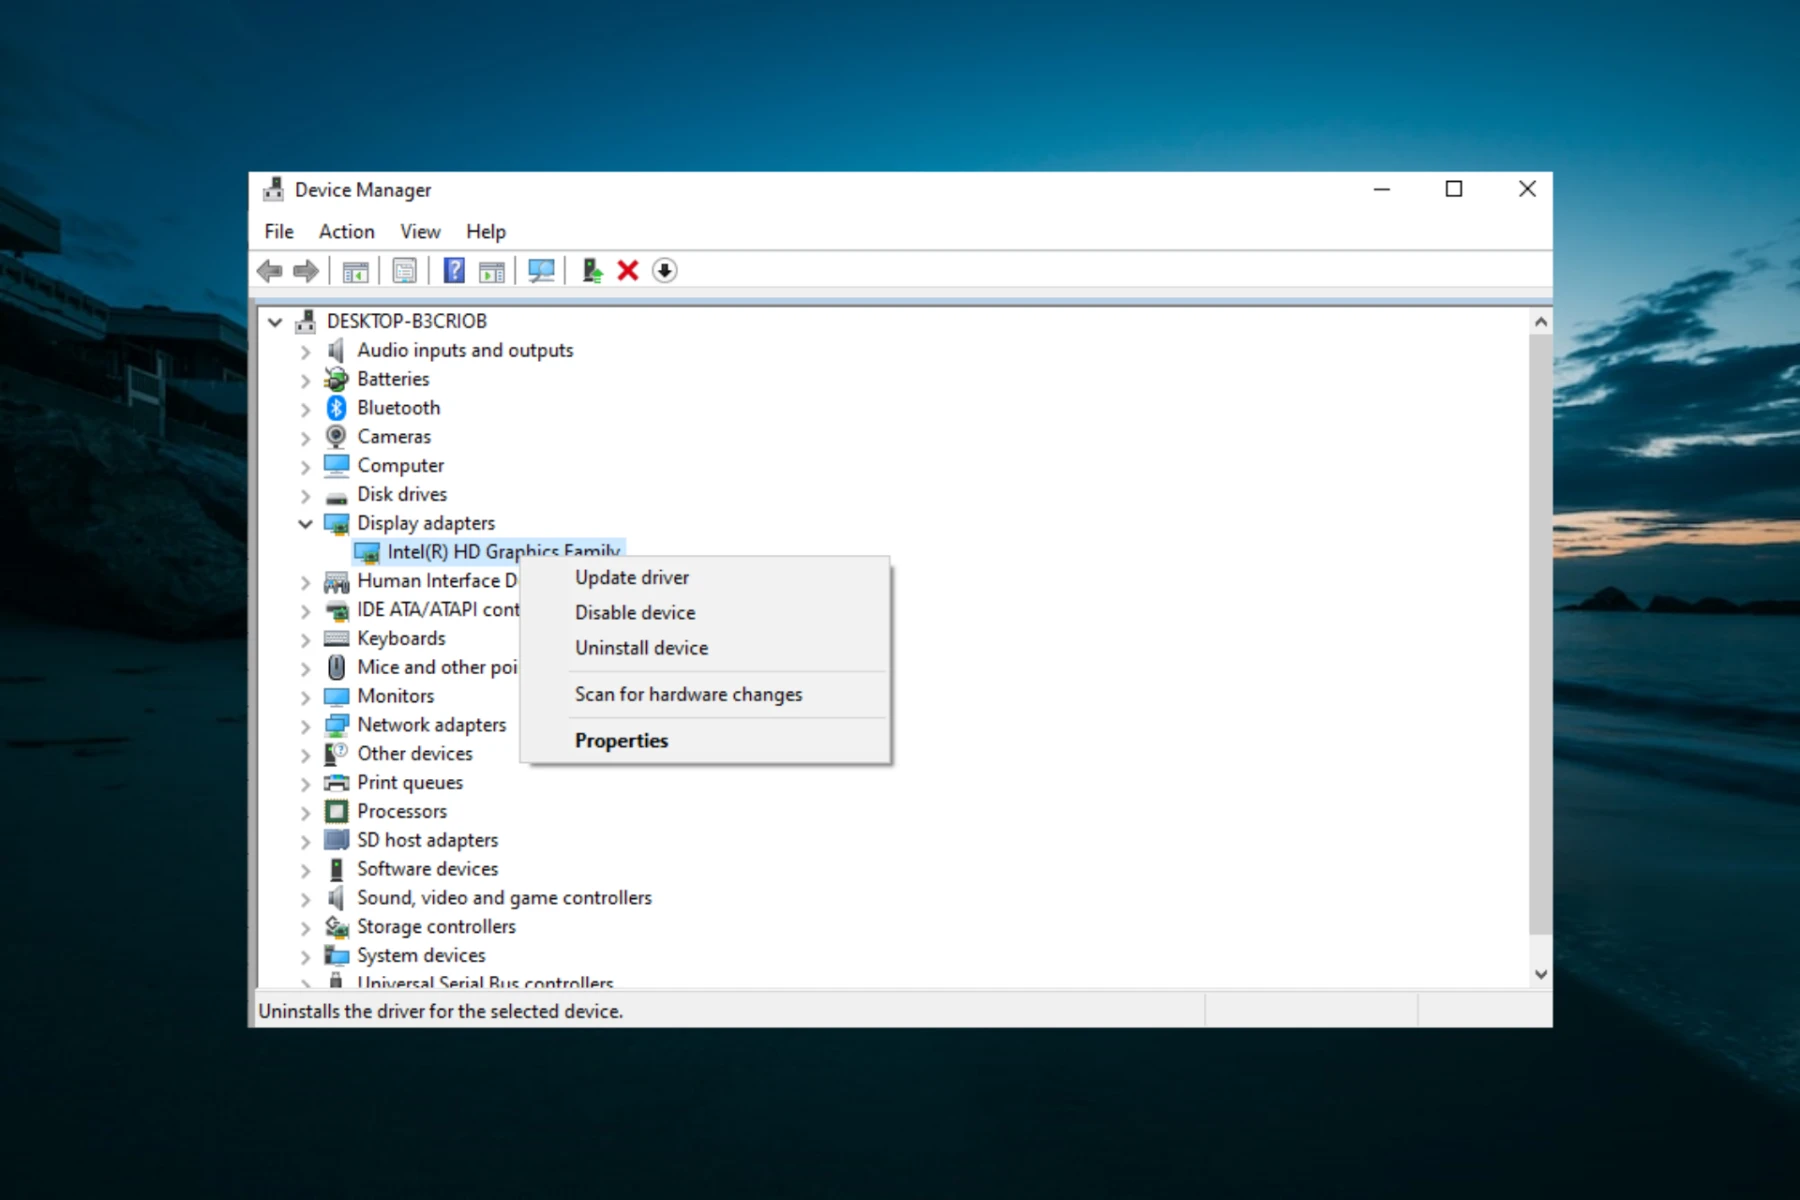
1. Open the device manager by right-clicking on the start menu or pressing the Windows key + X and selecting “Device Manager”.
2. Expand the “Display adapters” category and locate your GPU or second GPU if available.
3. Right-click on the GPU and select “Uninstall device” or “Update driver”.
4. If you choose to update the driver, select “Search automatically for updated driver software” and wait for the system to download and install the latest version from the internet. If you choose to uninstall the device, restart your computer and let the system reinstall the driver automatically, or download the driver from the manufacturer’s website and install it manually.
Check Hardware Connections
Another possible cause of the GPU or the second GPU not showing up in the device manager is due to a loose or improper connection between the GPU and the motherboard or power supply. To check this, you can try the following:
1. Turn off your computer and unplug it from the power source.
2. Open the computer case and locate the GPU and its PCIe slot.
3. Remove the GPU from the slot and check for any physical damage or dirt.
4. Reinsert the GPU firmly into the slot and make sure it clicks into place.
5. Check the power connectors of the GPU and make sure they are securely attached to the power supply.
6. Close the computer case and plug in the power source.
7. Turn on your computer and check if the GPU or the second GPU appears in the device manager.
Update BIOS Settings
Sometimes, the BIOS settings of your computer may prevent the GPU or the second GPU from being detected by the device manager. To update the BIOS settings, you can follow these steps:
1. Restart your computer and press the key to enter the BIOS setup (usually F2, F10, or DEL).
2. Look for the “PCIe Configuration” or “Advanced” tab and select it.
3. Check if the “PCIe Gen” option is set to the highest available version (such as Gen 3).
4. Enable the “Above 4G Decoding” option if available.
5. Save the changes and exit the BIOS setup.
6. Restart your computer and check if the GPU or the second GPU appears in the device manager.
Check Power Supply Capacity
If your power supply unit (PSU) is not powerful enough to supply sufficient wattage to your GPU or the second GPU, the device manager may not detect them. To check this, you can use a PSU calculator or a multimeter to measure the voltage and current of your PSU and compare them to the requirements of your GPU or the second GPU. If you find that your PSU is inadequate, you may need to upgrade it to a higher-wattage model.
If you have tried the above solutions and still cannot detect your GPU or the second GPU in the device manager, you may need to seek professional help from a computer technician or the manufacturer of your hardware. However, by following these steps, you can diagnose and fix the most common issues related to GPU detection and improve the performance of your computer.
Troubleshooting GPU Detection Issues
If your second GPU is not being detected, there could be several reasons for this issue. Some of the common reasons are:
– The GPU is not properly installed in the PCI slot. Make sure that the GPU is securely seated in the PCI slot and that the power cables are properly connected.
– The GPU driver is not installed or outdated. Check if you have installed the latest driver for your GPU from the manufacturer’s website.
– The BIOS settings are not configured properly. Check the BIOS settings to ensure that the PCI slot is enabled and configured to use the GPU.
– The GPU is faulty. If none of the above solutions work, it is possible that the GPU is faulty and may need to be replaced.
To troubleshoot the issue, you can try the following steps:
1. Check the physical installation of the GPU: Make sure that the GPU is properly installed in the PCI slot and the power cables are properly connected.
2. Update the GPU driver: Download and install the latest driver for your GPU from the manufacturer’s website.
3. Check the BIOS settings: Enter the BIOS settings and ensure that the PCI slot is enabled and configured to use the GPU.
4. Swap the GPUs: If you have multiple GPUs installed, try swapping them to see if the issue is with the GPU or the PCI slot.
5. Test the GPU on another system: If possible, test the GPU on another system to see if it is working properly.
If none of the above solutions work, it is possible that the GPU is faulty and may need to be replaced.
Detecting My Second Graphics Card
To detect your second graphics card, you can follow these steps:
1. Press the Windows key + R to open the Run dialog box.
2. Type “dxdiag” in the box and press Enter.
3. Click on the Display tab.
4. Look for the name of your second graphics card in the Device section.
5. If your second graphics card is not listed, it may not be installed properly or it may not be compatible with your system.
Alternatively, you can open the Device Manager by right-clicking on My Computer and selecting Properties. Under Display Adapters, you should see both your graphics cards listed. If your second graphics card is not listed, you may need to install the driver for it or check that it is properly connected to your computer.
Enabling Multi GPU
To enable multi-GPU, you can follow these steps:
1. Open the NVIDIA Control Panel by right-clicking on your desktop and selecting it from the context menu.
2. Click on “Set up multiple displays” to select which multi-GPU display to use as the primary display.
3. Under the “3D Settings” section in the navigation tree pane, select “Set Multi-GPU configuration” to open the associated page.
4. Under “Select multi-GPU configuration,” click on “Maximize 3D performance.”
5. click “Apply” to enable multi-GPU and take advantage of the increased performance it provides.
It is important to note that not all applications and games support multi-GPU, so it may not always provide a significant boost in performance. Additionally, make sure you have the latest drivers and that your hardware is compatible with multi-GPU before attempting to enable it.
Conclusion
The Graphics Processing Unit (GPU) is an essential component of a modern computer system. It is responsible for rendering images, videos, and graphics on the screen, and plays a critical role in the performance of games and other graphically-intensive applications. There are many different types of GPUs available on the market, ranging from entry-level models to high-end gaming cards, each with its unique set of features and capabilities. To ensure that your GPU is functioning correctly, it is essential to keep the drivers up-to-date and monitor the temperature and performance of the card regularly. With proper care and maintenance, your GPU can provide excellent graphics performance and enhance your overall computing experience.

