Saving and managing documents on your iPhone or iPad has become easier than ever with the introduction of the Files app. This app allows you to store and edit files right on your device, eliminating the need for external storage or complicated file transfer processes. In this article, we will guide you through the steps to save various types of documents on your iPhone.
First, let’s discuss how to save a PDF file on your iPhone. PDF files are widely used for their compatibility and ease of sharing. To save a PDF on your iPhone, follow these simple steps:
1. Find your file: Locate the PDF file you want to save on your iPhone. This could be in an email, a website, or a cloud storage service like Dropbox or Google Drive.
2. Open the PDF: Tap on the PDF file to open it. This will display the document on your screen.
3. Share to save: At the bottom of the screen, you will find a Share button, represented by a square with an arrow pointing upward. Tap on this button.
4. Export to your smartphone: A menu will appear with various options for sharing the PDF. Look for the “Save to Files” option and tap on it.
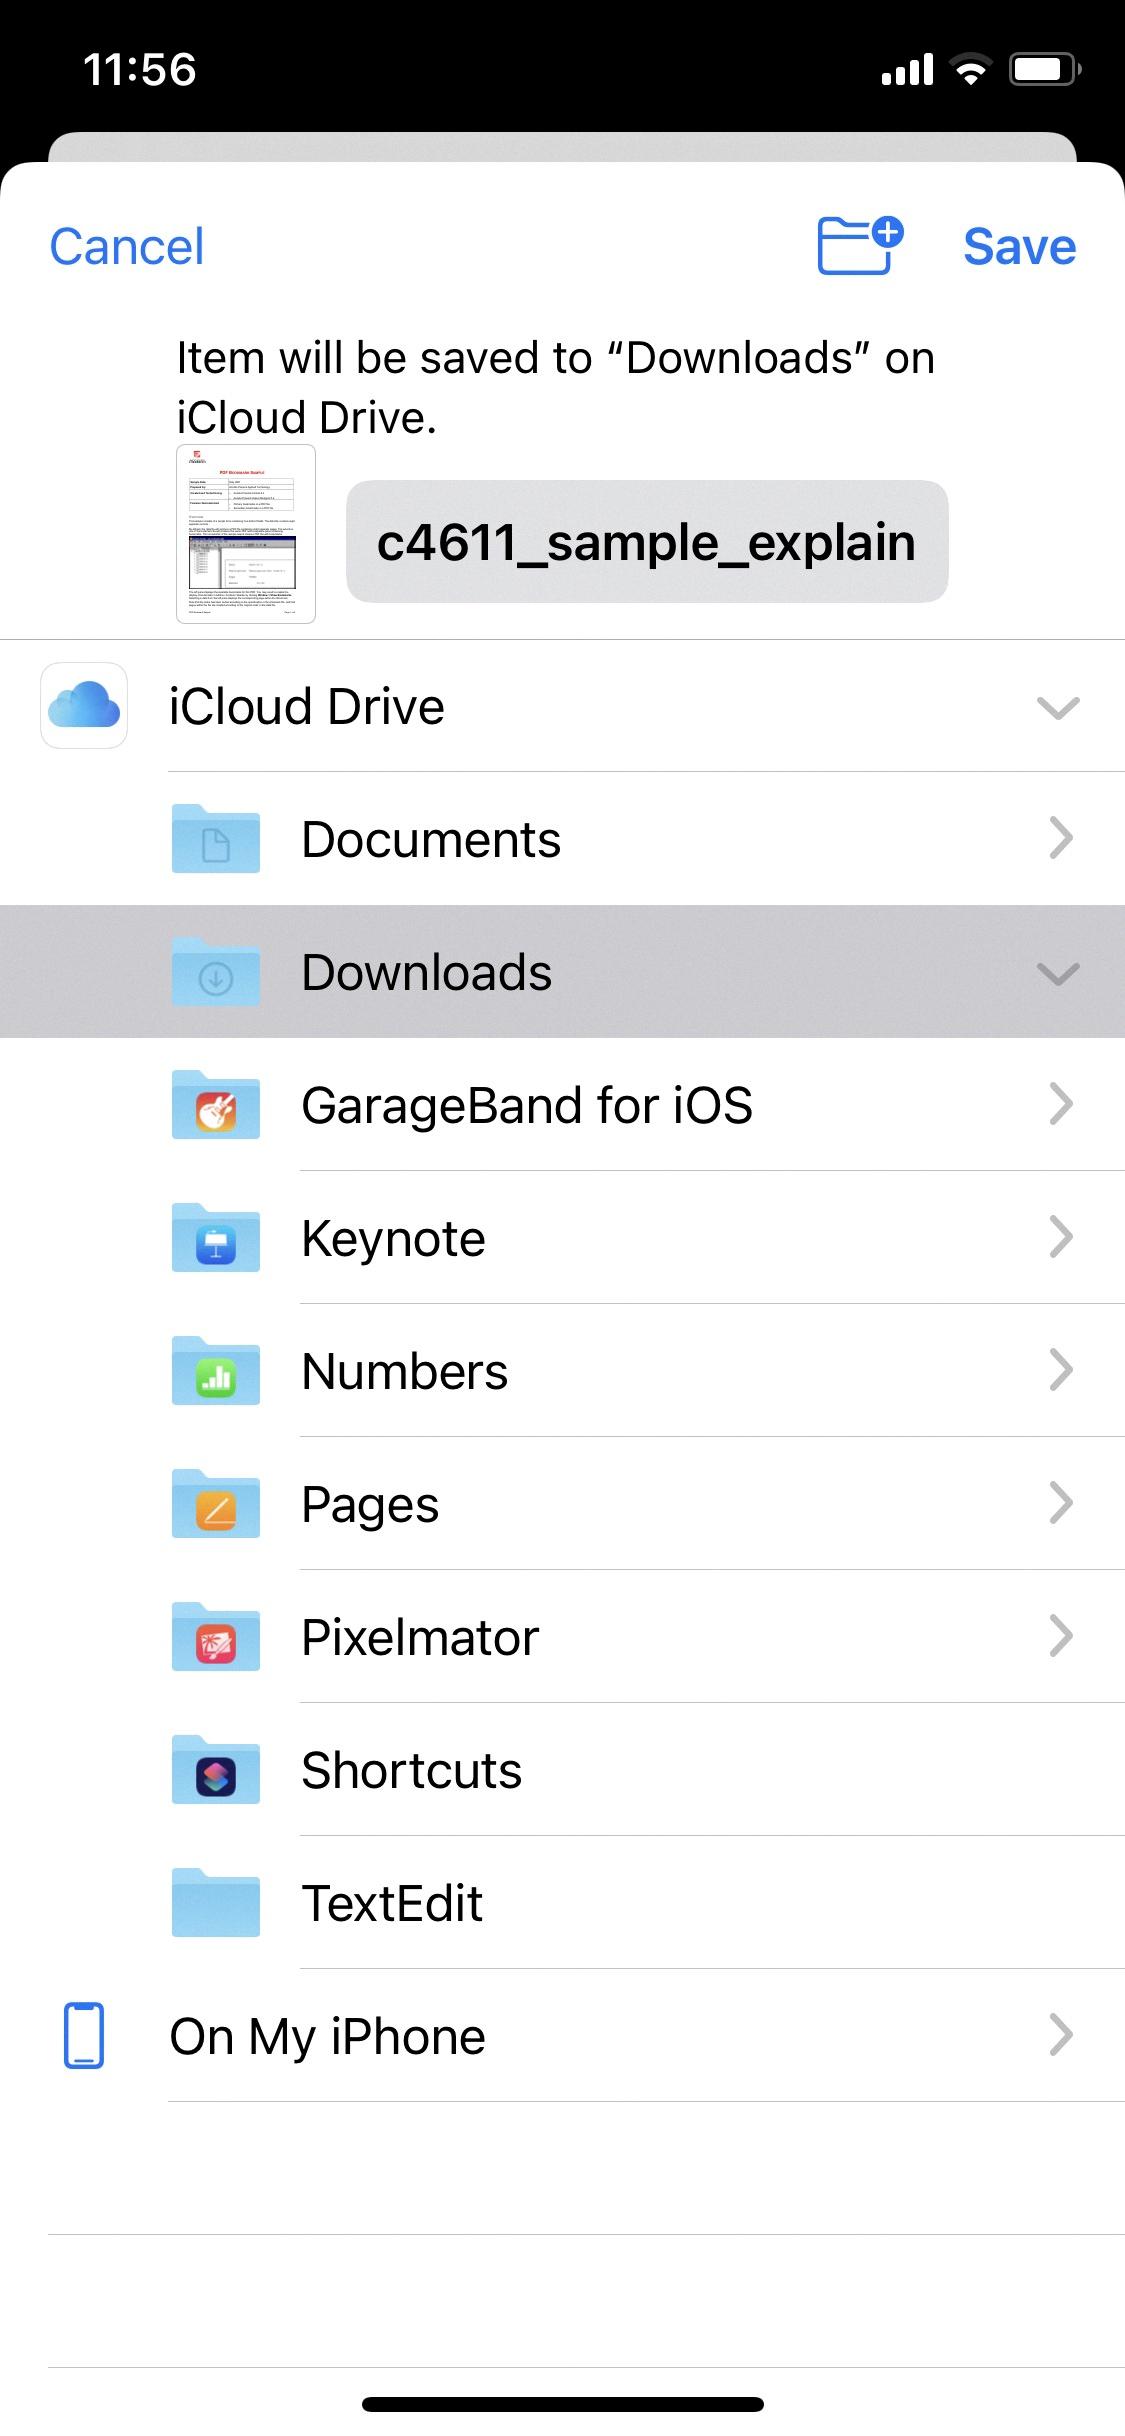
5. Choose a destination: The Files app will open, displaying your available storage locations. You can choose to save the PDF to the iCloud Drive, a specific folder, or a third-party cloud storage service if you have one installed.
6. Save the PDF: Select the desired location and tap on the “Save” button. The PDF file will now be saved to your iPhone.
Now that you know how to save a PDF, let’s move on to other types of documents, such as Word or Excel files. The process is similar, with a few minor differences:
1. Find your file: Locate the Word or Excel file you want to save on your iPhone.
2. Open the document: Tap on the file to open it. This will open the document in the respective app, such as Microsoft Word or Excel.
3. Share to save: Look for the Share button, usually represented by a square with an arrow pointing upward. Tap on this button.
4. Export to your smartphone: From the sharing menu, select the “Save to Files” option.
5. Choose a destination: The Files app will open, allowing you to choose where to save the document. Select the desired location and tap on the “Save” button.
By following these steps, you can save various types of documents on your iPhone or iPad using the Files app. This not only helps you keep your files organized but also allows for easy access and editing whenever you need it. Whether it’s a PDF, Word, Excel, or any other document, the Files app simplifies file management on your iOS device.
Where Do You Save Documents On Your iPhone?
On your iPhone, you can save documents in the Files app. The Files app serves as a centralized location for all your files, allowing you to easily manage and access them.
To save a document in the Files app, follow these steps:
1. Open the app where the document is located, such as Mail, Safari, or a third-party app.
2. Locate the document you want to save. This could be an email attachment, a downloaded file, or a document within an app.
3. Once you have found the document, tap on it to open it.
4. Look for the Share button, which is typically represented by a square with an arrow pointing upward. It is usually located at the bottom of the screen.
5. Tap on the Share button to bring up the share sheet.
6. In the share sheet, you will see various options. Scroll through the options until you find “Save to Files” or “Save to iCloud Drive.” Tap on this option.
If you choose “Save to Files,” you will be prompted to select a location within the Files app where you want to save the document. You can choose from the default locations such as iCloud Drive, On My iPhone, or any other folders you have created. If you choose “Save to iCloud Drive,” the document will be saved directly to your iCloud Drive.
Alternatively, you can also create a new folder within the Files app to save your documents. To create a new folder, follow these steps:
1. Open the Files app on your iPhone.
2. Tap on the “Browse” tab at the bottom of the screen.
3. Locate and tap on “On My iPhone” or “iCloud Drive,” depending on where you want to create the folder.
4. Tap on the “…” (three dots) button at the top-right corner of the screen.
5. From the menu that appears, select “New Folder.”
6. Enter a name for the folder and tap “Done.”
Once you have created a folder, you can save documents directly into it by following the steps mentioned earlier and selecting the folder as the destination.
The Files app on your iPhone serves as a central hub for managing and saving your documents. You can save documents from various apps by using the Share button and selecting “Save to Files” or “Save to iCloud Drive.” You can also create new folders within the Files app to organize your documents efficiently.

How Do You Download And Save Documents to Your iPhone?
To download and save documents to your iPhone, follow these simple steps:
1. Find the document you want to download. This could be a file attachment in an email, a document on a website, or a file stored in a cloud storage service like Google Drive or Dropbox.
2. If the document is in an email, open the email and locate the attachment. Tap on the attachment to open it.
3. If the document is on a website, tap on the link to open it in your web browser. You may need to scroll through the webpage to find the download link.
4. If the document is in a cloud storage service, open the app for that service and navigate to the location of the document. Tap on the document to open it.
5. Once you have the document open on your screen, look for the option to download or save it. This option may be represented by an icon that looks like a downward arrow or a square with an arrow pointing upward. Tap on this option.
6. After tapping the download or save option, your iPhone will typically ask you where you want to save the document. You can choose to save it to your device’s local storage or to a cloud storage service if you have one installed.
7. If you choose to save the document locally, select the desired location on your iPhone where you want to save it, such as the “Files” app or a specific folder. If you choose to save it to a cloud storage service, select the appropriate service and location.
8. Once you have selected the location, tap on the “Save” or “Done” button to start the download process. The document will then be downloaded and saved to your iPhone.
9. To access the downloaded document, go to the location where you saved it. If you saved it to the “Files” app, open the app and navigate to the appropriate folder. If you saved it to a cloud storage service, open the app for that service and navigate to the location where you saved the document.
10. You can now view and open the downloaded document on your iPhone whenever you need to.
Remember to always check the storage capacity of your iPhone to ensure you have enough space to download and save documents.
How Do You Save a PDF On Your iPhone?
To save a PDF on your iPhone, follow these step-by-step instructions:
1. Find your file: Locate the PDF file that you want to save on your iPhone. This can be done through various means, such as receiving it via email, downloading it from a website, or transferring it from another device.
2. Open the PDF: Once you have found the PDF file, tap on it to open it on your iPhone. This will launch the default PDF viewer on your device.
3. Share to save: To save the PDF, tap the Share button located at the bottom of the screen. This button is usually represented by a square with an arrow pointing upwards.
4. Export to your smartphone: After tapping the Share button, a list of options will appear. Look for the “Save to Files” or “Save to Books” option, depending on the apps you have installed on your iPhone. If you prefer to use a third-party app, choose the appropriate option from the list.
5. Tap Save: Once you have selected the desired app or location to save the PDF, tap the “Save” button. This will initiate the saving process and store the PDF file on your iPhone.
6. Locate the saved PDF: After saving the PDF, you can now locate it on your iPhone. If you saved it to the Files app, open the app and navigate to the appropriate folder. If you saved it to the Books app, open the app and go to the “Library” section.
By following these steps, you will successfully save a PDF on your iPhone, allowing you to access and view it whenever you need to.
Conclusion
Saving documents on your iPhone is a simple and convenient process using the Files app. Whether it’s a PDF, Word document, or any other file type, you can easily download and manage your files right on your device.
To save a PDF to your iPhone, start by opening the file in the Files app. From there, tap the Share button at the bottom of the screen and choose the desired app or location to export the file to. You can save it directly to the Books app for easy access, or select another compatible app that suits your needs.
Once the file is saved, you can easily locate it by opening the Files app on your iPhone and navigating to the appropriate location or folder. The Files app allows you to organize your files by creating folders and subfolders, making it easier to find and manage your documents.
With the ability to save and access your documents directly on your iPhone, you can have important files at your fingertips wherever you go. Whether it’s for work, school, or personal use, the Files app provides a user-friendly solution for managing and storing your files on your iPhone or iPad.
So next time you need to save a document on your iPhone, remember to utilize the Files app and enjoy the convenience of having your files readily available on your device.


