If you’re looking to record video on your MacBook, you’ve come to the right place. Recording video on your Mac can be a convenient way to capture memories, create instructional videos, or even record business meetings. Fortunately, with the right set up and a few simple steps, you can easily start recording quality video footage on your MacBook.
To start recording video usig a Macbook, you’ll need to make sure that you have the appropriate hardware and software. First, it’s important that your MacBook has a built-in camera or an external camera connected via USB port or Thunderbolt cable. Additionally, you’ll need QuickTime Player installed on your laptop for recording videos with audio.
Once you’re all set up with the necessary tools, open QuickTime Player and select File > New Movie Recording from the menu bar at the top of the screen. This will open up an overlay window that displays both your camera and microphone settings so that you can adjust them accordingly before recording. You can also click on the arrow next to the record button to switch between multiple cameras if desired.
Once everything looks good and ready to go, simply click on the red Record button in order to begin capturing video footage with sound. As long as there is adequate light in the room and no background noise interfering with audio capture, your resulting video should turn out great! To pause or stop recording at any time simply hit either of those buttons located undereath the preview window of what’s being captured by your camera.
Finally, when you’re finished recording simply hit Stop and then choose Save from the File menu in order to save your newly created movie file for later use or sharing with others. And just like that — Congratulations! You just recorded a great looking video using QuickTime Player and your Macbook!
Recording a Video on a Mac
To record a video on your Mac, you will need to open the Photo Booth app. Once the app is open, you shoud see either the View Photo button or the View Video button. If you click either of these buttons, you should then see the Take Photo button or Record Video button. If you do not see the Record Video button, then at the bottom left of the app, click on the Record a movie clip button which will allow you to record a video. Once this is done, simply click on the Record Video button and you should be able to start recording your video!
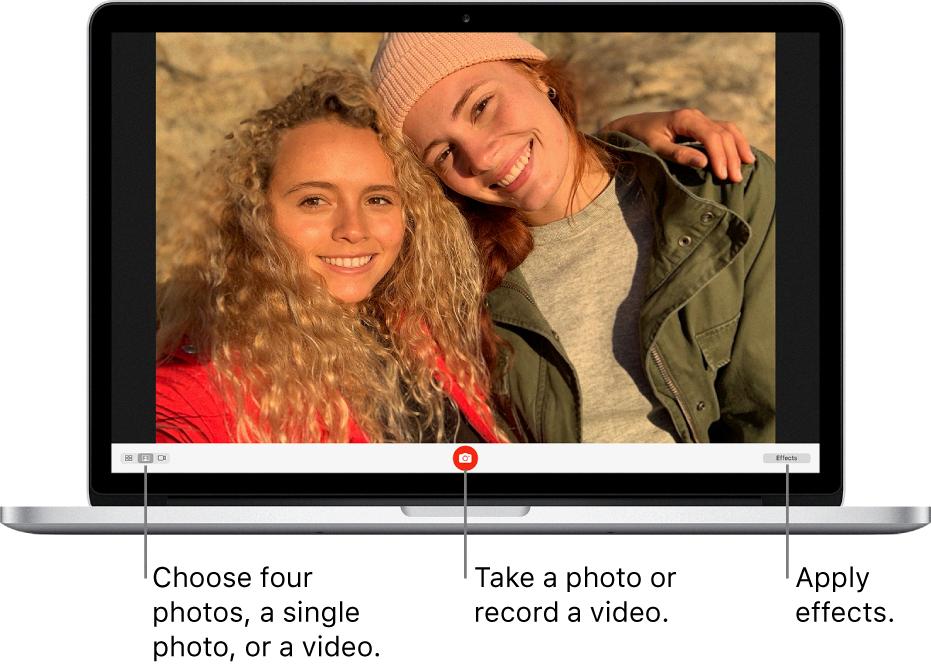
Source: support.apple.com
The Suitability of a MacBook for Recording Videos
Yes, MacBook Pro laptops are ideal for recording videos. They come with two powerful applications that make video recording easy and efficient. Photo Booth 6 offers a digital camera and video-recording application that is user-friendly and great for quickly capturing videos. iMovie ’11 alows users to create more complex projects, such as editing and adding music, transitions, titles, effects, and more. The processors in many MacBook Pro models are also designed to handle intensive tasks like video-editing without compromising performance. So whether you’re creating a simple or complex project, a MacBook Pro can help you get the job done.
Recording Video and Audio on a Mac
To record the video of your Mac with audio, you will need to use QuickTime Player. First, open QuickTime Player from your Applications folder and then choose File > New Screen Recording from the menu bar. You will then see either the onscreen controls or the Screen Recording window. To record your voice or other audio with the screen recording, choose a microphone from the drop-down menu in the Screen Recording window. Once you have selected a microphone, click on the red button to start recording your video and audio. When you are finished recording, click on the stop button to end the recording session. Your video and audio will then be sved as a file in QuickTime Player for you to view and edit as needed.
Maximum Length of Video Recording on a Mac
A Mac can record video for as long as you have the drive space to save it. Depending on the resolution, file format, and frame rate of your video, the amount of storage space it takes up will vary, but tere is no limit to how long a Mac can record video. If you want to make a longer video, you may need to upgrade your hard drive or use an external drive with additional storage capacity.
Is the MacBook Air Suitable for Video Editing?
The MacBook Air is a great choice for simple video editing tasks. With its powerful M1 processor, 8GB of RAM, and 256GB of storage, the MacBook Air is well-equipped to handle basic video editing workflows. If you are lookig to do more intensive video editing or use multiple applications at once, then you may want to consider upgrading to the entry-level MacBook Pro. The Pro model has a faster processor, more RAM and storage options, as well as a dedicated graphics card that can help with more complex tasks. Additionally, it offers a larger display and improved speakers that can enhance your editing experience. Ultimately, it all depends on the type of video editing you plan to do and what features are most important for your workflow.
The Suitability of a MacBook for Video Editing
The MacBook Air (M1, 2020) is an excellent choice for video editing, thanks to its impressive performance and battery life. The device runs on Apple’s new M1 chip, which offers up to 3.5x faster CPU performance and up to 5x faster GPU performance than the previous generation of MacBooks. This makes the MacBook Air a great choice for those who need to edit videos quickly and efficiently. Additionally, the device boasts a long-lasting battery life of up to 15 hours – perfect if you’re travelling or working on-the-go. Finally, for an Apple product, the MacBook Air is surprisingly affordable – making it a great choice for those on a budget. All in all, the MacBook Air (M1, 2020) is an excellent option for anyone looing for a laptop to use for video editing.
Recording YouTube Videos on Mac
Yes, you can record YouTube videos on your Mac. To do this, you will need to use a third-party app such as ScreenFlow or Camtasia. These apps will allow you to capture the video from your screen, as well as record your audio and make any other edits you might need. You can then save the video in the format of your choice.
Does Mac Screen Recording Include Audio?
Yes, screen recording on a Mac does record audio. To do so, you can use the built-in QuickTime Player app that’s installed with macOS. In the app, go to File > New Screen Recording and then click the arrow next to the record button. This will open up a new window where you can select whether or not you want to record audio from your Mac’s microphone or other audio sources. Once you have configured your settings, start the recording and it will capture both video and audio from your Mac’s screen.
Troubleshooting No Sound When Screen Recording on Mac
The most common reason for not hearing any sound when you screen record on Mac is that the built-in microphone is not selected as the audio input device. You need to manually select a microphone to record your voice or sound before starting the recording. To do this, open QuickTime and go to File > New Screen Recording. In the window that appears, click on the downard arrow next to the red Record button and select a microphone from Audio Input options. Once you have selected a microphone, click on Record to start screen recording with sound.
Recording Mac Screen with Sound for Free
Recording your Mac screen with sound is easy, free and can be accomplished in several ways. One of the easiest methods is to use the QuickTime Player app which is already installed on your Mac. To record the sound coming from your Mac’s built-in microphone, open QuickTime Player and select File > New Screen Recording. This will open a small window with a red recording button. Click this button to start recording your Mac’s screen with sound.
If you want more features than what QuickTime offers, then you may want to consider using one of the many free and open-source screen recording software available for Mac such as OBS or Apowersoft Screen Recorder. These apps provide more advanced recording options such as microphone selection and output file format customization.
Finally, there are severl paid screen recorders for Mac that offer even more features for professional recordings such as Camtasia or Snagit. Though these paid options cost money, they usually come with additional support or tutorials to help you get started quickly and easily.
Maximum Recording Time on Macbook
The recording length is only limited by the amount of storage space available on your hard drive. Depending on your hard drive size and the quality of the recording, you may be able to record for hours or even days. If you are running low on storage space, you can always delete old recordings or transfer them to an external hard drive or cloud storage to free up space.
Recording Yourself on a Laptop Mac
To record yoursef on your Mac laptop, you’ll need to use QuickTime Player. To begin, open the QuickTime Player app, and then choose File > New Movie Recording from the menu bar. This will open a new window where you can adjust your recording settings. Click the Options pop-up menu to select the type of recording you’d like (audio or video). You can also adjust the microphone volume control here to ensure that your audio is being recorded clearly. When you’re ready to begin recording, click the red Record button at the bottom of the screen. When you’re finished, click the Stop button to end your recording session.
Editing 4K Video on a MacBook Air
Yes, you can edit 4K video on the new MacBook Air (M1, 2020) with ease. Our testing has shown that it is equipped with the same powerful ARM-based Apple M1 chip as the more expensive MacBook Pro 13-inch and is capable of handling 4K video editing in Final Cut Pro wthout any issue.
How Much RAM Is Necessary for Video Editing?
If you’re looking to edit videos, you’ll need at least 32GB of RAM. This will give you enough memory to be able to work with a wide range of high-resolution files and longer videos. You’ll also be able to multitask and have multiple programs running at the same time, so that you can preview your footage and make edits without any interruptions or slowdowns. 32GB is the optimal amount of RAM for video editing, as it prvides enough capacity for complex projects without taking up too much physical space or costing too much money.
The Pros and Cons of Editing Video on a Mac or PC
When it comes to editing videos, both Macs and PCs can get the job done. However, if you’re looking for a more entry-level video editing experience, a Mac is often the better choice. Macs come with iMovie pre-installed, so you can transfer files and start editing quickly. Additionally, Macs are renowned for their reliability and performance when it comes to creative tasks such as video editing.
On the other hand, PCs typically require additional software purchases and setup bfore you can begin video editing. Furthermore, PCs may not offer the same reliable performance as a Mac when it comes to video editing tasks that require high levels of processing power or intensive graphics capabilities.
Ultimately, both Macs and PCs have their advantages when it comes to video editing — but if you’re looking for an easier entry-level experience that offers reliable performance, a Mac is likely your best bet.
Benefits of Using Mac for Video Editing
The Mac is an ideal choice for video editing because it comes with powerful built-in tools that make it easy to manipulate images and videos. It’s equipped with an intuitive interface, which makes it easy for users to quickly learn the basics of video editing. Furthermore, Macs come preinstalled with software like iMovie and Final Cut Pro that offer a range of features and tools for creating professional-looking videos. Additionally, Macs are designed to handle large multimedia files quickly and efficiently, and many models feature powerful graphics cards for smoothly rendering complex visuals. Finally, Macs prvide access to a wealth of third-party plugins, making it easy to extend the capabilities of video editing software.
Is 8GB RAM Enough for Video Editing on a MacBook Pro?
It depends on the type of video editing you’re dong and the software you’re using. For basic video editing, 8GB RAM should be enough, especially if you’re using iMovie or Final Cut Pro. However, if you’re doing more intensive work such as 4K video editing with Adobe Premiere or DaVinci Resolve, 8GB RAM may not be enough as these programs are more resource-intensive. In that case, it is recommended to upgrade to 16GB RAM for optimal performance.
Recording Screen with Audio and Video
In order to record your screen with audio and video, you will need to have a device running Android 11 or higher. To start the recording process, go to the Quick Settings (or search for) “Screen recorder”. Tap on the app to open it, and choose your desired sound and video quality settings. Once you have selected your desired settings, click Done and your screen recording will begin. You can stop the recording at any time by tapping on the red bar that appers at the top of the screen.
Recording Internal Screen and Audio on Mac
To record your screen and internal audio on a Mac, you’ll need to launch the Screen Recording tool with its keyboard shortcut Cmd+Shift+5. From there, select the type of recording you’d like to do. Click on Options and then select BlackHole 2Ch uner the Microphone section. Finally, click Record to begin your recording. If you want to record from a specific application or window, make sure to select it prior to starting the recording.
Recording Screen and Audio with QuickTime
To record your screen and audio with QuickTime, open the QuickTime Player and go to File > New Screen Recording. A Screen Recording prompt will appear, allowing you to choose whch microphone you wish to use and whether or not you want to record the entire screen or a portion of it. When you are ready, click the record button. Your recording will begin and any audio from your chosen microphone will be recorded as well. When you are ready to finish recording, in the top menu bar, click on the Stop Icon. Your recording will now be saved as a video file in your desired location.
Recording Screen with Audio on a Laptop
To record your screen with audio on your laptop, you will need to use a third-party software such as OBS Studio or Bandicam. Both of these are free to download and install. Once installed, open the program and select the screen you want to record from the list of available sources. You can then adjust the settings for resolution, frame rate, and audio source befre beginning the recording. To activate the audio source, make sure that “Record System Audio” is enabled in your settings menu. When done recording, save your video file and share it with others!
Troubleshooting QuickTime Videos with No Sound
When playing a file via QuickTime, it is possible that there is no sound coming through your ActivBoard 300 Pro or ActivBoard 500 Pro speakers. This is because of a setting within QuickTime which has overridden the audio device to its own MIDI playback device. To resolve this issue, open QuickTime and select ‘Preferences’ from the ‘Edit’ menu, then click on the ‘Audio’ tab. From here, select the correct audio device from the list and click ‘OK’ to apply changes. This should restore sound to your QuickTime video.
The Best Recording Software for Mac
The best recording software for Mac is Movavi Screen Recorder. It allows you to capture both audio and video in high quality, with a variety of settings to customize your recordings. You can also record from multiple sources at once and adjust volume levels. Additionally, the intuitive interface makes it easy to manage your recordings and quickly share them with others. Other great options include GarageBand, Audio Hijack, Audacity, Ableton Live, Apowersoft Audio Recorder for Mac, Ardour, and Macsome Audio Recorder.
What Screen Recorder Do Youtubers Use?
Many YouTubers use OBS (Open Broadcaster Software) for recording videos for their YouTube channels. OBS is a free and open-source screen recorder that allows users to record, edit, and stream video content from their computers or mobile devices. It is one of the most popular screen recording programs due to its ease of use, powerful features, and wide range of supported formats. With OBS, you can record your desktop activity in full HD resolution, capture audio from multiple sources, add graphics and text overlays, customize transitions and more. Additionally, it integrates seamlessly with YouTube Live streaming so you can easily broadcast your recordings to your followers.
Recording Audio on a Macbook Air
To make an audio recording on your MacBook Air, open the Voice Memos app. You will see a Record button (or a Touch Bar) at the top of the app. Click on this to begin recording. To pause, click on the Pause button and to resume, click Resume. When you are finished making your recording, click Done in the lower-right corner of the app and your recording will be saved.
Conclusion
Recording video with a MacBook is an easy and convenient way to capture meaningful moments in life or to create important visual content for your business. With the built-in camera, you can record HD video and use the editing tools to enhance the footage before sharing it with friends or uploading it online. You can also add audio to the video, such as music tracks or narration, as well as apply filters and effects. Plus, you can save your video files in various formats so that they are easy to upload and share on social media sites or oher platforms. Recording video on a MacBook is an effective and efficient way to create videos that will help you stand out from the crowd.

