In this digital age, the need to quickly and efficiently convert physical documents into digital format has become more important than ever. With the advent of smartphones, scanning documents using the camera has become a popular method. If you own an iPhone, you’re in luck, as the built-in Notes app offers a simple and effective solution for scanning documents and saving them as PDFs.
To get started, open the Notes app on your iPhone, iPad, or iPod touch. Create a new note or open an existing one that you want to add a scanned document to. Tap on the camera icon within the note to access the scanning feature.
Position your device over the document you want to scan, ensuring that it fits within the frame on your screen. The camera will automatically detect the document and highlight it for you. Once you’re satisfied with the framing, tap the capture button to take the photo.
After capturing the document, you’ll be presented with a thumbnail preview. Tap on the document to open it in full screen view. From here, you can adjust the document’s orientation, crop it if necessary, or add additional pages to create a multi-page PDF.
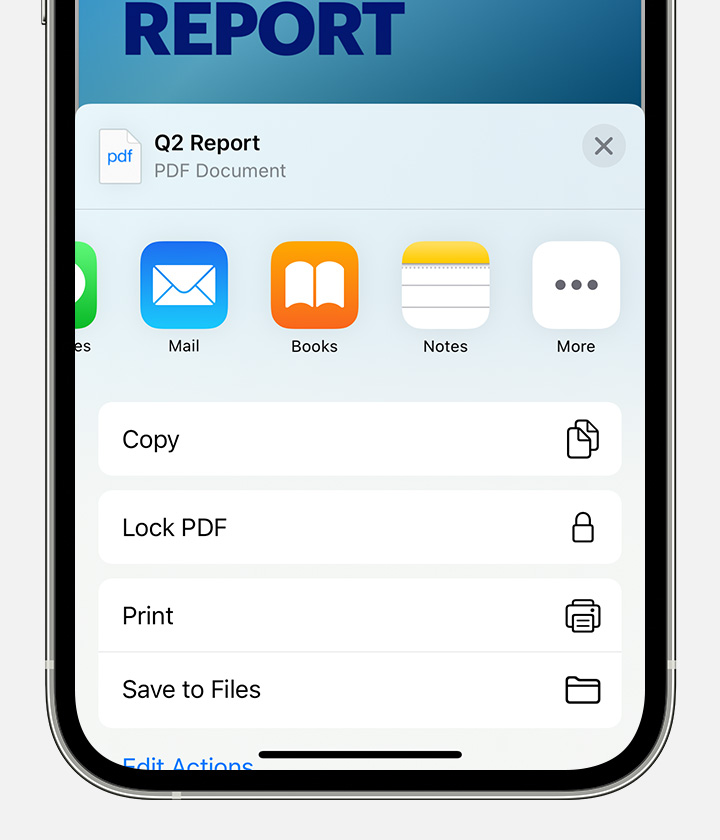
Once you’re satisfied with the scanned document, tap the share button located in the upper right corner of the screen. A menu will appear with various sharing options. Select “Save to Files” to save the PDF to your device.
Within the Files app, you can choose a specific folder to save your PDF to for easy organization. This allows you to keep all your scanned documents in one place, making them easily accessible whenever you need them.
Now, let’s say you want to view or download your scanned documents on a different device or from your computer. If you use iCloud, you can access your scanned documents directly from the Notes app on iCloud.com.
Simply log in to iCloud.com and open the Notes app. Locate the note that contains the scanned document you want to view. Double-click on the document’s thumbnail to open it in full screen view.
From here, you can view the document, zoom in or out, and even download it to your computer if needed. This allows you to have your scanned documents available on any device with internet access, making it incredibly convenient and versatile.
The ability to scan documents using the camera on your iPhone and save them as PDFs offers a quick and convenient solution for digitizing physical documents. With the Notes app, you can easily capture, edit, and organize your scanned documents, making them easily accessible whenever and wherever you need them. Whether it’s for personal or professional use, this feature proves to be a valuable tool in our increasingly digital world.
How Do You Save a Scanned Document As a PDF On Your iPhone?
To save a scanned document as a PDF on your iPhone, follow these steps:
1. Open the Notes app on your iPhone.
2. Locate the note that contains the scanned document and tap on it to open it.
3. Within the note, tap on the scanned document to open it in full view.
4. In the upper right corner of the screen, you will see a share button, represented by a square with an arrow pointing upwards. Tap on this button.
5. A share sheet will appear with various options. Scroll through the options until you find “Save to Files” and tap on it.
6. The Files app will open, displaying your iCloud Drive and any other locations you may have set up. Select the folder where you want to save your PDF by tapping on it.
7. Once you’ve selected the folder, tap on the “Save” button in the upper right corner of the screen.
8. Your scanned document will now be saved as a PDF file in the chosen folder within the Files app on your iPhone.
By following these steps, you can easily save a scanned document as a PDF on your iPhone using the Notes app and the Files app. This allows you to conveniently store and access your scanned documents in a PDF format directly on your device.
Where Are Scans Saved On iPhone?
Scanned documents on iPhone are saved within the Notes app. To access the scanned documents, you need to open the Notes app on your iPhone. Once you have opened the app, navigate to the specific note that contains the scanned document you are looking for.
Within the note, you will see a thumbnail of the scanned document. To view the document, simply tap on the thumbnail. This will open up the scanned document in a larger view, allowing you to read the contents.
If you wish to save or download the scanned document to your iPhone, you can do so by tapping on the share icon (usually represented by a square with an arrow pointing upwards). From the share options, select “Save Image” or “Save PDF” depending on the format of the scanned document. This will save the document to your iPhone’s Photos app or Files app, depending on your device’s settings.
By following these steps, you can easily view and download scanned documents within the Notes app on your iPhone.
Conclusion
The ability to scan documents using the iPhone camera and save them as PDFs is a convenient and efficient feature. With just a few taps, users can capture important documents, receipts, or handwritten notes and have them automatically converted into PDF files.
This feature offers a multitude of benefits. Firstly, it eliminates the need for a separate scanner or scanning app, saving both time and resources. Users can conveniently scan documents on the go, without the hassle of carrying additional equipment.
Furthermore, the scanned documents are easily accessible within the Notes app on all Apple devices, including iPhone, iPad, and iPod touch. This ensures that important documents are always at your fingertips, regardless of the device you are using.
Saving the scanned documents to the Files app provides even more convenience. Users can organize their scanned files into specific folders, making it easy to locate and retrieve them when needed. Additionally, the Files app allows for seamless integration with other third-party apps and cloud storage services, further expanding the possibilities for managing and sharing scanned documents.
The ability to view and download scanned documents on iCloud.com enhances the accessibility and flexibility of this feature. Users can access their scanned files from any web browser, enabling them to view or download the documents even when they are not using their Apple devices.
The PDF scanning feature on the iPhone camera is a powerful tool that simplifies document management and enhances productivity. Its ease of use, seamless integration, and accessibility make it an invaluable asset for individuals and professionals alike.

