Are you looking for a way to mute your microphone on your Mac? For example, you might want to mute your mic during calls so that it doesn’t pick up certain things you are doing or saying to someone else. Fortunately, Macs offer various audio settings and microphone controls that you can use to mute your mic, regardless of whether you’re on a video call, phone call, or live video on social media.
Using System Preferences to Mute Microphone

Did you know that you can go into System Preferences to mute your mic? Follow these steps to mute your Mac microphone:
- Click on the Apple logo at the top-left of your screen and select System Preferences.
- Find and click on Sound.
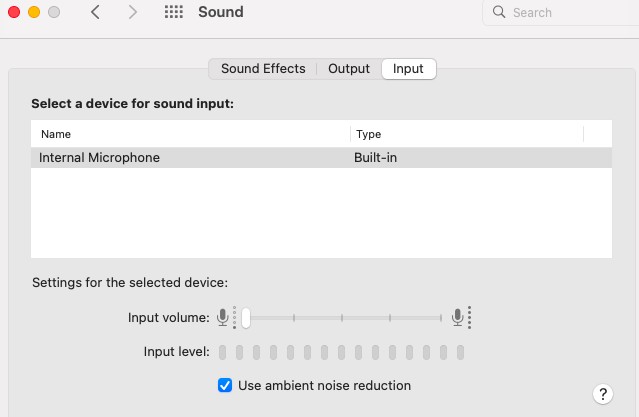
- Click on the Input tab, where you can find your Mac sound input settings.
- You will see a slider for your input sound. Slide it all the way to the left. This will cause the input volume to go to what is effectively zero. See the screenshot above for guidance.
The slider controls how much volume your computer picks up from your microphone. If you slide it all the way to the right, it will pick up even low-volume sounds. If you slide it all the way to the left, it won’t be able to pick up audio.
Under the slider, you will see a label called Input Level, along with some bars. Speak into your Mac’s microphone to see which bar is lighting up. If no bar lights up, it means it is not picking up any sound, and your microphone is effectively muted.
Muting Microphone Using Keyboard Shortcuts
Unfortunately, there is no built-in keyboard shortcut for muting your microphone. I wish there was a mute and unmute mic shortcut, but there isn’t! However, some third-party applications may allow you to mute your Mac’s microphone by adding your own keyboard shortcut. We’ll talk about them later, so don’t stop reading!
Muting Microphone in Specific Applications
By the way, many applications provide built-in methods for muting your microphone, so going to your System Preferences isn’t always necessary. The Systems Preferences method is a system-wide method that works across all applications, but what if you want to mute your mic during a Zoom call, for example?
Zoom offers an option to mute your mic. Similarly, there is a Google Meet mute mic button and a Skype mute mic button. The same goes for other video conferencing tools. While the app-specific mic control option can vary slightly, it will generally look like a microphone icon. Clicking on it should cause the mic to get crossed out, which is a visual indication that you have muted your mic. To unmute yourself, click on the mic icon again.
Disabling Microphone Access for Applications

hile specific applications provide a mute button for temporary muting, what if you want to block that application from accessing the microphone altogether?
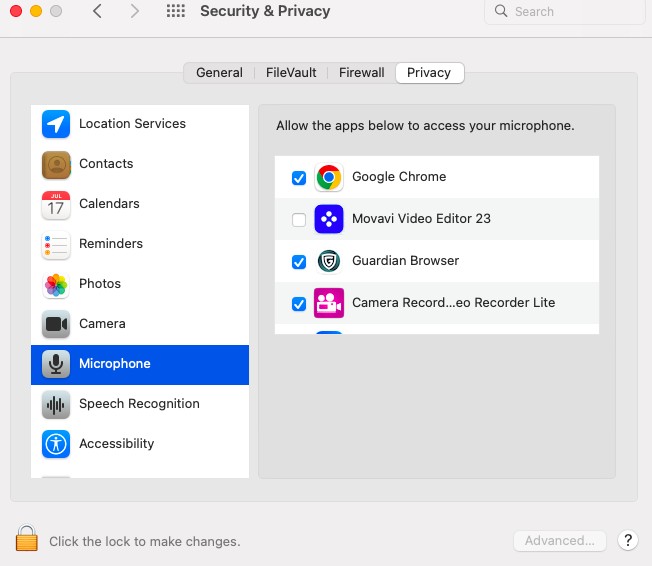
You can disable an application’s mic access on macOS in your Security and Privacy mic settings. There, you can set app permissions so that only certain apps can access your microphone.
To do that, open your System Preferences. Find the Security & Privacy option, and click on it. Scroll down until you see the Microphone option on the left side of the window. There, you can uncheck any application you don’t want to allow access to the microphone. An example is shown in the screenshot above.
You will have to enter your device password before you can make any changes to these settings. Click the lock in the bottom-left corner and then enter your password. Once you do that, you can make changes with no restrictions.
Using Third-Party Apps to Control Microphone

There are third-party mic control apps you can use for advanced mic controls. My favorite is Mic Drop for macOS. It’s not free, but it is only $4.99, and it’s well worth it. It allows you to define a custom keyboard shortcut that you can use to instantly mute your mic, whether you are using Zoom or any other app. It works on all apps! It will also show you your mic status in your menu bar, so you can easily check at any time to see if your mic is on or muted.
Another option is the Shush app. It’s a bit different, though, and it’s a bit more buggy, although it costs the same amount of money. Shush lets you define a hotkey of your choice that you can press to mute your mic in real time. As long as you keep pressing and holding the button, you will remain muted. When you release the button, you will be unmuted. It’s a good option when you are working from home and your kid starts screaming in the middle of a video call or when an ambulance passes by your home.
Shush also allows you to set up a reverse mode, in which you are always muted by default. To unmute yourself, press and hold a hotkey of your choice. You will be unmuted until you release the key. That’s a good option if you want to be muted by default and only need to speak occasionally.
Troubleshooting Microphone Issues
Let’s talk about how to troubleshoot Mac mic issues and fix mic problems.
If your mic is not muting, make sure you have followed all the instructions correctly. For example, you may have turned off microphone access for a different app by mistake. Or, you may have not slid the slider all the way to the left in your System Preferences.
On the other hand, if your mic isn’t picking up any sound when you have unmuted it, make sure it is unmuted in all settings. In other words, even if you clicked the unmute button in Zoom, you might have forgotten that you also slid the slider to the left in System Preferences, effectively muting yourself. Another possibility is that you selected a different mic as an input source, and you are speaking into the wrong mic.
Conclusion
There are multiple mic control methods that allow for effective mic muting on macOS. macOS offers some built-in audio controls, but the most efficient and easiest way to mute yourself is to simply use an app’s built-in mute button (such as the one on Zoom) or to download a third-party app like Mic Drop.


