Installing Git on a Macbook is easy and straightforward. With the help of the stand-alone installer and a few simple commands, you can quickly get up and running with Git on your Macbook.
The first step in installing Git on your Macbook is to download the latest version of the installer. This can be done directly from the official downloads page, which provides links for both the Mac and Windows versions of Git. Once you have downloaded the installer, simply run it to begin the installation process.
Once installed, you can open a terminal window and verify that the installation was successful by typing “git –version” into the command line. If everything went as expected, you should see something like “git version 2.9.2” displayed in response.
If using a GUI is more your style, then you can use an easy installation method provided by Git itself. All you need to do is follow through with ther instructions for setting up git on your Macbook and you should be good to go!
Finally, if you would prefer to install Git using terminal commands rather than through an installer, there are several different ways this can be done on both Mac and Linux systems. First, you’ll need to make sure that Homebrew is installed; this will allow you to easily install Git via the terminal command “brew install git”. Once that’s done, simply type “git –version” once again in order to verify that everything was successful!
Whether usig an installer or running commands in the terminal, getting started with Git on your Macbook is a relatively straightforward process that shouldn’t take too much time at all!
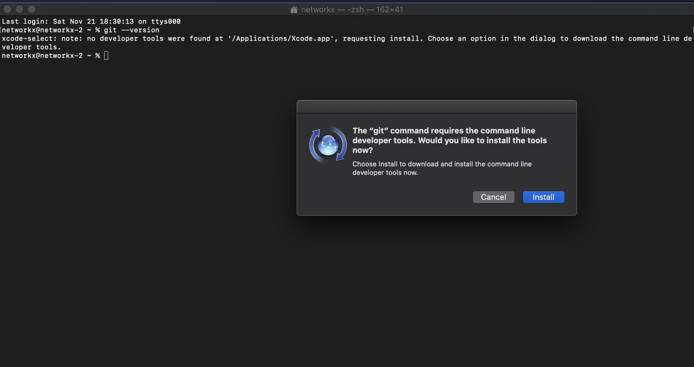
Installing Git on a Mac
Installing Git on a Mac is easy and straight-forward. First, download the latest Git for Mac installer from the official website. Once you have the installer downloaded, double-click it to open the package and follow the on-screen instructions for installing Git. After installation is complete, open a terminal window and type git –version to verify that the installation was successful. You should see a message displaying the current version of Git you have installed. That’s it! You now have Git installed on your Mac.
Using Git on Mac
Yes, you can use Git on Mac! Git is a version control system that allows developers to track changes to their code and collaborate with others. It is a widely used tool for many developers and is avalable on Mac as both a desktop application and via the command line.
The easiest way to get up and running with Git on Mac is to use the installer. You can download it from the official website and follow the instructions in the documentation to install it. Once installed, you will be able to use eiter a graphical user interface (GUI) or command-line interface (CLI) to manage your Git repositories.
You can also install Git using Homebrew, which is a package manager for Mac that allows you to easily install applications from the command line. To do this, open up Terminal and enter: ‘brew install git’. Once this command has been executed, you should have access to all of Git’s features from the command line.
No matter which method you choose, once you’ve successfully installed Git on your Mac, you’ll be able to start tracking changes in your projects and collaborating with other developers in no time!
Installing Git Bash on Mac
Yes, you can install Git Bash on Mac. Git Bash is a free and open source command-line interface for running Git commands. It provides an easy way to interact with the distributed version control system that is used by many developers to manage their projects. You can install it on your Mac using Homebrew, the popular package manager for Mac OS. Simply open a terminal window and enter the folloing command: ‘brew install git’. This will download and install the latest version of Git Bash on your Mac. Once installed, you can run the ‘git’ command from anywhere in your shell to start using it.
Installing Git
Installing Git is an easy process that can be completed in a few simple steps.
First, open your command prompt shell and type the following command: sudo dnf install git-all. This will begin the installation process. Once the output has completed, you can verify the installation by typing in git version to view the version of Git that is installed.
If you are experiencing any issues with the installation, please consult your operating system’s documentation as each one may have different instructions for installing Git.
Checking if Git is Installed on Mac
If you’re using a Mac, you can check if Git is already installed on your computer by opening a Terminal window and typing “git –version” and pressing Enter. This should display the version number of the Git application currently installed on your machine. If it does not display any output, or if the version number is lower than 2.9.0, then you will need to install Git on your machine.
Opening Git GUI on Mac
Opening Git GUI on Mac is a simple process. First, open the directory where you’d like to access your Git repository in Finder by typing ‘open .’ in your Terminal window. Once the folder has opened, click the ‘Git’ button located in the top toolbar of Finder. This will open up the Git GUI interface, where you can view and manage your repository’s files and branches, as well as make commits and push them to remote repositories. You can also use this interface to manage any remotes asociated with your repository.
Connecting a Mac to GitHub
To connect Mac to GitHub, you will first need to generate an SSH key. To do this, open the Terminal application on your Mac and run the following command:
ssh-keygen -t rsa -b 4096 -C “your_email@example.com”.
This will create a new SSH key using the provided email as a label and save it in your computer’s root directory. You can then copy this key by running the command:
pbcopy < ~/.ssh/id_rsa.pub
Now we’ll add your key to Github: Visit your account settings. Click Add SSH Key. Enter a descriptive title for the computer you’re curretly on, e.g. “Work iMac” into the Title field. Paste your key into the Key field (it has already been copied to your clipboard). Click Add Key. Enter your Github password and click “Add SSH Key”. Once you have added your key, you can now use Git commands with GitHub from your Mac!
Installing Git
Git is typically installed in the “C:\Program Files\Git” directory on Windows. However, you can choose a different location during installation by clicking the Browse button and selecting a different folder. After installation is complete, you can confirm the install path by running the “git –version” command from a command prompt.
Do I Need Git Bash for Mac?
No, you do not need Git Bash for Mac. Git is already installed on most Macs, either by default or when Xcode is installed. You can check if it’s installed by running the command which git in your Terminal. If it’s installed, you’ll get the output /usr/bin/git and you won’t need to install Git Bash.
Running Git Commands on Mac
To run a Git command on Mac, fist you need to open the Terminal app. You can find it in the Utilities folder inside the Applications folder. Once Terminal is opened, you can type any Git command and press enter to execute it. For example, if you want to clone a repository from GitHub, you can type “git clone ” and press enter.
Installing Bash on a Mac
Installing Bash on a Mac is a relatively straightforward process. First, you’ll need to install Homebrew, a package manager for MacOS. You can do this by following the instructions on the Homebrew homepage. Next, you’ll need to install Git using Homebrew (optional but recommended). To do this, open up Terminal and type ‘brew install git’. After that is complete, you can install Bash with the command ‘brew install bash’. Once that is finished, add this install of bash to your list of allowed shells by typing ‘sudo echo /usr/local/bin/bash >> /etc/shells’. Finally, change your shell to use this new one by typing ‘chsh -s /usr/local/bin/bash’ in Terminal. And that’s it! You should now have Bash installed on your Mac.
Conclusion
In conclusion, installing Git on a Mac is a straightforward process. With the stand-alone installer, you can get started quickly and easily. For more advanced users, there are several other methods for setting up Git using the terminal or a GUI. Ultimately, whichever method you choose, you’ll be able to start using Git on your Mac right away.

