Managing which websites have access to your Mac is essential for maintaining a secure browsing experience. Whitelisting websites on Apple devices allows you to decide which sites are trusted and can be accessed without restrictions, ensuring a smoother and safer internet experience.
By learning how to effectively manage website permissions, you can control what content is available while minimizing security risks. This method of granting selective access is an excellent way to ensure secure internet access, providing peace of mind as you browse trusted sites while keeping unwanted or harmful ones at bay.
How to Whitelist a Website in Google Chrome on macOS
Whitelisting a website in Google Chrome on macOS is a simple process that gives you control over which sites are marked as safe. This guide will walk you through the steps to whitelist websites in Google Chrome so you can ensure secure access to approved websites in Chrome without unnecessary restrictions.
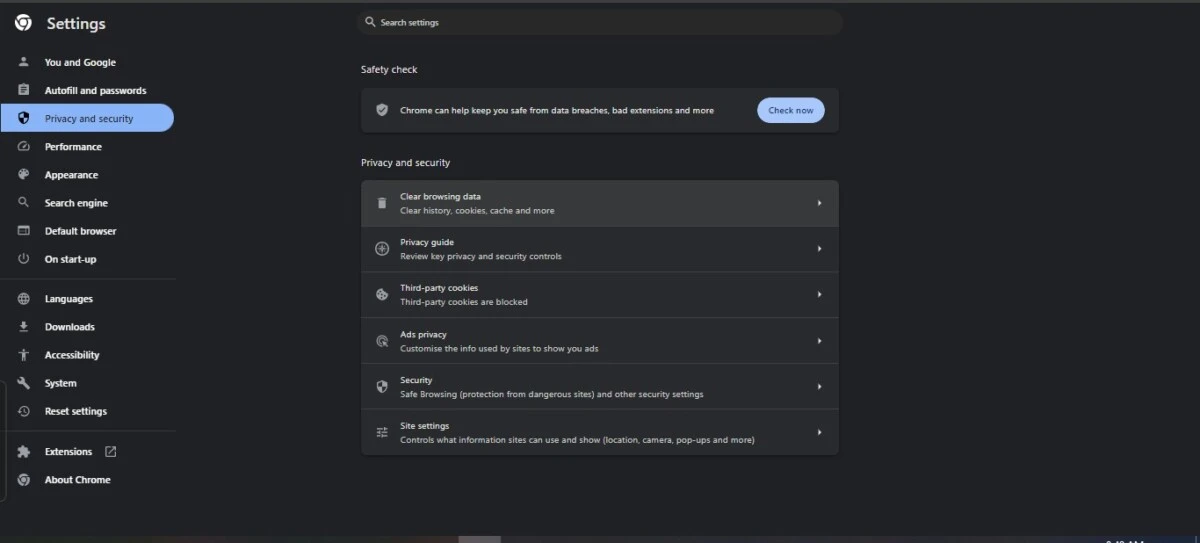
To begin, open Google Chrome and click on the three vertical dots in the top-right corner of the browser. From the dropdown menu, select “Settings.” Once the Settings page loads, scroll down and click on “Privacy and security.”

Here, you can adjust Chrome settings to manage site permissions. Choose “Site Settings,” which allows you to specify how websites can behave in your browser.
In the “Permissions” section, you’ll find options such as location, camera, and notifications. Click on the specific setting for which you’d like to whitelist websites in Google Chrome. For instance, if you want to allow notifications from a specific site, click on “Notifications,” and then click “Add” under “Allow.”
Now, enter the URL of the approved websites in Chrome that you want to whitelist, and click “Add.” Once added, the site will be able to function without being blocked by Chrome’s security settings. You can adjust Chrome settings at any time if you wish to remove or modify these permissions.
Whitelisting a Website in Safari Browser
Allowing trusted websites in the Safari browser can help you avoid security blocks while maintaining a smooth browsing experience. If you want to give specific websites hassle-free access, here’s a quick guide to allow websites in Safari without compromising safe browsing.
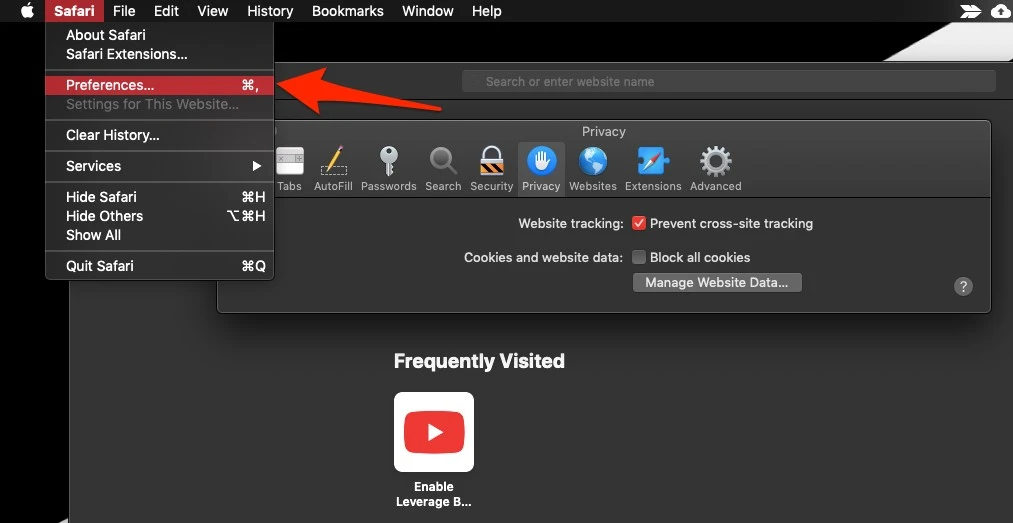
1. Open Safari Preferences: Begin by launching Safari and heading to the “Safari” menu at the top-left corner. Select “Preferences” from the dropdown menu.

2. Access Website Permissions: In the Preferences window, click on the “Websites” tab. Here, you’ll manage your Safari website permissions for different types of content like pop-ups, location services, and more.
3. Select the Website You Want to Whitelist: Under each category (e.g., Camera, Microphone, Pop-up Windows), you’ll see a list of websites you’ve visited. Find the website you want to whitelist and adjust its settings to “Allow” to grant permission.
4. Manage Global Website Settings: If you prefer to whitelist all future visits to the same website, scroll to the bottom of the “Websites” tab. You can choose to always allow websites in Safari by selecting “Allow” for the respective website under each category.
5. Ensure Safe Browsing: While you adjust Safari website permissions, Safari’s built-in protections will continue to keep your safe browsing active. You’ll still get warnings for any sites that might pose a risk, giving you control without sacrificing security.
Using Parental Controls to Approve Websites
Using parental control features on a Mac is an effective way to manage which websites your child can access. Through website management settings, you can restrict website access for kids by creating a list of approved websites with parental controls.
This ensures that only the sites you select are accessible, keeping unwanted content out of reach. Simply go into your Mac’s system settings, enable parental control, and specify the websites that are allowed.
Disabling Website Blocking on macOS
If you’re looking to turn off website blocking on your Mac and allow unrestricted access to certain websites, you’re in the right place. One of the simplest ways to do this is by adjusting the screen time settings in macOS.
This feature helps you control the websites that can be accessed on your device, but sometimes, you might want to disable web restrictions for a smoother browsing experience.
To adjust macOS screen time settings and disable web restrictions, follow these steps:
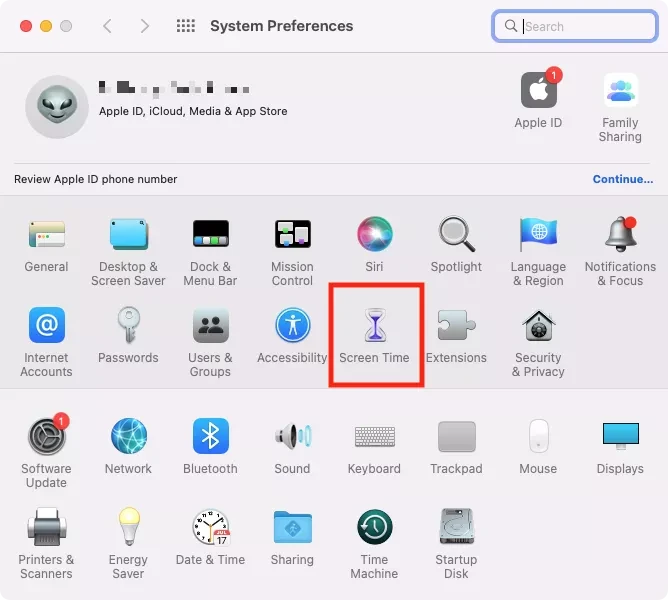
1. Open “System Preferences” from the Apple menu on your Mac.
2. Scroll down to “Screen Time” and click on it.

3. Select the user account for which you want to modify access.
4. Under the “Content & Privacy” section, ensure that “Content & Privacy Restrictions” is enabled.
5. Then, head to the “Web Content” section.
6. Here, you can choose “Unrestricted Access” to completely turn off website blocking and remove restrictions.
Marking Websites as Trusted in Safari
To mark trusted websites in Safari and eliminate those annoying security warnings, follow these quick and easy steps.
First, open Safari and go to the website you want to mark as trusted. At the top of the screen, click Bookmarks, then select “Add Bookmark…” from the menu. From the dropdown, choose “Top Sites” and click Add. This will save the website to your top sites, helping Safari recognize it as a trusted website.
If you want to manage trusted sites further, you can head to Safari’s Preferences by clicking the Safari tab at the top and selecting Preferences. In the Security tab, you can customize how Safari handles safe sites and certificates, allowing certain websites to bypass the usual security checks, treating them as safe sites for Safari.
Allowing a Website Through macOS Firewall
To allow websites through firewall on macOS, start by accessing your firewall website permissions in System Preferences. Open “Security & Privacy,” click the “Firewall” tab, and select “Firewall Options.” From here, you can manage firewall settings by adding or modifying applications that are allowed through the firewall, enabling them to access the internet without restriction.
To allow specific websites, you’ll need to configure the apps or services related to those sites, as macOS firewall manages internet traffic through apps rather than individual websites. Ensuring that the appropriate app is authorized will provide uninterrupted use of the site.
Conclusion
Whitelisting websites on your Apple device is essential for ensuring a secure browsing experience while maintaining control over the sites you visit. By using built-in features like parental controls, content & privacy restrictions, and third-party tools, you can easily whitelist websites on Apple devices.
These methods not only enhance safety but also allow you to manage website access effectively, making your internet usage more tailored to your needs.


