IBackupBot is a powerful tool that allows users to manage and manipulate their iPhone, iPad, and iPod backups. One of its useful features is the ability to find and recover the restrictions passcode on your device. In this article, we will guide you through the process of using iBackupBot to find your restrictions passcode.
Before we begin, it’s important to note that using iBackupBot requires a computer (Mac or PC) and a recent backup of your iOS device. Make sure you have these requirements fulfilled before proceeding.
Step 1: Download and Install iBackupBot
Start by downloading and installing iBackupBot on your computer. You can find the software on the iBackupBot website. Once downloaded, follow the on-screen instructions to install it on your computer.
Step 2: Connect your iOS Device
Connect your iOS device to your computer using a USB cable. Launch iBackupBot and wait for it to recognize your device.
Step 3: Select your Backup
In iBackupBot, you will see a list of available backups for your iOS device. Select the backup that you want to retrieve the restrictions passcode from and click on it to proceed.
Step 4: Locate Restrictions Passcode
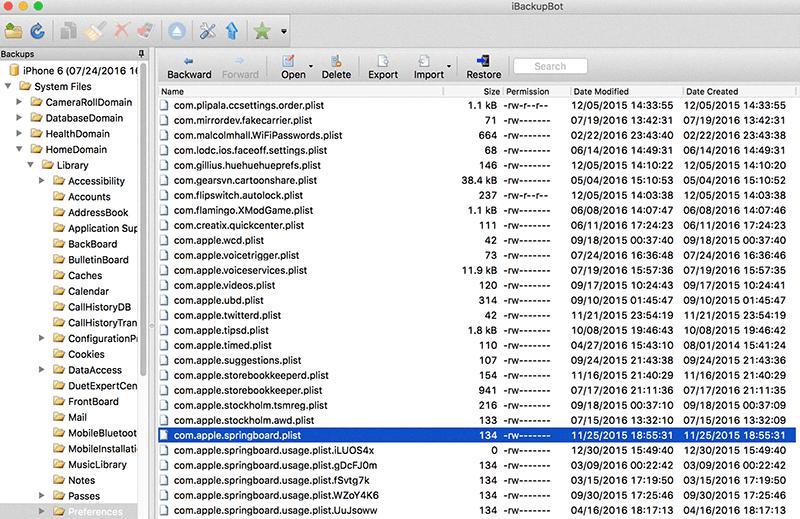
Once you’ve selected the backup, iBackupBot will display a list of backup data categories on the left-hand side. Click on “System Files” and then “HomeDomain” to expand the options. Look for the file named “com.apple.restrictionspassword.plist” and select it.
Step 5: Extract the Restrictions Passcode
With the “com.apple.restrictionspassword.plist” file selected, click on the “Export” button at the top of the iBackupBot interface. Choose a location on your computer to save the exported file.
Step 6: Open the Restrictions Passcode File
Navigate to the location where you saved the exported file. Right-click on it and open it with a text editor, such as Notepad (for Windows) or TextEdit (for Mac). The file will contain a series of encrypted characters.
Step 7: Decrypt the Passcode
To decrypt the restrictions passcode, you can use an online decryption tool or a third-party software specifically designed for this purpose. Copy the encrypted characters from the file and paste them into the decryption tool. Follow the instructions provided by the tool to decrypt the passcode.
Step 8: Retrieve and Reset Restrictions Passcode
Once you have decrypted the passcode, you can use it to unlock the restrictions on your iOS device. Go to “Settings” on your device, select “Screen Time,” and then “Change Screen Time Passcode.” Enter the decrypted passcode, and you will have successfully reset the restrictions passcode.
IBackupBot is a valuable tool that can help you retrieve a forgotten restrictions passcode on your iOS device. By following the steps outlined in this article, you can easily use iBackupBot to locate and decrypt the passcode, allowing you to regain control over the restrictions settings on your device.
How Do You Find Your Restrictions Passcode?
To find your restrictions passcode, follow these steps:
1. Open the Settings app on your device.
2. Scroll down and tap on “Screen Time.”
3. On the next screen, tap on “Content & Privacy Restrictions.”
4. If you see “Content & Privacy Restrictions” is enabled, it means that restrictions are already set on your device. Tap on it to proceed.
5. You will be prompted to enter your passcode. If you can remember your passcode, enter it and proceed to the next step. If you don’t remember it, you will need to follow the steps to reset your passcode, which will involve erasing all the content and settings on your device.
6. Once you have entered the passcode, you will see the “Content & Privacy Restrictions” screen. Here, you can view and modify the various restrictions that are set on your device.
7. If you want to change or disable the restrictions passcode, tap on “Change Screen Time Passcode” or “Disable Screen Time Passcode.” You will be prompted to enter your current passcode before making any changes.
8. If you want to recover a forgotten restrictions passcode, tap on “Forgot Passcode?” You will be asked to authenticate using your Apple ID credentials, and then you can follow the instructions to reset the passcode.

What If You Forgot Your Apple Restrictions Passcode?
To reset your Apple restrictions passcode, follow these steps:
1. Click on the Apple menu () located in the top-left corner of your screen.
2. Select “System Preferences” or “System Settings” from the drop-down menu.
3. In the System Preferences window, locate and click on the “Screen Time” icon.
4. Once in the Screen Time settings, click on “Change Passcode.”
5. If you have forgotten your current passcode, click on the “Forgot Passcode” option.
6. You will be prompted to enter the Apple ID and password that you used to set up the Screen Time passcode initially.
7. Enter your Apple ID and password, and click on “OK” to proceed.
8. After verifying your Apple ID, you will be able to set a new Screen Time passcode.
9. Enter your desired passcode, and then enter it again to confirm.
10. Once you have entered and confirmed your new passcode, click on “OK.”
By following these steps, you can reset your Apple restrictions passcode even if you have forgotten it.
How to Bypass Content Restrictions On iPhone Without Passcode?
Bypassing content restrictions on an iPhone without a passcode is a challenging task as there is no official method to do so. However, if you are looking to remove or turn off restrictions on your iPhone without losing any data, you can try the following methods:
1. Use a Third-Party Tool: There are various third-party tools available online that claim to help bypass content restrictions without a passcode. These tools usually work by exploiting vulnerabilities in the iOS system. It’s important to note that using third-party tools can be risky and may not always be reliable. Make sure to do thorough research and choose a reputable tool if you decide to go down this route.
2. Restore from a Backup: If you have a recent backup of your iPhone that was created before the restrictions were enabled, you can restore your device from that backup. This will remove the restrictions along with any other data that was added after the backup was made. Keep in mind that this method will erase all the data that was added after the backup, so it’s crucial to have a recent backup available.
3. Contact Apple Support: If you are unable to bypass the content restrictions on your iPhone using the above methods, it’s recommended to reach out to Apple Support for assistance. They may be able to guide you through the process or provide a solution based on your specific situation.
It’s important to note that bypassing content restrictions without a passcode may violate Apple’s terms of service and could potentially lead to security risks or loss of data. It’s always advisable to use caution and consider the potential consequences before attempting any bypass methods.
How Do You Reset Your iPod Touch Without The Restrictions Passcode?
To reset your iPod touch without the restrictions passcode, follow these steps:
1. Ensure that you have a computer (Mac or PC) with the latest version of iTunes installed.
2. Connect your iPod touch to the computer using the USB cable.
3. Open iTunes on your computer. If prompted, enter your device passcode or choose “Trust This Computer” on your iPod touch.
4. In iTunes, select your iPod touch from the device list.
5. Click on the “Summary” tab, and then click on “Restore iPod” or “Restore iPhone,” depending on the version you are using.
6. A warning message will appear, stating that your device will be restored to factory settings. Click on “Restore” to continue.
7. iTunes will download the necessary software and restore your iPod touch to its original settings. This process may take some time, so be patient and make sure that your device remains connected to the computer throughout the process.
8. Once the restore process is complete, you can set up your iPod touch as a new device or restore it from a backup if you have one.
It’s important to note that by restoring your iPod touch, you will lose all data and settings on the device. Therefore, it’s crucial to ensure that you have a backup of your important data before proceeding with the reset.
Conclusion
IBackupBot is a powerful software tool that enables users to easily access and manipulate their iOS device backups. It provides a range of features and functionalities that allow users to view and modify various data on their devices, including contacts, messages, notes, call history, and more.
This tool offers a user-friendly interface, making it easy for both beginners and advanced users to navigate and utilize its features effectively. With iBackupBot, users can easily extract and export data from their device backups, making it convenient for transferring data between devices or creating backups for safekeeping.
One of the standout features of iBackupBot is its ability to recover and reset the restrictions passcode on iOS devices. This can be incredibly helpful for users who have forgotten their passcode and need to regain access to their device without losing any data. By following a simple process, users can restore their device as new and remove the restrictions passcode, allowing them to regain full control over their device.
IBackupBot is a reliable and efficient tool for managing and manipulating iOS device backups. Whether you need to extract data, transfer files, or recover a forgotten passcode, iBackupBot provides a comprehensive solution that caters to the needs of iOS users.


