Updating your HomePod to the latest version of iOS is an easy process that requires a few simple steps.
First, make sure your HomePod is plugged into power and connected to Wi-Fi.
Next, open the Home app on your iPhone or iPad and tap on the “Settings” tab at the bottom of the screen.
Then, select “Software Update” from the list of options and tap “Check for Updates”. If tere is an update available for your HomePod, you will see a prompt to begin downloading it. Tap “Download & Install” and then wait for the update to complete.
You can also check for updates manually by going to Settings > General > Software Update on your HomePod. The same prompt will apear if there is an update available.
Once you have selected Download & Install, do not unplug or turn off your HomePod until it has finished updating. This process can take up to 10 minutes depending on how large the update is and how fast your internet connection is.
After the download has completed, you should see a message saying that your HomePod has been updated successfully. Now you are ready to enjoy all of the new features and improvements that come with this latest version of iOS!
Updating HomePod Manually
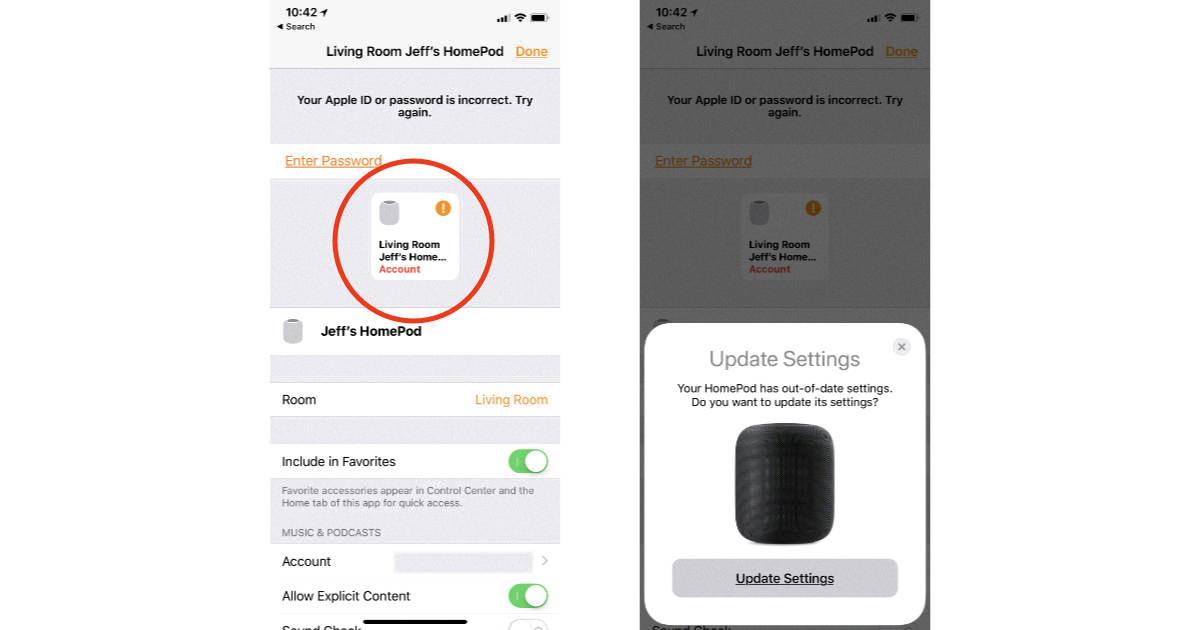
To manually update HomePod, start by opening the Home app on your device. From the home icon in the upper left corner of the display, tap on Home Settings. Scroll down to Software Update and pull down from the top of your iPhone or iPad screen to check if an update is available. If an update is available, tap Install to begin downloading and installing it. Once you have finished downloading and installing, your HomePod will be updated with the latest software version.

Source: 9to5mac.com
Updating HomePod
Yes, HomePod neds to be updated in order to take advantage of the latest features and security updates. HomePod will automatically download and install future updates, but you can also use the Home app on an iPhone, iPad, or Mac to manually install them. Updating your HomePod is important to ensure optimal performance and security.
Troubleshooting HomePod Software Updates
It’s possible that your HomePod is not updating because of a connection issue with your router or because it hasn’t been able to download the update. To try and fix this, you sould first reboot your router and power cycle the HomePod, then try again. If it still won’t update either manually or after leaving overnight with automatic updates enabled, then you should try the Press the top of HomePod to reset it method from Reset HomePod – Apple Support, and then try to get the update once more.
Downloading the HomePod Update
To download the HomePod update, you’ll need an iOS device running iOS 16. If you already have the public beta of iOS 16 installed, open the Home app, tap the Home icon in the top left corner, go to Home Settings, scroll down, and tap Software Update. This will show you any available updates for your HomePod. Select the update and follow the on-screen instructions to download and install it.
Updating HomePod to iOS 15
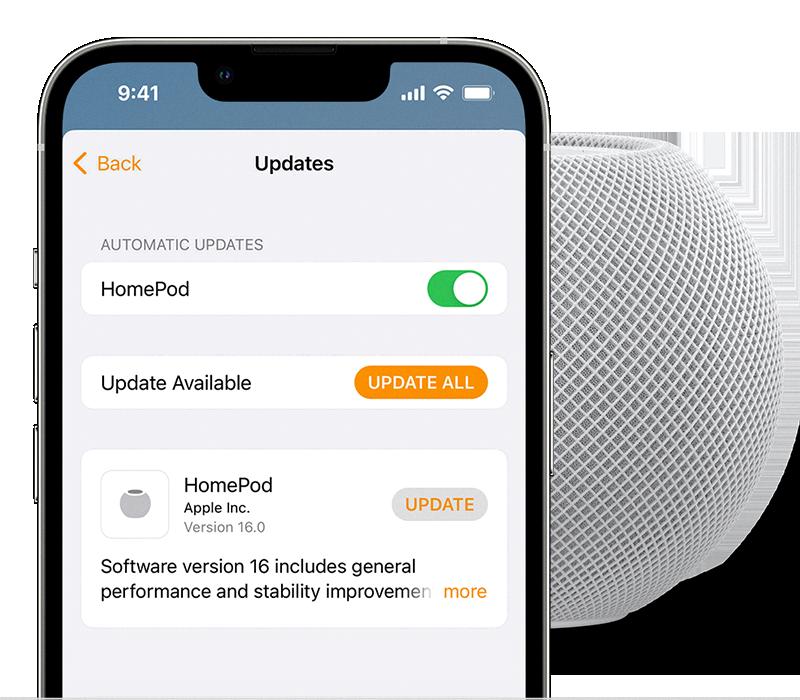
In order to update your HomePod to iOS 15, you will first need to make sure that all of your devices are updated to the latest version of iOS, iPadOS, or macOS. To do this, open the Home app, select Home and then Home Settings > Software Update. Select HomePod and turn automatic updates on or off. If there is a new update available (in this case iOS 15) select “Update” and your device should begin downloading and installing the new software.
Latest Version of HomePod
The latest version of HomePod is Software Version 13.4.8, whch includes general improvements for stability and quality.
Checking HomePod Software Version
To check your HomePod software version, start by opening the Settings app on your iPhone, iPad or iPod touch. Then, tap your registered Apple ID name at the top of Settings. Scroll down and tap your HomePod in the list of devices associated with your Apple ID. At the bottom of this page you will see the serial number and version for your HomePod. You can use this information to ensure that you have the latest version of software installed on your HomePod.
Does the HomePod Mini Automatically Update?
Yes, the HomePod mini can update itself automatically. By default, HomePod mini is set to automatically check for software updates and install them when available. This ensures that your HomePod mini is alwys running the latest software and has access to the latest features and improvements. You can also manually check for updates by going to your device’s Settings menu in the Home app.
Updating a Mini Pod
To update your HomePod mini, make sure that your device is running the latest version of iOS, iPadOS, or macOS. Then, open the Home app on your iPhone, iPad, iPod touch, or Mac. Select the HomePod mini to turn automatic updates on or off. If automatic updates are enabled, your HomePod mini will be updated whenevr new software becomes available. If you’d like to manually update your HomePod mini to the latest version you can select Software Update from the bottom of the settings page for your HomePod mini in the Home app.

Source: macobserver.com
Update Time for HomePod
It takes roughly 10 minutes for the HomePod to update. During this time, the speaker will be unusable and the top of the HomePod will display an animated white ring. Once the lights go away, your HomePod is updated and ready to use with AirPlay 2.
Troubleshooting HomePod Not Responding
If your HomePod is not responding, the first thing to do is to make sure it is turned on. If this doesn’t work, check your Wi-Fi connection. You should also ensure that the ‘Listen for Hey Siri’ feature is enabled in the Home app. After this, you should check for any alerts in the Home app and restart your HomePod if necessary. You may also try removing and re-pairing the HomePod with the Home app, as well as updating and resetting it if needed. If these steps don’t work, you can contact Apple Support for further assistance.
Accessing HomePod Settings
To access the settings for your HomePod Mini, open the Home app on your iOS device and long-press on the HomePod tile. Scroll down past the now playing screen and you’ll find all of the settings you can adjust. Here you can block explicit music, adjust Siri’s listening sensitivity, and customize other settings to tailor it to your liking.
Updating HomePod Mini WIFI
To update your HomePod mini Wi-Fi, you’ll need to open the Home app on your iOS or iPadOS device. Once you’ve opened the app, tap , then tap Home Settings. From here, select Software Update and then follow the on-screen instructions to install any available updates. If you’d like to have your HomePod mini automatically install software updates when they beome available, you can turn on Install Updates Automatically in the same menu.
Connecting HomePod to WIFI
To connect your HomePod to your Wi-Fi network, first make sure that your device is in the same room as HomePod. Then open the Home app on your iPhone, iPad, or iPod touch and tap the Add Accessory button. Tap Don’t Have a Code or Can’t Scan. Follow the onscreen instructions and select your Wi-Fi network from the list of available networks. Enter the password for your Wi-Fi network when prompted, and then tap Join. HomePod will then connect to your Wi-Fi network, and you’ll be ready to start using it.
Forcing HomePod Mini to Update
In order to force your HomePod mini to update, you’ll need to open the Home app on your iOS device. Once the app is open, tap the House icon, then select Home Settings followed by Software Update. After that, follow the onscreen prompts and set your HomePod updates to automatically install by moving the HomePod slider to on/green. Once this is done, your HomePod mini will automatically update wheneer a new version of software is available.

Source: support.apple.com
Accessing HomePod Settings on an iPhone
The HomePod settings can be found on your iPhone by opening the Home app. Once you open the app, you will see a main page that says “My Home” or “[Your Name]’s Home,” with eithr a series of icons or just the HomePod icon if it’s your only HomeKit device. To access the HomePod settings, 3D Touch or long press on the HomePod icon and then tap “Details.” From there, you will be able to adjust your HomePod’s settings.
Troubleshooting HomePod Wi-Fi Connection Issues
There are a few possible reasons why your HomePod might not be connecting to Wi-Fi. The most common causes are that the signal strength is poor, you recently changed your Wi-Fi password, or you moved HomePod mini or HomePod to a new location. To fix this issue, try moving your HomePod closer to your router, and wait a few seconds before asking Siri a question to see if it is connected. If the issue persists, you may need to reset your HomePod or contact Apple Support for further assistance.
Conclusion
Updating your HomePod is quick and easy. All you need to do is make sure your HomePod is connected to the same Wi-Fi network as your iPhone, iPad, or iPod touch. After that, open the Home app on your device and select the HomePod icon in the upper left-hand corner. From there, you can choose “Software Update”. If an update is available, it will appear on the screen with instructions for how to install it. Once you’ve followd the instructions, your HomePod will be running on the latest software version. With regular updates, you can keep enjoying all of its great features like sound quality and voice control!


