Guided Access is a feature available on iOS devices that allows users to limit access to teir device, keeping users within the app they have chosen. This can be useful for parents with children who use their device as it prevents them from accessing other apps or content they should not be viewing. It can also be used in educational settings where teachers need to limit the use of an iPad to a specific app for lesson purposes.
To enable Guided Access, open the Settings app on your device and select ‘General’. Scroll down and tap ‘Accessibility’, then tap ‘Guided Access’. Here you will see the toggle switch which you shoud move to ‘On’ in order to activate Guided Access.
Once activated, you are able to set up a passcode so that only you are able to exit Guided Access when it has been enabled on an app. You can do this by tapping the ‘Set Guided Access Passcode’ option and folowing the instructions given.
Now that you have successfully enabled Guided Access, you must enter into the app that you would like to limit access to using Guided Access. Once inside the app, triple click on your Home button (or Side/Top button depending on your device) and a menu will appear with several options including Start, Options and End. Tap Start in order to begin limiting access within this particular app.
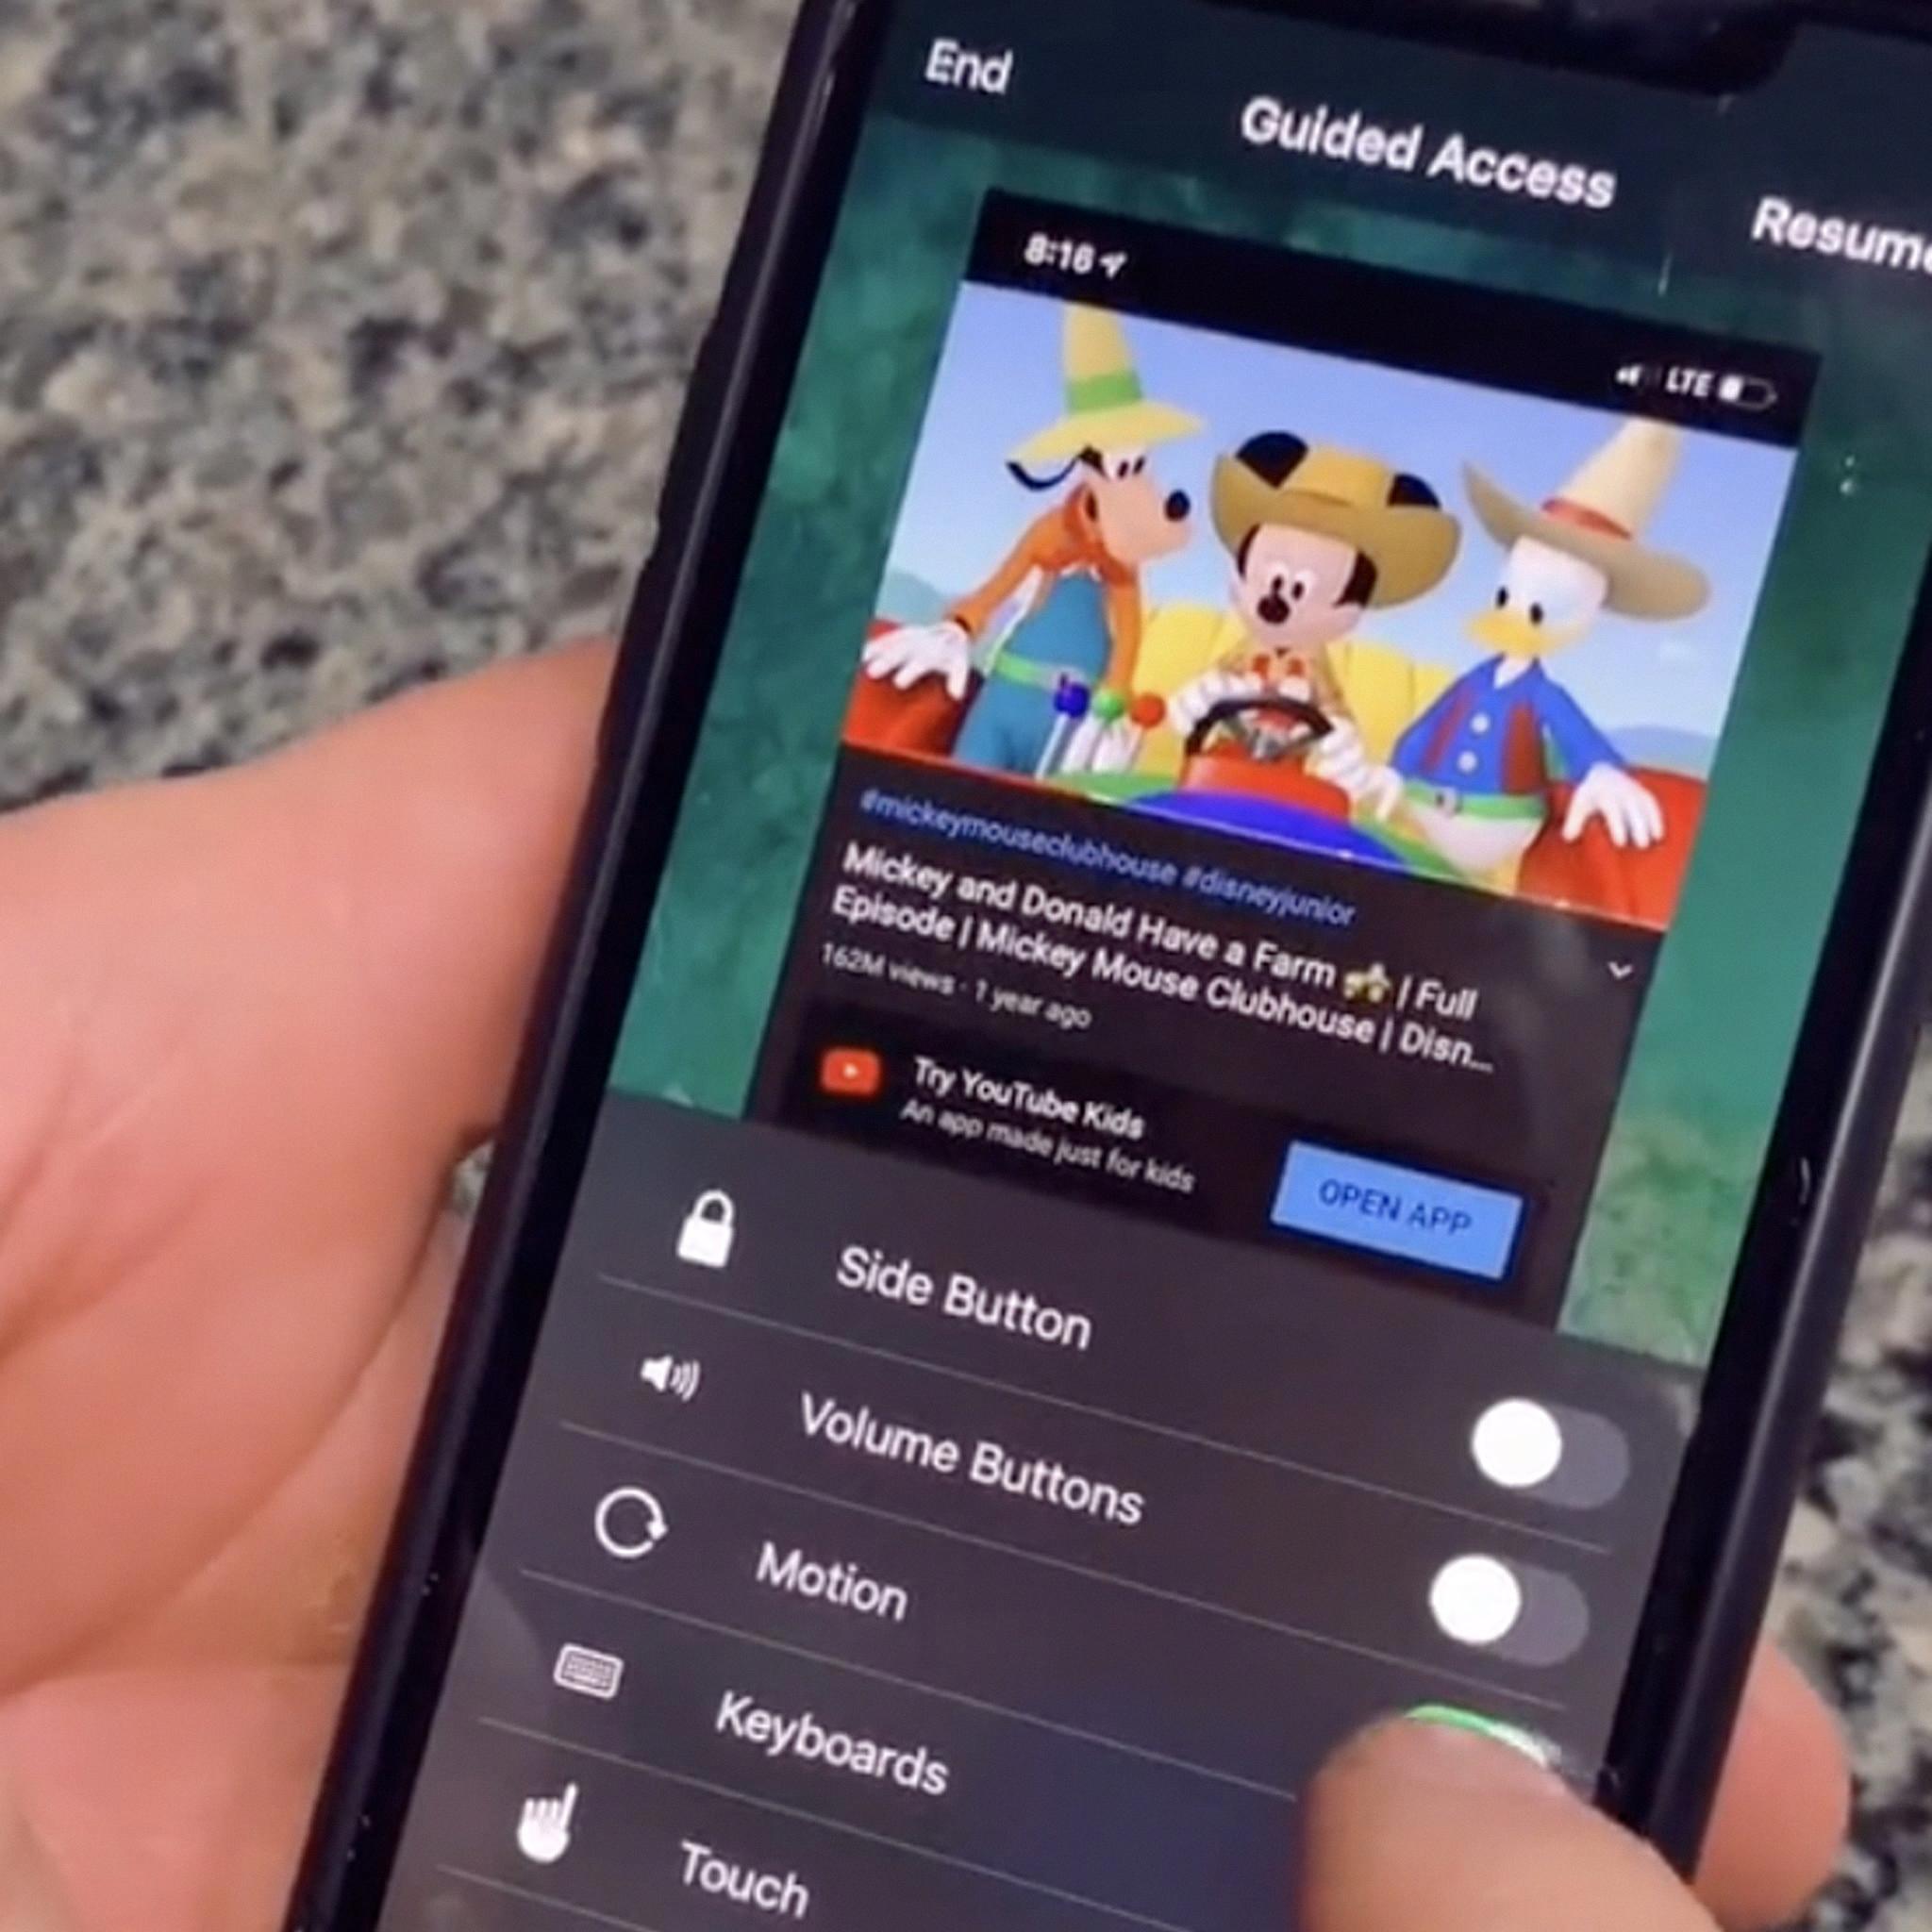
You can now adjust various settings by tapping Options and then adjusting any of the available settings such as time limits or disabling certain buttons or areas of the screen which cannot be accessed while in Guided Access mode. When finished adjusting these settings, tap Done at the top left of your screen and then tap Start again at the bottom of your screen to exit back into your app with all of these changes now applied.
To end or disable guided access for this particular app simply triple click your Home button again (or Side/Top button depending on your device) and then tap End at the top right corner of your screen before entering in your passcode when prompted.
By follwing these steps you should now have successfully enabled and used guided access on an iOS device – enjoy!
Enabling Guided Access Mode
Guided Access mode is a feature available on Android and Samsung devices which allows you to lock your device into a single app, restricting access to other features and settings. To enable Guided Access mode on your device, frst you’ll need to go to your device’s MDM console. From there, click on the Device Mgmt tab and select Profiles from the left pane. From here navigate to Create Profile->Android and provide the name and description for the profile, then click Continue. Next, select Kiosk from the left pane and select Guided Access from within it. Finally, toggle the switch at the top of this page which reads “Enable guided access” so that it is turned On. Once this is done, your device will be locked into Guided Access mode.

Source: 42gears.com
Enabling Guided Access on an iPhone
To force your iPhone to turn on Guided Access, fist go to Settings > General > Accessibility > Guided Access. Then, toggle the switch to enable it. Once enabled, you can tap the Settings button in the top right corner of the screen and configure the options for using Guided Access. After setting up Guided Access, triple click the Home button on your device to enter Guided Access mode. You’ll be prompted with a passcode screen, which will allow you to set a passcode that enables or disables access to certain features on your device. Once this is done, you can go back and triple click Home again to exit out of Guided Access and use your device as normal.
Enabling Guided Access for Children
To turn on Guided Access for your child, start by opening the Settings app on your ?iPhone? or ?iPad?. Then tap Accessibility and scroll down to “General”. Tap Guided Access and move the switch next to it to the green ON position. This will reveal additional options that you can customize, such as setting a time limit, disabling certain areas of the screen, and more. Once you’ve made your changes, press the Home button thee times to activate Guided Access.
Troubleshooting Guided Access on iPhone
Guided Access on an iPhone may not be working because it hasn’t been properly enabled. To enable Guided Access, open the Settings app, tap on ‘General’, then select ‘Accessibility’ and choose ‘Guided Access’. Make sure to turn on the Accessibility Shortcut as well. After enabling this feature, you can then triple-click the home button to activate Guided Access when you are in the app that you want to restrict access to. If Guided Access is still not working, try restarting your phone or reinstalling the app that isn’t working correctly.
Troubleshooting Guided Access Issues
Guided Access is not working because it may be disabled in the Settings app, or due to a software conflict with another app. To check if Guided Access is enabled, go to Settings > General > Accessibility > Guided Access and make sure it is turned on. If it is alreay enabled and still not working, then check if there are any recently installed apps that could be conflicting with Guided Access. If so, try uninstalling them and see if that resolves the problem.
Source: popsugar.com
Exploring the Benefits of IPhone Guided Access
IPhone Guided Access is a feature that allows you to temporarily restrict your iPhone to a single app, and control which app features are available. It helps you stay focused on a task by disabling areas of the screen that aren’t relevant to the task or where an accidental gesture might cause a distraction. This feature is useful for people with learning and attention difficulties, allowing them to stay focused on a task without getting distracted.
Understanding Guided Access
Guided Access is a feature designed to help people with disabilities, such as those with autism, focus and remain on task. When enabled, Guided Access limits an iOS device to a single app and allows you to control which features are available within that app. You can also set a passcode so no one can exit the application witout your permission.
To enable Guided Access, open Settings > General > Accessibility > Guided Access and turn it on. Then open the app you want to use and triple-click the Home button to activate it. Once activated, you can use the options available in the Guided Access menu to limit access to certain parts of the app or disable certain hardware buttons like Sleep/Wake or Volume. You can also set up a time limit for how long someone can use the app befoe they are automatically logged out. When you’re finished using Guided Access, triple-click the Home button again and enter your passcode or Touch ID (if enabled) to exit out of it.
Turning Off Guided Access on an iPhone
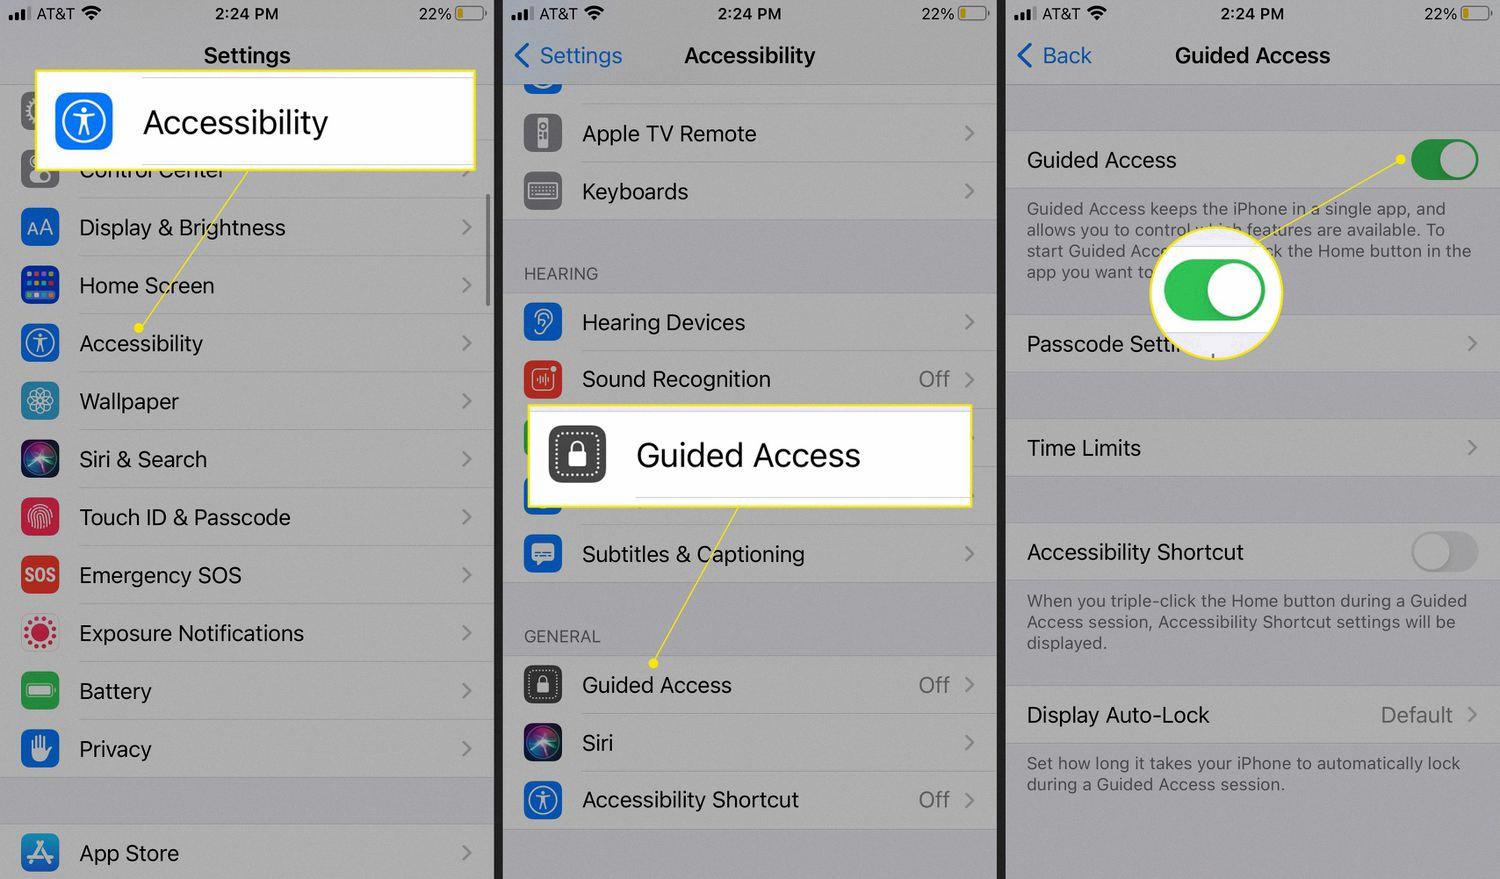
To turn off Guided Access on your iPhone, start by opening the Settings app. Then go to Accessibility, and tap on Guided Access. Here you will see a switch that can be used to turn Guided Access on or off. To disable it, just tap the switch and it will be turned off. If you set a passcode for Guided Access previously, you may also need to enter it befoe disabling it.
Does the iPhone Feature Guided Access?
Yes, iPhone does have a feature called Guided Access. This feature allows you to limit your device to a single app and control which features are available. You can turn on Guided Access any time you need to prevent accidental gestures or when you want to let a child use your device.
Source: lifewire.com
Unlocking an iPhone Stuck on Guided Access
To unlock an iPhone that is stuck on guided access, you will need to take one of the folloing actions.
1. Use the Triple-Click Shortcut: To exit guided access mode, you can use the triple-click shortcut by quickly pressing the Home button three times. This will bring up a menu whre you can enter your passcode to turn off the mode.
2. Force Restart iPhone and Turn Off Guided Access: You can also force restart your iPhone by pressing and holding both the Home button and Sleep/Wake button at the same time until you see the Apple logo appear on the screen. Once it restarts, enter your passcode to turn off guided access mode.
3. Use iCloud Lost Mode: If you have enabled iCloud lost mode, you can remotely disable guided access through iCloud’s Find My feature. Log into your iCloud account using any device, select “Find My” and enter your device information to turn off guided access remotely.
4. Ask Someone With Access to Your Device: If someone else has access to your device, they should be able to enter their own passcode or password in order to turn off guided access mode for you.
5. Restore Device from Backup: The last resort is to restore your device from a backup that was taken before being put in guided access mode in order to reset it completely and get out of this mode permanently.
Starting Guided Access on iPad Pro
To start Guided Access on iPad Pro, firt go to Settings > Accessibility > Guided Access. Toggle the switch to turn it on. You can then adjust the settings to create a passcode (or set up Face ID or Touch ID) that will be used to end a Guided Access session. Once you have finished setting everything up, press the Home button three times quickly to activate Guided Access.
Does the iPhone Have a Child Lock Feature?
Yes, there is a child lock on iPhone. It is called Screen Time and it can be found in the Settings app. With Screen Time you can set Content & Privacy Restrictions that help you manage which apps, features, and content your child can access on their device. You can also set Web Content restrictions to limit access to adult websites or restrict your child to only allowed websites.
Enabling Guided Access on iPhone 12
To enable Guided Access on an iPhone 12, open the Accessibility Settings: from the Home screen, go to Settings > General > Accessibility. Scroll to the bottom of the page and select ‘Learning’. Tap on ‘Guided Access’ and then tap the toggle switch next to ‘Guided Access’ to turn it on. Once enabled, you will be able to use Guided Access on your iPhone 12.
Duration of Guided Access
Guided Access lasts for as long as you have it enabled. If the Mirror Display Auto-Lock setting is turned on, then the Guided Access session will end when the Auto-Lock time on Display & Brightness is reached. If Mirror Display Auto-Lock is not turned on, then Guided Access will end ater 20 minutes of inactivity.
Troubleshooting Guided Access on a Mobile Device
Answer: It sounds like your iPhone is stuck on Guided Access mode, which is a feature designed to help users with disabilities stay focused on a single app and limit access to other apps. This usually happens when the Guided Access feature was accidentally enabled and the passcode used to exit the feature was forgotten. To solve this issue, you can try restarting your device or accessing your device’s Settings->Accessibility->Guided Access menu to change the passcode. If you are still having trouble, please contact Apple Support for further assistance.
Enabling Guided Access on iPhone 13
To get Guided Access on your iPhone 13, open the Settings app, select Accessibility from the list, and scroll to the bottom. On the Accessibility screen, select Guided Access and then set the toggle switch to On. This will enable Guided Access so you can lock your device into a single app or some features of it.
What is the Guided Access Passcode?
Guided Access passcode is a 6-digit code that is required to turn off Guided Access mode. This passcode must be set up when enabling Guided Access for an iPhone or iPad. It acts as a security measure to make sure that your child cannot access any other apps or content whie using the device in Guided Access mode. You can also use Face ID or Touch ID to disable Guided Access if you prefer.
Changing Guided Access Settings
To change guided access settings, you first need to ensure that Guided Access is turned on. To do this, go to Settings > General > Accessibility and toggle Guided Access on.
Once you have enabled Guided Access, open the app you want to use and triple press the side button (on the riht side of the phone). You will be prompted to set a passcode for Guided Access. Use your finger to circle areas of the screen that you want to disable and tap the switch(es) to turn them on or off. When you are finished, tap Start in the upper-right corner of the screen.
Restricting a Child’s Phone Usage
Step 1: Open the Google Play app on your child’s phone.
Step 2: At the top right, tap the profile icon.
Step 3: Tap Settings, then tap Family.
Step 4: Select Parental controls and turn them on.
Step 5: To protect the parental controls, create a PIN that your child doesn’t know.
Step 6: Select the type of content you want to filter (e.g., age-restricted content, apps and games, etc.).
Step 7: Choose how to filter or restrict access (e.g., alow only specific apps, block inappropriate websites, etc.).
Conclusion
Guided Access is a feature of Apple’s iOS that enables parents and teachers to limit the use of an iOS device to a single app, making it easier to help children focus on learning one thing at a time. It has several useul features, such as allowing users to disable areas of the screen, restrict touch input on certain areas, set time limits for usage, and prevent access to certain sections of an App. Guided Access also allows users to password protect settings, making it more secure. By using Guided Access, parents and teachers can ensure that children are not distracted by other apps or features while they focus on completing their tasks. Additionally, this feature helps provide an environment where children can safely explore different apps and learn at their own pace. Overall, Guided Access is a great tool for parents and educators who want to give children focused learning experiences while keeping them safe online.

