The Mac operating system is known for its user-friendly interface and plethora of useful features. One such feature is the ability to capture screenshots effortlessly. Whether you want to capture a portion of the screen or the entire screen, Mac provides various options to meet your needs. However, sometimes you may want to trim or resize the screenshot to focus on a specific area or reduce its size. In this article, we will explore how to trim a screenshot on Mac and make the necessary adjustments using the Preview app.
To begin, open the Preview app on your Mac and navigate to the file you want to modify. If you have just taken a screenshot, it will automatically open in Preview. If not, simply locate the screenshot file and open it in Preview.
Once the file is open, go to the top menu and select “Tools.” From the drop-down menu, choose “Adjust Size.” This will open a new window where you can make adjustments to the screenshot’s dimensions.
In the Adjust Size window, you will see various options to modify the screenshot. The most important setting for trimming the screenshot is the Resolution field. By entering a smaller value in this field, you can reduce the size of the image.
It’s important to note that when you reduce the resolution, the image quality may be affected. Therefore, it is recommended to find a balance between size reduction and maintaining decent image quality. Experiment with different values until you achieve the desired result.
Once you have made the necessary adjustments, click on the “OK” button to apply the changes. You will notice that the new size of the image is displayed at the bottom of the window.
Now that you have resized the screenshot, you may want to trim it further to focus on a specific area. To do this, go to the top menu and select “Tools” once again. From the drop-down menu, choose “Rectangular Selection.”
A crosshair cursor will appear, allowing you to drag and select the area you want to keep. Simply click and drag the cursor to create a rectangle around the desired portion of the screenshot. If you need to move the selection, press and hold the space bar while dragging.
Once you have selected the area, go to the top menu and choose “Edit.” From the drop-down menu, select “Crop.” This will remove everything outside the selected area, leaving you with a trimmed screenshot.
If you are satisfied with the result, you can save the trimmed screenshot by going to the top menu and selecting “File.” From there, choose “Save” and select the desired file format and location.
Trimming a screenshot on Mac is a simple and effective way to focus on specific details or reduce the image size. By using the built-in Preview app, you can easily make the necessary adjustments to meet your requirements. So whether you need to highlight a particular area or reduce the file size for sharing, Mac provides all the tools you need to trim your screenshots with ease.

How Do You Cut Part Of A Screenshot On a Mac?
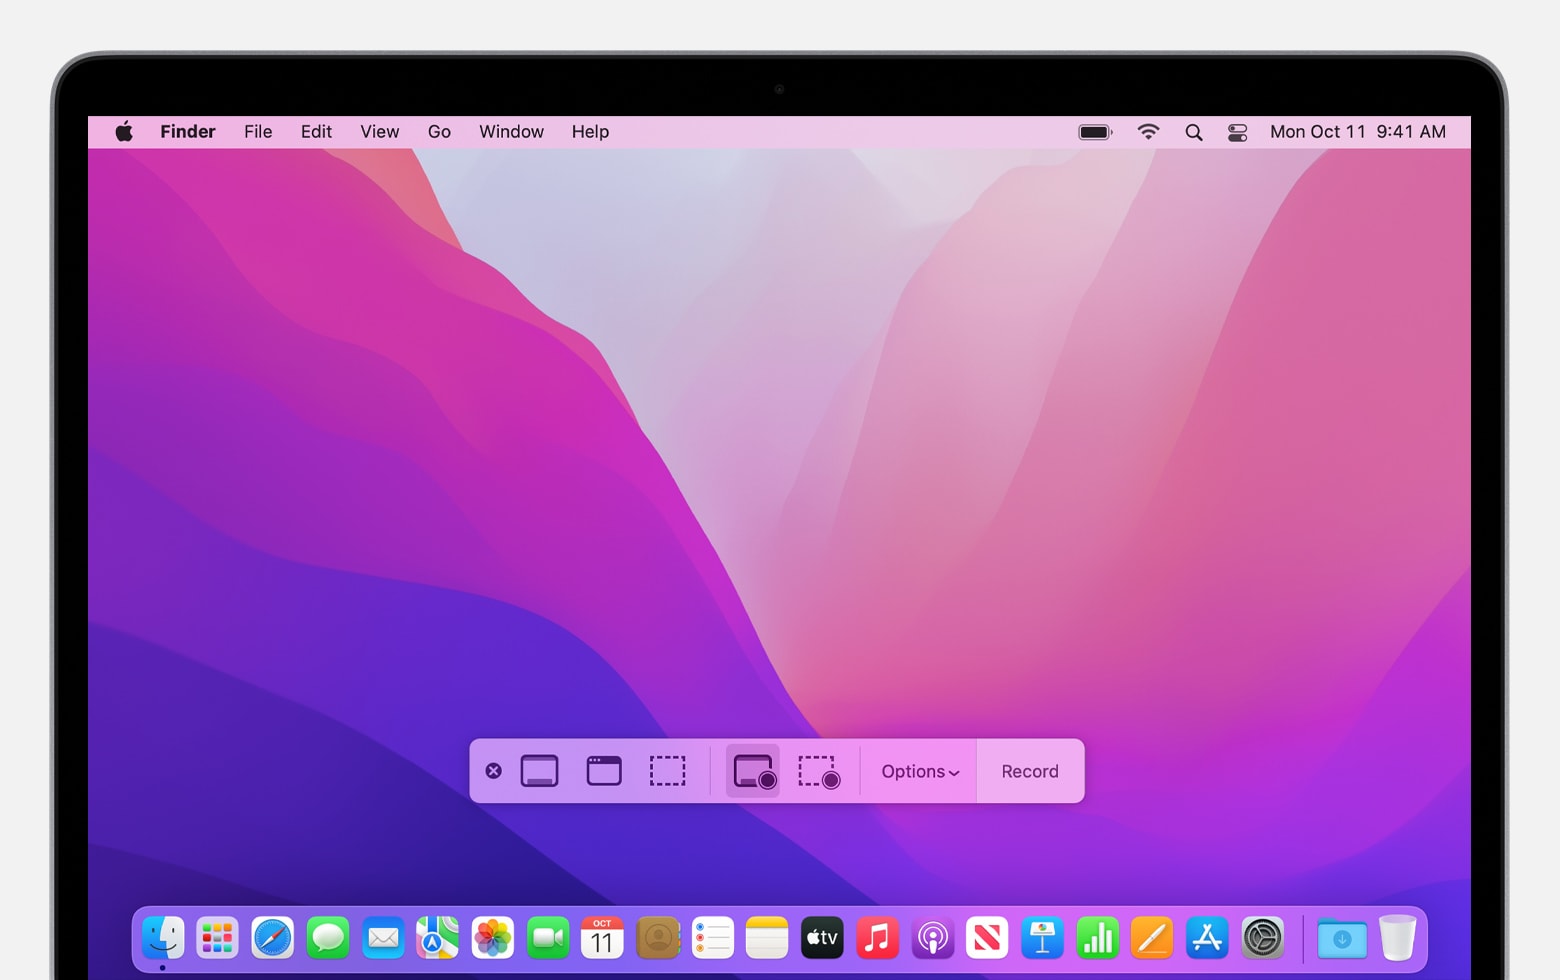
To capture a specific portion of your screen on a Mac, follow these step-by-step instructions:
1. Press and hold the Shift, Command, and 4 keys simultaneously on your keyboard.
2. You will notice that your cursor changes to a crosshair symbol.
3. Click and drag the crosshair to select the area of the screen that you want to capture. As you drag, you will see the dimensions of the selected area displayed.
4. If you need to adjust the position of the selected area, press and hold the Space bar. While holding the Space bar, you can move the selected area by dragging it to your desired location.
5. Once you have selected the desired portion of the screen, release the mouse button or trackpad to capture the screenshot.
6. The captured screenshot will be saved as a file on your desktop with a default filename starting with “Screen Shot” followed by the date and time of capture.
By following these steps, you can easily capture and save a specific portion of your screen on a Mac for various purposes such as documentation, sharing information, or troubleshooting.
How Do You Trim a Screenshot?
To trim a screenshot, you can follow these steps:
1. Capture the screenshot: Press the Print Screen (PrtScn) key on your keyboard. This will copy the entire screen to your clipboard.
2. Open an image editor: You can use software like Microsoft Paint, Adobe Photoshop, or any other image editing tool you have installed on your computer.
3. Paste the screenshot: Open the image editor and paste the screenshot from your clipboard. You can do this by pressing Ctrl + V or right-clicking and selecting Paste.
4. Crop the image: Look for the “Crop” tool or option in your image editor. It is usually represented by a square or rectangle icon. Click on it to activate the cropping feature.
5. Select the area to be trimmed: Click and drag your cursor to select the specific area you want to keep in your screenshot. You can adjust the selection by dragging the corners or edges of the selection box.
6. Remove the unwanted area: Once you have selected the desired area, press the Delete or Cut button on your keyboard, or look for the “Delete” or “Cut” option in the image editing software’s menu. This will remove the unwanted area from your screenshot.
7. Save the trimmed screenshot: After removing the unwanted area, save the trimmed screenshot. Go to File > Save or use the keyboard shortcut Ctrl + S. Choose a location on your computer to save the file, and select a suitable file format such as PNG or JPEG.
8. Optional: Make further edits or adjustments: If needed, you can make additional edits to the trimmed screenshot, such as resizing, adding annotations, or applying filters. Most image editing software provides various tools and options to enhance your screenshot.
By following these steps, you can easily trim a screenshot to focus on the specific area you want to highlight or share.
How Do You Edit Screenshots on Macbook?
To edit screenshots on a MacBook, follow these steps:
1. Locate the screenshot you want to edit. It should be saved on your desktop by default unless you specified a different location.
2. Double-click on the screenshot to open it in the Preview app. Alternatively, you can open the Preview app first and then go to File > Open to locate and open the screenshot.
3. Once the screenshot is opened in Preview, you can use various editing tools and features to make changes to it. Here are some of the editing options available:
– Crop: Use the Crop tool to select and remove unwanted portions of the screenshot. Click and drag to create a selection, and then go to Tools > Crop or press Command + K.
– Adjust colors and exposure: Go to Tools > Adjust Color to access options for adjusting brightness, contrast, saturation, and other color settings.
– Annotate and highlight: Use the Markup toolbar, which can be accessed by clicking the toolbox icon in the top-right corner of the Preview window. It provides a range of tools for adding text, arrows, shapes, and highlights to your screenshot.
– Add text: Click on the “Aa” button in the Markup toolbar to add text to your screenshot. You can customize the font, size, color, and alignment of the text.
– Rotate and flip: If your screenshot needs to be rotated or flipped, go to Tools > Rotate Left, Rotate Right, Flip Horizontal, or Flip Vertical.
– Resize: To change the size of your screenshot, go to Tools > Adjust Size. Here you can specify the dimensions and resolution of the image.
4. After making the desired edits, go to File > Save or press Command + S to save the edited screenshot. You can choose a different file format if needed, such as JPEG, PNG, or PDF.
Remember to save your edited screenshot as a new file, so you don’t overwrite the original screenshot.
Editing screenshots on a MacBook is a straightforward process using the built-in Preview app, which offers a range of editing options to enhance and modify your screenshots.
How Do You Take a Screenshot On Mac And Make It Smaller?
To capture a screenshot on a Mac and subsequently reduce its size, you can follow these steps:
1. Find the content you want to capture on your screen.
2. Press the “Command” (⌘), “Shift” (⇧), and “3” keys simultaneously. This will capture the entire screen.
3. Locate the screenshot thumbnail that appears in the bottom-right corner of your screen. Click on it to open the screenshot in the Preview app.
4. Once the screenshot is open, go to the “File” menu and select “Export”.
5. In the Export dialog box, choose a location to save the file and select a desired format such as JPEG or PNG.
6. Before saving, you can adjust the size of the screenshot to make it smaller. To do this, go to the “Tools” menu and select “Adjust Size”.
7. In the Adjust Size dialog box, make sure the “Resample image” option is selected.
8. Locate the “Resolution” field and enter a smaller value to decrease the size of the screenshot. The new size will be displayed at the bottom.
9. After adjusting the size, click on the “OK” button to apply the changes.
10. click on the “Save” button to save the resized screenshot to your desired location.
By following these steps, you can easily capture a screenshot on your Mac and reduce its size using the Preview app.
Conclusion
Capturing a portion of the screen on a Mac is a simple and straightforward process. By pressing and holding the Shift, Command, and 4 keys together, you can activate the crosshair tool to select the area you want to capture. You can also use the Space bar to move the selection if needed. Additionally, pressing the Print Screen key will capture the image of your screen and copy it to the clipboard.
For Windows users, the combination of Windows + PrtScn allows you to capture the entire screen. You can then paste the screenshot into programs like Paint or other image editors to edit and save it.
On Android phones, taking a screenshot is as easy as pressing and holding the Power and Volume Down buttons simultaneously. Once you have captured the screenshot, you can tap on the preview or hit the “Edit” button to access the editing options.
If you are using a Mac and need to make adjustments to the size of a file, you can use the Preview app. Simply open the file, go to Tools > Adjust Size, and select “Resample image.” Here, you can enter a smaller value in the Resolution field to reduce the size of the image.
Capturing and adjusting screenshots on Mac, Windows, and Android devices can be done quickly and efficiently. These features are handy for various purposes, including sharing information, troubleshooting, and creating visual content.


