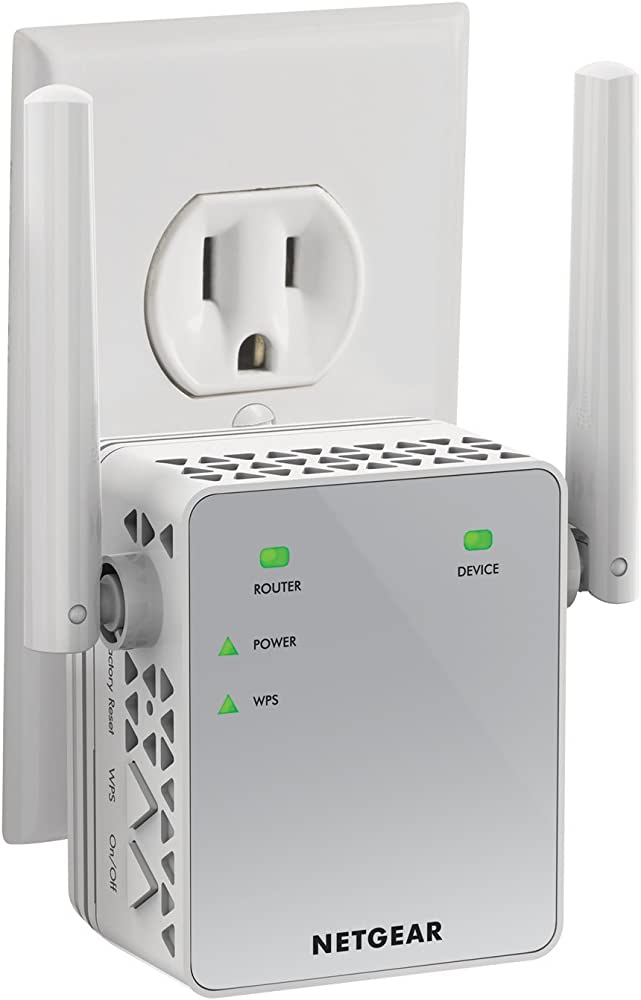
Netgear WiFi extender is a device that is designed to extend the coverage of your existing wireless network. It is a powerful solution that eliminates dead zones and improves the overall wireless coverage in your home or office. In this article, we will discuss how to set up a Netgear WiFi extender and get it up and running in no time.
Step 1: Plug in the Extender
The first step is to plug in the Netgear WiFi extender halfway between your hub/router and the area you wish to extend WiFi to. After plugging it in, give the extender 20 seconds to boot up. The range lights will scroll up and down while it searches and connects to your router. After about 30 seconds, the flashing will stop, and the signal quality will be shown.
Step 2: Perform a Network Power Cycle
Perform a network power cycle by rebooting your main router and extender. Reconnect to the default WiFi network of your NETGEAR extender. Open the web browser and re-run the NETGEAR extender setup wizard.
Step 3: Choose the Admin Credentials
Click or tap NEW EXTENDER SETUP. Choose your extender’s admin credentials. Select and answer two security questions from the drop-down menus.
Step 4: Connect Your Device to the Extender’s WiFi Network
Connect your computer or mobile device to the extender’s WiFi network. Launch a web browser and enter mywifiext.net or 192.168.
Step 5: Set up the Netgear WiFi Extender
Choose the WiFi network you want to extend and click the NEXT button. Enter the password for your existing WiFi network and click the NEXT button. You can also change the SSID and password for the extender’s network. Follow the on-screen instructions to complete the setup process.
Step 6: Place the Extender in the Desired Location
After setting up the extender, place it in the desired location. The best location for the extender is halfway between your hub/router and the area you wish to extend WiFi to. The extender should be placed in an open area, free from obstructions such as walls and furniture.
Setting up a Netgear WiFi extender is a simple and straightforward process. By following the above steps, you can extend the coverage of your existing WiFi network and eliminate dead zones in your home or office. It is important to place the extender in the right location for optimal performance. With the Netgear WiFi extender, you can enjoy seamless WiFi connectivity throughout your home or office.

Setting Up a Netgear WiFi Extender
To set up your Netgear WiFi extender, you need to follow the below steps:
1. Plug in your extender and wait for the power LED to turn green.
2. Connect your computer or mobile device to the extender’s WiFi network. This network name will be the same as your existing WiFi network, but with “_EXT” at the end of it.
3. Launch a web browser on your device and enter mywifiext.net or 192.168.1.250 in the URL bar.
4. You will be directed to the Netgear Genie setup page. Click or tap on “NEW EXTENDER SETUP.”
5. You will be prompted to enter your extender’s admin credentials. If you have not set up your admin credentials yet, use the default username and password (admin and password, respectively).
6. Select and answer two security questions from the drop-down menus. These questions will be used to recover your password in case you forget it.
7. Choose the WiFi network that you want to extend and enter its password.
8. Follow the instructions on the screen to complete the setup process.
By following the above steps, you can set up your Netgear WiFi extender and enjoy a stronger and wider WiFi network coverage in your home or office.
Connecting a WiFi Extender to a Router
To connect your WiFi extender to your router, follow these steps:
1. Plug the extender into a power outlet halfway between your router and the area where you want to extend your WiFi coverage.
2. Wait for about 20 seconds for the extender to boot up. During this time, the range lights on the extender will start scrolling up and down as it searches for and connects to your router.
3. Once the extender has been connected to your router, the range lights will stop flashing, and the signal quality will be displayed.
4. To complete the setup, you will need to connect a device to the extender’s network. You can do this by searching for available WiFi networks on your device and selecting the network name that starts with “EXTENDER.”
5. Once you are connected to the extender’s network, open a web browser and follow the instructions provided to complete the setup process.
6. Once the setup is complete, your device will automatically connect to the strongest WiFi signal available, whether it’s from your router or your extender.
By following these steps, you can easily connect your WiFi extender to your router and enjoy extended WiFi coverage throughout your home or office.
Troubleshooting Netgear Extender Connection Issues
If your NETGEAR extender is not connecting to the internet, there could be several reasons behind it. Some of the possible causes are:
1. Incorrect WiFi Password: If you have recently changed your WiFi password or entered it incorrectly while setting up the extender, it will not be able to connect to the internet. Make sure you enter the correct password for your WiFi network.
2. Poor WiFi Signal: If your extender is located too far from the main router, it may not receive a strong enough WiFi signal to connect to the internet. Try moving the extender closer to the router.
3. Outdated Firmware: If your extender’s firmware is outdated, it may not be able to connect to the internet. Check for any available firmware updates and install them.
4. Network Congestion: If there are too many devices connected to your WiFi network, it may cause network congestion, which can prevent the extender from connecting to the internet. Disconnect any unused devices or consider upgrading your internet plan.
5. Extender Configuration Issues: If there are any configuration issues with your extender, it may not be able to connect to the internet. Try resetting the extender to its default factory settings and reconfigure it.
In order to resolve the issue of your NETGEAR extender not connecting to the internet, you can try rebooting your main router and extender, reconnect to the default WiFi network of your NETGEAR extender, open the web browser and re-run the NETGEAR extender setup wizard. If the issue persists, reset the extender back to the default factory settings.
Connecting a Netgear WiFi Extender to Ethernet
To connect your Netgear WiFi extender to Ethernet, you can follow the below steps:
1. Locate the Access Point/Extender switch on your extender and set it to Access Point mode.
2. Take an Ethernet cable and connect one end to the extender’s Ethernet port.
3. Connect the other end of the Ethernet cable to a LAN port on the back of your router.
4. Plug your extender into an electrical outlet and wait for the power LED to light up.
5. Once the power LED is lit, you can connect to the extender’s wireless network using a device that supports WiFi.
6. Open a web browser on your device and enter the extender’s IP address in the URL field.
7. Enter the login credentials for your extender to access its settings.
8. Navigate to the ‘Network’ settings and select ‘WiFi’ as the connection type.
9. Enter your existing WiFi network’s name (SSID) and password.
10. Click ‘Apply’ to save the changes.
Your Netgear WiFi extender is now connected to Ethernet and ready to use. You can place it in a location where you need better WiFi coverage and enjoy a stronger and more reliable connection.
Conclusion
The Netgear WiFi Extender is a reliable and efficient solution for extending the range of your home or office wireless network. Its easy setup process, which involves connecting to the extender’s WiFi network, launching a web browser, and following the on-screen instructions, makes it accessible to even those with little technical knowledge. Additionally, the extender’s range lights and signal quality indicators allow you to position it in the optimal location for maximum coverage. If you encounter any issues during setup or use, resetting the extender to its default factory settings and connecting it via an Ethernet cable to your router can help resolve the problem. the Netgear WiFi Extender is a great investment for anyone looking to improve their wireless network coverage and performance.


