Are you a proud iPhone user looking to share your photos on Instagram? Resizing photos for social media can be tricky, but with the right tools, it doesn’t have to be a challenge. In this blog post, we’ll show you how to resize photos on your iPhone so they look great on Instagram.
When it comes to sharing your photos on Instagram, there are certain image requirements that you’ll need to meet. This includes aspect ratios, file size, and resolution. Here’s what you need to know:
Aspect Ratios: The most common aspect ratio used on Instagram is 1:1 (square) but you can also use 4:5 (portrait) and 1.91:1 (landscape). If your photo does not meet these requirements, it will be cropped automatically when uploaded to Instagram.
File Size & Resolution: For best results, we recommend using an image with a resolution of at least 1080 x 1080 pixels for square images and 1080 x 1350 pixels for portrait images. The maximum file size allowed is 30MB, so if your photo exceeds this limit you will need to reduce its size before uploading it onto Instagram.
Now that you know the requirements for posting images on Instagram, let’s take a look at how you can easily resize your photos using the Photos app on your iPhone.
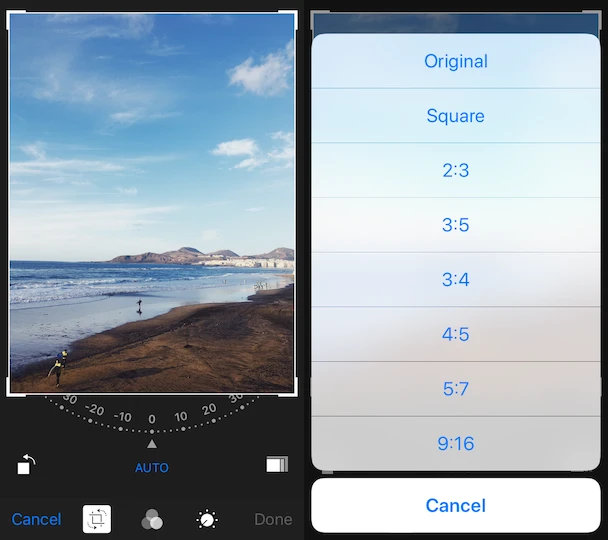
The first step is opening the Photos app and selecting the image that you want to resize or crop. Once selected, tap ‘Edit’ in the top right corner of the screen and select ‘Crop’. You’ll see three options; Original, Freeform, and Square – choose whichever one best suits your photo’s aspect ratio requirements for Instagram. After selecting an option, use two fingers to pinch or expand the image until it fits within the grid lines – this will ensure that all parts of the photo are visible when uploaded onto Instagram.
When satisfied with how it looks, tap ‘Done’ in the top right corner of the screen and then click ‘Save’ in order to save a copy of your edited image into your camera roll – ready for sharing! If needed, you can also reduce its resolution by tapping ‘Adjust’ in the edit menu and sliding down until you reach ‘Size’. Here you can enter new dimensions or reduce its resolution using percentage values like 50% or 25%. Once happy with how everything looks clicks ‘Done’ once again and select ‘Save’, as before.
And there you have it – now you know how easy it is to resize and crop images for Instagram directly from your iPhone! All that’s left now is logging into Instagram so that you can start sharing those beautiful photos with friends and family!
Making an Entire Picture Fit on Instagram
In order to make your whole picture fit on Instagram, you will need to click on the expand arrows in the lower left corner of the image or pinch the image with two fingers when it is displayed in the Instagram app. This will allow you to adjust and resize the picture so that it fits within Instagram’s square crop. Once you have adjusted the size of your picture, click ‘Next’ to proceed with uploading your photo.
Resizing Photos on an iPhone
Resizing a photo on your iPhone is easy and can be done in the Photos app. To start, open the photo you want to resize and tap the Edit button at the top right of the screen. You should see a crop icon appear at the bottom. Tap on it to open up the crop tool.
Here you have three different options for resizing your image: Original, Freeform, and Square. Original will keep your image at its original size, Freeform will let you freely adjust your picture’s size and shape, and Square will give you a perfect 1:1 ratio for your image.
Once you’ve made your selection, simply drag from any corner or side of the image to make it larger or smaller until you’re happy with it. When you’re done, tap Done in the top right corner to save your changes and exit out of the crop tool.
If you want to change your image’s resolution as well as its size, you’ll need to use a third-party app like Image Size instead of Photos’ built-in crop tool.
Resizing an Image on Instagram Without Cropping It
To resize an image on Instagram without cropping it, you will need to adjust the dimensions of the image before uploading it. For landscape Instagram posts, the optimal size is 1080 x 608 pixels. To achieve this size, open the image in a photo-editing program such as Photoshop or Gimp, and select “Image Size” under the Image menu. In the settings window that appears, enter 1080 in both the width and height fields and make sure that “Constrain Proportions” is checked. Then click OK to save your changes. For portrait Instagram posts, you need to resize your image to 1080 x 1350 pixels. Follow the same steps as above but set both width and height fields to 1080 and 1350 respectively. Once you have done this, save your changes and upload the resized image onto Instagram!
Resizing Photos on iPhone: Is There an App for That?
Yes, there is an app to resize photos on iPhone. “Resize image” is a free and easy-to-use app that allows you to quickly resize any photo on your iPhone. To use it, simply pick the photo you want to resize, choose a preset size or enter a custom size, and then save or share. With this app, resizing photos is fast and simple!
Locating the Resize Button on an iPhone
The resize button is located in the lower right corner of the photo editing pane when you are cropping a photo. It looks like a square with two arrows circling it. When you tap on this button, it will bring up a selection of aspect ratios to choose from, allowing you to resize your photo accordingly.
Ideal Instagram Photo Size
The ideal Instagram photo size is 1080px by 1080px at a 1:1 aspect ratio. This is the optimal size for square posts, which are the most common type of posts used on Instagram. For landscape posts, the recommended image size is 1080px by 566px, with an aspect ratio of 1.91:1. Vertical images should be sized at 1080px by 1350px with a 4:5 aspect ratio. It is important to remember that all images will be cropped to a square in the feed, regardless of their original size or shape.

