Shared photos are a great way to connect and share memories with your friends and family. However, there may come a time when you want to remove these shared photos from your device. In this article, we will discuss how to remove shared photos on iOS 15.
To begin, let’s take a look at how to delete shared photos from an album. First, open the shared album in the Google Photos app on your Android device. Once you have the album open, tap on the specific photo or video that you wish to delete. Look for the Trash button and tap on it. A prompt will appear asking you to confirm the deletion. Tap on “Delete Photo” to remove the photo from the album.
Now, let’s move on to removing shared photos from the Messages app on your iPhone. Start by opening the Messages app and selecting the conversation with the person or group you’re communicating with. At the top of the conversation, you will see the name of the person or group. Tap on it to access more options. Scroll down until you find the category labeled “Photos” and tap on “See All” to view all the shared photos in that conversation.
To delete specific photos, tap on “Select” and then choose each item you want to remove. Once you have selected all the photos you wish to delete, tap on “Delete” to remove them from the conversation. It’s important to note that deleting shared photos from the Messages app will not delete them from your device’s photo album.
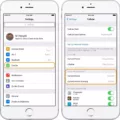
To prevent shared photos from appearing in your photo album, you can adjust a setting on your iPhone. Open the Settings app and scroll down to find the “Messages” option. Tap on it, and then select “Shared with You.” Within this menu, you will find a setting for “Photos.” By turning this setting off, shared photos from Messages will no longer be automatically added to your photo album.
Removing shared photos from your device is a simple process that can be done through the Google Photos app or the Messages app on your Android phone or iPhone, respectively. By following these steps, you can easily manage and delete shared photos to keep your device organized and clutter-free.

How Do You Remove Shared Photos From Your iPhone?
To remove shared photos from your iPhone, follow these steps:
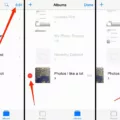
1. Open the shared album on your iPhone.
2. Tap on the specific photo or video that you want to remove.
3. Look for the Trash button, usually located at the bottom or top right corner of the screen, and tap on it.
4. A confirmation prompt will appear asking if you want to delete the photo. Tap on “Delete Photo” to proceed with the removal.
Alternatively, you can also delete multiple shared photos at once by following these steps:
1. Open the shared album on your iPhone.
2. Tap on the “Select” option, usually located at the top right corner of the screen.
3. Tap on each photo or video that you want to remove. Selected items will be highlighted.
4. Once you have selected all the desired photos, look for the Trash button and tap on it.
5. A confirmation prompt will appear asking if you want to delete the selected photos. Tap on “Delete Photos” to proceed with the removal.
By following these steps, you can easily remove shared photos from your iPhone.
How Do You Make Shared Photos Go Away?
To remove shared photos from your Google Photos album, follow these steps on your Android device:
1. Open the Google Photos app. It is usually a colored pinwheel icon.
2. Tap on the “Sharing” tab at the top of the screen. Note: For some users, the “Sharing” tab might be located at the bottom.
3. Select the album containing the shared photos that you want to remove.
4. Tap on the “More Options” button. It is represented by three vertical dots or lines, usually located in the top-right corner of the screen.
5. From the options that appear, choose the “Leave album” option.
6. Confirm your decision by tapping on “Leave” or any similar option that appears.
Following these steps will remove your photos and comments from the shared album, effectively making them go away.
How Do You Permanently Delete Shared Photos on iMessage?
To permanently delete shared photos on iMessage, follow these steps:
1. Open the Messages app on your iPhone.
2. Tap on the name of the person or group you’re communicating with at the top of the conversation.
3. Scroll down to find the category labeled “Photos” and tap on “See All” to view all the shared photos in that conversation.
4. Tap on the “Select” button located at the top right corner of the screen.
5. Now, go through the list of shared photos and tap on each item that you want to delete. A checkmark will appear on the selected items.
6. Once you have selected all the photos you want to delete, tap on the “Delete” button at the bottom right corner of the screen.
7. A confirmation message will appear asking if you want to delete the selected photos. Tap on “Delete” again to confirm the deletion.
By following these steps, the selected shared photos will be permanently deleted from the iMessage conversation.
Why Do Shared Photos Save to Your iPhone?
Shared photos save to your iPhone because of a setting called “Shared with You” in Messages. When this setting is turned on, any photos that are shared with you through messages will be automatically saved to your photo album. This can be convenient if you want to keep a copy of shared photos, but it can also clutter your photo library if you receive a lot of shared photos.
By default, this setting is usually turned on, so any photos that you receive in messages will be saved to your iPhone. However, you have the option to turn this setting off if you prefer not to have shared photos automatically saved to your photo album. This can help keep your photo library more organized and prevent it from being filled with photos that you may not necessarily want to keep.
To turn off the “Shared with You” photos setting, you can follow these steps:
1. Open the Settings app on your iPhone.
2. Scroll down and tap on “Messages”.
3. In the Messages settings, locate the “Shared with You” section.
4. Tap on “Photos” within the “Shared with You” section.
5. Toggle the switch next to “Photos” to the off position.
Once you have turned off this setting, any shared photos that you receive in messages will no longer be automatically saved to your iPhone’s photo album. This gives you more control over which photos get saved to your device and helps keep your photo library more organized.
Conclusion
Shared photos can be easily managed and deleted from various platforms and devices. For Google Photos, simply open the app, go to the Sharing section, select the album, tap on More Options, and choose to leave the album. This action will remove your photos and comments from the shared album. On an iPhone, open the Messages app, select the conversation, scroll down to the Photos category, tap See All, select the photos you want to delete, and tap Delete. Additionally, you can prevent shared photos from appearing in your photo album by turning off the “Shared with You” option in the Messages settings. By following these steps, you can effectively manage and control the shared photos in your digital ecosystem.


