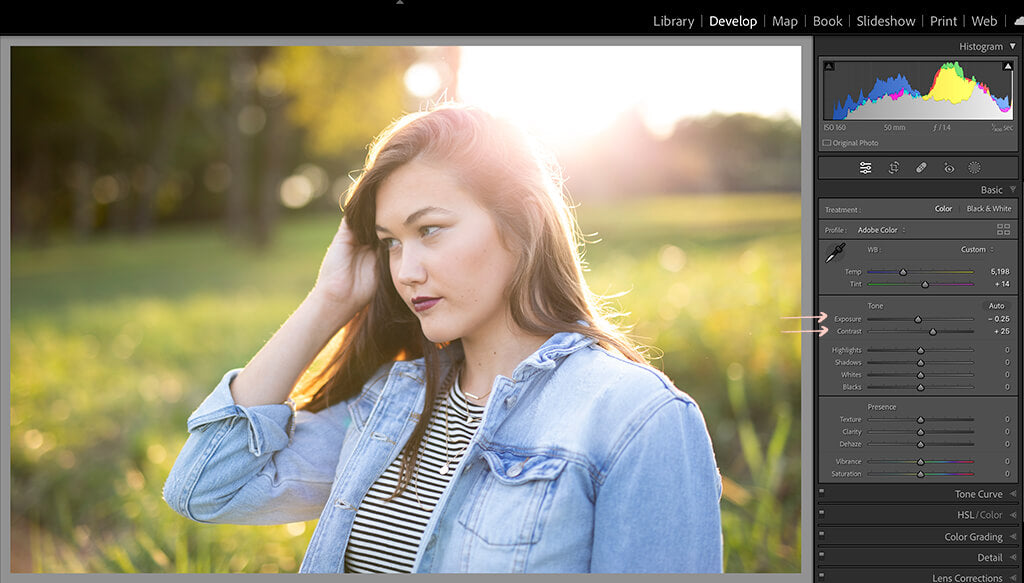
Backlit photos can be some of the most breathtaking images you can take, but they can also be difficult to perfect. If you’ve ever tried taking a backlit photo and been disappointed with the results, don’t give up just yet! With a few simple tricks and techniques, you can make your backlit photos look amazing. Read on to learn more about backlit photos and how to fix them in post-processing.
First things first: what is a backlit photo? Backlighting occurs when the main light source is behind your subject, creating a halo of light around their silhouette. This type of lighting creates an ethereal, dreamy effect that’s perfect for portrait photography as well as landscape shots.
When shooting backlit photos, it’s important to pay attention to your camera settings. If you’re using automatic modes, try using aperture priority mode instead to reduce overexposure from the light behind your subject. You may also need to adjust your white balance setting to ensure the colors in your image are accurate.
Now let’s talk about post-processing backlit photos. The two most important tools for editing this type of image are the manual exposure slider and the Quick Selection tool (in Photoshop). With the manual exposure slider, you can under-expose the brightest areas of the scene (like hair or fabric) while still keeping detail in other areas like shadows or backgrounds. The Quick Selection tool will help you select specific areas of your image so that you can adjust their brightness or contrast without affecting other parts of the photo.
Finally, don’t forget to add vibrance or saturation to bring out all those beautiful colors! Vibrance helps enhance muted colors without oversaturating bright tones like blues and greens; it’s perfect for enhancing autumnal scenes. And if all else fails, try experimenting with different angles or positions until you find something that works best for your shot!
Backlighting can be tricky but with practice and patience, you can create stunning images that capture all kinds of moods and emotions. Follow these tips and techniques for post-processing backlit photos and before long your shots will be turning heads!

Fixing a Picture With Too Much Backlight
Fixing a picture with too much backlight can be a tricky task, but it is possible! Here are some tips to help you get the job done:
1. Adjust the temperature of the image. If it’s too warm, try cooling it down and vice versa. This will help reduce the intensity of the backlight and bring out more detail in your subject.
2. Increase the contrast of the image to make sure that all elements are distinct and stand out from each other. This will also help to reduce any hazy or flat lighting effects caused by backlighting.
3. Decrease the highlights in your photo to keep them from overpowering other areas of the image, such as shadows or mid-tones.
4. Increase clarity to bring out more details in your subject and make sure that everything is sharp and clear.
5. Increase luminance to add more light to your image without affecting its overall exposure levels too drastically. This will also help balance out any overly bright areas caused by backlighting, such as blown highlights on your subject’s skin or clothing.
Making Backlit Pictures Look Good
Making backlit pictures look good starts with choosing the right camera settings. A low ISO and a wide aperture are generally recommended, as they will help capture the most detail in the image. You should also adjust the shutter speed to ensure that your subject is properly exposed. Additionally, it’s best to use a spot meter when taking backlit photographs, so you can accurately measure the light around your subject.
Next, you should choose the best time of day for taking backlit photos. Early morning or late afternoon are good times because the sun is lower in the sky and will create more dramatic and interesting lighting effects.
Thirdly, position your subject so that the light source is behind them. This will create a nice contrast between their silhouette and the background of your image, making it more striking and eye-catching.
Finally, you can use fill flash or fill light to add extra detail to your subject’s face or body if needed. This will help to bring out their features and make them stand out from their surroundings even more. Additionally, adjusting the white balance of your camera can help to prevent colors from becoming too saturated or unnatural-looking when shooting in bright sunlight.
Fixing Backlighting Issues on iPhone Photos
To fix backlighting photos on your iPhone, first, open the Camera app and tap the exposure icon (sun icon) to open the manual exposure slider. Then, adjust the slider to under-expose the photo so that the brightest areas of the scene (the backlit fabric or hair) are correctly exposed. The darker areas of the scene such as the background will then be automatically under-exposed. When you’re done, tap ‘Done’ and you should have a better-exposed photo.
Fixing a Backlit Image in Photoshop
To fix a backlit image in Adobe Photoshop, there are a few steps you can take. First, use the Quick Selection tool to make a selection of the subject you want to focus on. Then, go to Image > Adjustments and choose Levels. Move the shadow slider to the right until all dark areas of your image appear brighter. Finally, increase the vibrance by going to Image > Adjustment > Vibrance and moving the slider to the right until you are satisfied with how vibrant your image looks. With these adjustments, you can easily fix a backlit image in Adobe Photoshop!
Reducing Backlighting in Photography
1. Identify the source of the backlighting, such as a window or light fixture.
2. Move your camera to reduce the amount of backlight hitting your subject. If you can’t move the camera, block off some of the light with a sheet or flag.
3. Use a reflector or video light to fill in any shadows that may have been created by blocking off the backlight.
4. Adjust your camera’s exposure settings to properly expose your subject and reduce any harsh highlights created by the backlighting.
5. Consider using an external neutral density filter if necessary to further reduce any brightness from the background light source.
The Impact of Backlight on Picture Quality
Yes, backlighting has a major effect on picture quality. Backlighting is responsible for providing the necessary brightness and contrasts to the image displayed on an LCD or LED screen. Without backlighting, an image would appear dark and washed out. Additionally, the type of backlight used can affect the color accuracy of an image; different types of backlighting produce different amounts of light and create different color temperatures, which can affect how colors are perceived. For example, a white light with a yellow tinge will make red pixels appear slightly orange. To ensure optimal picture quality, it is important to use high-quality backlighting and calibrate it correctly.
Fixing the Backlight on a Phone
If the backlight on your phone isn’t working, you may need to replace the display assembly. This is a bit of a tricky repair job, so it’s best to take your device to an experienced and reliable technician. Depending on the model of your phone and what parts are needed, it could involve replacing just the LCD or even the entire back panel and display assembly. Your technician can help you determine which parts need to be replaced and guide you through the repair process.
Removing Glowing Light in Photoshop
To get rid of glowing light in Photoshop, the best approach is to use the Lasso Tool. Start by selecting the area where you want to get rid of the glow. Then, go to Image > Adjustments > Levels and adjust the levels until you have achieved the desired result. You can also try using the Brush Tool and Clone Stamp Tool if you need more precision when removing the glow. Finally, you can add a Color Layer or an Adjustment Layer for more control over how much of the glow is left in your image.
Conclusion
In conclusion, backlit photos can be a great way to create stunning and unique photos. It is important to remember that because the light is coming from behind the subject, it can be tricky to get the exposure right and highlights can easily be blown out. However, with the right camera settings, choosing the best time of day, and using fill flash and fill light, you can create beautiful backlit images. Additionally, don’t forget to adjust exposure and white balance as well as use the manual exposure slider in the camera app or increase vibrance in Photoshop to bring out details in your photos. With practice and experience, you will find yourself taking amazing backlit images!


