External hard drives are a great way to store and back up your important data. Whether you’re using it for business or personal use, an external hard drive can provide plenty of storage space and peace of mind. Unfortunately, there may come a time when you need to erase all the data on your external hard drive. If this is the case, here’s how to erase your external hard drive on a Mac.
First, connect your external hard drive to your Mac computer. Once connected and powered on, launch the Finder application from the dock. From the Go menu, select Utilities and then select the external hard drive from the list of Internal Drives, External Drives, and Disk Images. Once selected, click the Erase button at the top of the window.
Next, you will be prompted for a name for your external hard drive along with a format and scheme selection. This is where you will indicate how you want to erase it – either manually or with specialized software such as Disk Utility or Disk Drill. Depending on what type of data is stored on your external hard drive (files, programs, etc.) will determine which option you should choose. For example, if there are sensitive files that need to be erased beyond recovery then you should select a secure option such as secure to erase or disk wiping software.
Once all information has been entered click Erase and wait for the process to finish before disconnecting your external drive from the computer. It’s important to remember that erasing an external hard drive does not delete any files that have been backed up online or stored in other places (such as cloud storage). Therefore it’s important to ensure that any confidential information is also securely deleted from these locations as well before disposing of an old hard drive.
By following these simple steps you can easily erase an external hard drive on a Mac computer without needing any additional software or complicated processes!
Permanently Erasing an External Hard Drive on a Mac
To permanently erase an external hard drive on a Mac, you’ll need to connect the hard drive to your computer and power it on. Then, launch Finder and go to the utility folder. Select the external hard drive from the list of Internal, External, and Disk Images and click the Erase button. You’ll then be prompted to enter a Name for the hard drive, select a Format and Scheme, and click Erase again to confirm. After this process is complete, all of the data stored on your external hard drive will be permanently erased.
Wiping an External Hard Drive
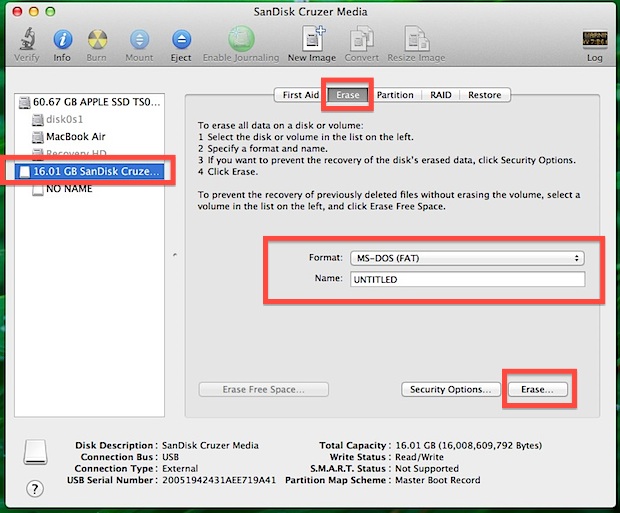
To wipe your external hard drive, you will need to begin by connecting it to your computer. Then, open the Disk Utility App. Once the app is open, select the drive you wish to wipe clean. It’s important to make sure you select the correct drive as any other external hard drives should be disconnected before doing this and double-checking is always a good idea. Once your drive is selected, click ‘Erase’ and then choose the appropriate format for erasing (e.g. Mac OS Extended). Finally, click ‘Erase’ again to perform the wipe and wait for the process to be completed. After it’s finished, your external hard drive should now be wiped clean.
Erasing an External Hard Drive for Mac
The best format for erasing an external hard drive for a Mac is Mac OS Extended (Journaled). This format is compatible with all Macs and is the recommended format for most users. If you have a newer Mac running macOS 10.13 or later, you can also use APFS (Apple File System). It is worth noting that exFAT is compatible with both PCs and Macs, but it is not recommended if you are solely using the drive with your Mac.
Erasing an External Hard Drive on a Mac
Erasing your external hard drive on a Mac requires special steps because the drive is formatted differently than the startup disk. It’s important to back up your data first, as erasing the external hard drive will permanently delete all of its contents. To erase an external hard drive, you need to first open Disk Utility, select the disk you want to erase, and then click the Erase button. Make sure to choose the correct format for your hard drive before erasing it. Once everything is in order, click Erase and wait for the process to complete.
Formatting and Wiping a USB on a Mac
To wipe and format a USB drive on your Mac, first, plug the USB drive into your computer. Then open Disk Utility, which can be found in Applications > Utilities. Once Disk Utility is open, select the USB drive from the left sidebar. Next, click ‘Erase’ to begin wiping and formatting the USB drive. Give the USB drive a name and select the desired format from the drop-down menu. When you are ready to proceed, click ‘Erase’ again to begin formatting your USB drive. After a few minutes, your drive should be successfully wiped and formatted for use on your Mac!
Erasing and Formatting a USB Stick on a Mac
Erasing and formatting a USB stick on a Mac is easy! First, open Finder and select Applications. Then open the utility folder, and select Disk Utility. In Disk Utility, you will see a list of drives on the left side of the window. Select your USB drive from this list. You’ll then have the option to Erase the drive. You can give your USB drive a name and choose between different file systems such as ExFAT or FAT32. Once you’ve selected your preferences, click Erase to begin the process. The process should take only a few moments to complete, and once it’s done, your USB drive will be ready for use!
Formatting an External Hard Drive for Mac
Yes, you need to format an external hard drive for Mac in order to use it with your computer. You can use the Erase function in Disk Utility to format the drive using one of the following file systems that are supported by Mac: Apple File System (APFS), Mac OS Extended (HFS+), MS-DOS (FAT), or exFAT. Be sure to choose a file system that is compatible with your operating system and other devices you may plan on connecting to the hard drive. Once formatted, you will be able to store and access data on the external hard drive from your Mac.

