The iPhone has become an integral part of our lives, serving as a communication hub, entertainment device, and portable computer all in one. With its advanced features and capabilities, it’s no wonder that millions of people around the world rely on their iPhones every day. One important aspect of using an iPhone is understanding how to manage and control the apps that have access to your local network. In this article, we will explore the concept of local network access on the iPhone and how to enable or disable it for specific apps.
Local network access refers to the ability of an app to find and communicate with other devices on the same network. This can include devices such as computers, printers, smart home devices, and more. By enabling local network access, you allow apps to discover and interact with these devices, enhancing their functionality and convenience.
To enable or disable local network access on your iPhone, you can follow these simple steps:
1. Start by accessing the Settings app on your iPhone. This can be done by tapping on the “Settings” icon, which resembles a gear.
2. Once you are in the Settings menu, scroll down and tap on the “Privacy” option. This will take you to a new screen where you can manage various privacy settings.
3. In the Privacy menu, you will find a section called “Local Network.” Tap on this option to proceed.
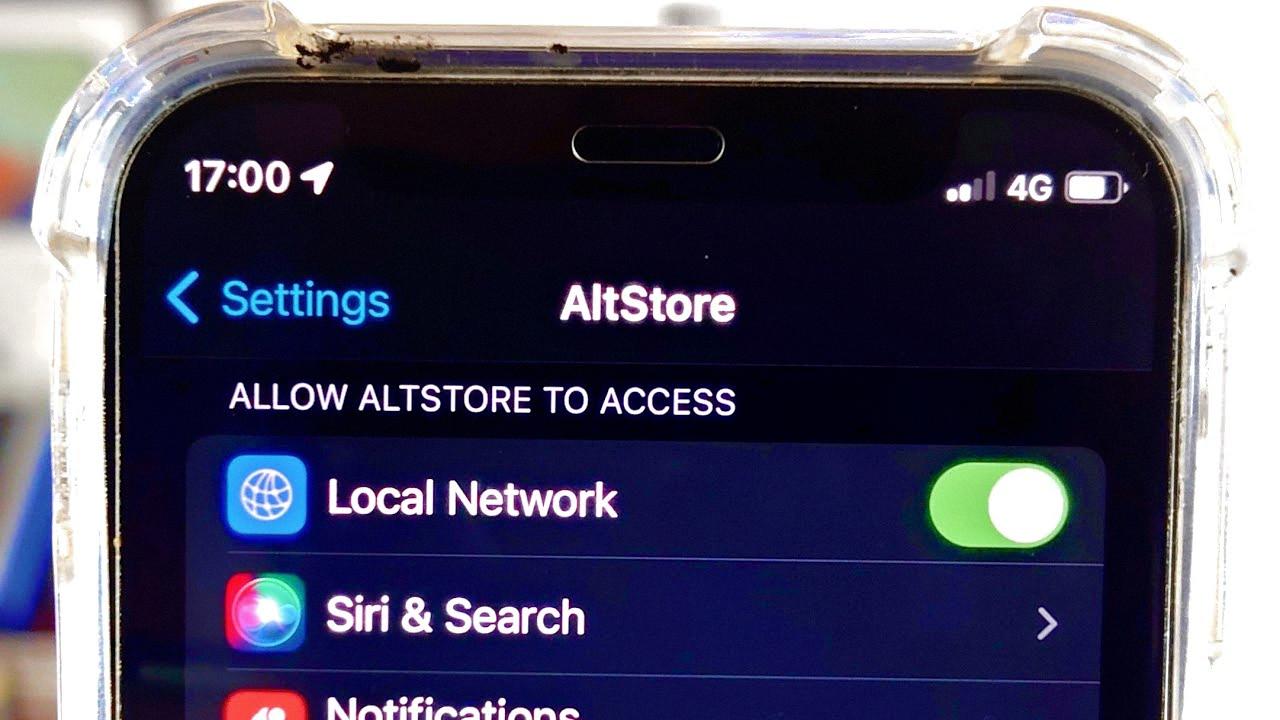
4. On the Local Network screen, you will see a list of apps that have requested permission to access your local network. Each app will have a switch beside its name, allowing you to enable or disable local network access for that specific app.
5. To enable local network access for an app, simply tap on the switch beside its name. The switch will turn green, indicating that the app now has permission to access your local network.
6. Conversely, if you want to disable local network access for an app, tap on the switch to turn it off. The switch will turn gray, indicating that the app no longer has permission to access your local network.
By managing local network access, you can have more control over the apps that can discover and communicate with devices on your network. This can help protect your privacy and ensure that only trusted apps have access to your local network.
It is worth noting that the first time you open an app that tries to access the network, you may see a pop-up asking for permission to enable local network access. This is a security measure implemented in iOS/iPadOS 14 to give users the choice to allow or deny access. It is recommended to carefully review the app’s request and consider the purpose and necessity of local network access before making a decision.
Enabling or disabling local network access on your iPhone is a straightforward process that can be done through the Privacy settings. By managing local network access, you can enhance your privacy and control which apps are allowed to interact with devices on your network. Stay informed and make conscious decisions regarding app permissions to ensure a secure and personalized iPhone experience.
How Do You Give Your iPhone Local Network Permission?
To give your iPhone local network permission, you can follow these steps:
1. Open the Settings on your iPhone.
2. Scroll down and tap on “Privacy.”
3. Within the Privacy settings, tap on “Local Network.”
Here, you will see a list of apps that have requested permission to find and communicate on your local network. To grant permission to an app, simply tap on the switch beside its name to enable Local Network Access. The switch will turn green when enabled.
If you want to revoke the permission for an app to access your local network, you can tap on the switch to disable Local Network Access. The switch will turn gray when disabled.
By enabling or disabling Local Network Access for specific apps, you can control which apps are allowed to connect and communicate with devices on your local network.

How Do You Enable Local Network Permissions?
To enable local network permissions for an app, you can follow these steps:
1. Open the Settings on your device.
2. Look for the “Privacy & Security” section and tap on it.
3. Within the Privacy & Security menu, find and select the option called “Local Network.”
4. You will now see a list of apps that have requested access to the local network.
5. To enable permissions for a specific app, simply toggle the switch next to its name to the “on” position.
6. If you want to revoke access for an app, toggle the switch to the “off” position.
By following these steps, you can easily manage and control which apps are allowed to access the local network on your device.
What is Local Network Access On iPhone?
Local network access on iPhone refers to the ability of an app to connect and communicate with other devices on the same network, such as other iPhones, iPads, Macs, printers, or smart home devices. It allows apps to share data, stream content, or perform other network-related tasks within the local network environment.
When an app requests local network access, it means that it wants to discover and interact with devices on the network. This can be useful for various purposes, such as:
1. Home automation: Apps that control smart home devices, such as lights, thermostats, or security systems, need local network access to communicate with these devices and send commands or receive status updates.
2. File sharing: Some apps enable file sharing between devices on the same network. For example, you might use an app to transfer files between your iPhone and a Mac or share documents with other users on the local network.
3. Multiplayer gaming: Games that support local multiplayer mode allow players on the same network to connect and play together. Local network access enables these connections and facilitates smooth gameplay.
4. Printers and scanners: Apps that provide printing or scanning functionality need local network access to discover and communicate with printers or scanners connected to the network. This allows you to print documents or scan images directly from your iPhone.
When an app requests local network access for the first time, iOS/iPadOS 14 displays a pop-up notification to seek your permission. This notification ensures that you are aware of which apps are trying to access your local network and allows you to grant or deny access on a per-app basis.
By granting local network access to an app, you allow it to communicate with other devices on your network. However, if you deny access, the app won’t be able to interact with devices on the local network, potentially limiting its functionality.
It’s important to note that local network access is separate from internet access. Even if you deny an app access to the local network, it may still have access to the internet for tasks like retrieving data from remote servers.
Should You Enable Local Network On iPhone?
Enabling Local Network on your iPhone is recommended for several reasons:
1. Enhanced Privacy: When you enable Local Network, apps on your iPhone will request access to your local network instead of connecting directly. This helps protect your privacy as it allows you to control which apps can access your network. App developers usually customize a message explaining why their application needs to access your network, giving you more transparency and control over your data.
2. Network Functionality: Enabling Local Network allows your iPhone to seamlessly connect and interact with other devices on your local network. This can be useful for various purposes such as streaming media, sharing files, or controlling smart home devices.
3. App Compatibility: Some applications require access to your local network to function properly. By enabling Local Network, you ensure that these apps can work as intended and provide you with the full range of features and functionality.
4. Home Automation: If you have smart home devices, enabling Local Network on your iPhone is essential for controlling and managing them through dedicated apps or Apple’s Home app. This enables you to control your lights, thermostats, security systems, and more, all from your iPhone.
To sum up, enabling Local Network on your iPhone is highly recommended as it enhances your privacy, enables seamless connectivity with other devices, ensures app compatibility, and allows for convenient control of smart home devices.
Conclusion
The iPhone offers a wide range of features and functionalities that make it a highly popular and sought-after device. With its sleek design, powerful performance, and user-friendly interface, the iPhone provides a seamless and enjoyable user experience.
One of the standout features of the iPhone is its ability to enable or disable local network access. This feature allows users to have control over which apps can access and communicate on their local network. By enabling local network access, users can allow specific apps to interact with other devices on their network, enhancing functionality and convenience.
However, it is important to exercise caution when granting local network access to apps. This feature can potentially pose a privacy risk if misused or if apps with malicious intent gain access to the network. Therefore, it is recommended to carefully review and consider the apps that request local network access and make informed decisions based on trustworthiness and necessity.
The iPhone’s capability to enable or disable local network access provides users with control over their network privacy and enhances the overall security of their device. By being mindful of the apps requesting access and exercising caution, users can make the most of this feature and enjoy a safe and seamless network experience on their iPhone.


