If you’re an iPhone user, you know how important it is to keep your device backed up. But what do you do when it comes time to eject your iPhone from your PC? While the process may seem straightforward, there are a few iPhone safety tips to keep in mind and key steps to take before safely removing your device to prevent data corruption and other problems.
See Also: The Best iPhone Accessories to Enhance Your Everyday Life for our top rated list of accessories!
Stop All Activity on Your iPhone
The first step is to stop any iPhone activity. That includes syncing files, copying files, and other types of data transfer between your iPhone and PC. That will prepare your iPhone for ejection without suffering data loss.
Open Windows Explorer
Next, on Windows 10 and 11, look for the Safely Remove Hardware icon in your taskbar. You might have to click on “Show Hidden Icons” first. This icon looks like a USB stick with a check mark, and it allows you to eject media safely:
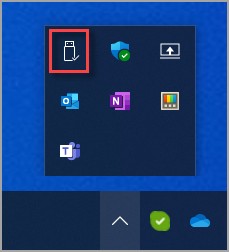
Click on it, and then click on the iPhone in your list of devices to safely remove the hardware.
If you can’t find this icon, right-click on the taskbar and click on Taskbar Settings. Find “Windows Explorer: Safely Remove Hardware and Eject Media” and turn it on.
On Windows 10, first click on “Select which icons appear on the taskbar” under “Notification Area.” Then, scroll and find “Windows Explorer: Safely Remove Hardware and Eject Media” and turn it on.
Access Bluetooth & Devices Settings
If the task bar icon isn’t appearing, you can instead head to your Bluetooth & Devices Windows settings by navigating to Start Menu > Settings > Bluetooth & Devices on Windows 10. Then, click on Devices, find your iPhone in the settings, click on the three dots, and then click on “Remove Device.”
On Windows 11, there is no Bluetooth & Devices section. Instead, head directly to Devices from Start > Settings.
Eject the iPhone
Finally, once you have clicked the eject iPhone button in the task bar or device settings, you are ready to safely eject the iPhone. On Windows, you can proceed by removing the USB cable from your computer.
Follow the same process for other connected devices, such as a USB stick. These steps work for all connected media devices, not only iPhones.
Consequences of Not Ejecting an iPhone
Not ejecting your iPhone properly can cause several problems, including data corruption risks. When the iPhone is connected to a computer, the phone and computer are sharing data. If you don’t eject your iPhone correctly, it can lead to data corruption or data loss risks, or, in some cases, freezing and an unresponsive iPhone.
By removing the device first in your settings, Windows will stop all read and write operations so you can safely remove the device without corrupting data.
Do I Need to Eject My Phone from My Computer?
It’s highly recommended. But, why is there such a big importance of ejecting properly?
You need to eject a phone from a computer because your computer treats it as a media storage device, like a USB stick. If you are transferring data, the computer is doing read/write operations to and from the phone.
If you suddenly remove the phone, the data that is being transferred might not get transferred in its entirety, leading to data corruption and potential data loss (if you don’t have backups). For your phone’s safety and data protection, it’s best to always eject it in your Windows settings before you physically remove it from your computer.
What Does Ejecting an iPhone Mean?
The meaning of ejecting an iPhone is safely disconnecting it from a computer. The initial ejecting process is done through software, not physically unplugging the device. This software disconnection basically means that the computer stops the transfer of data to and from the device.
When ejecting an iPhone, you will see a prompt that your device has been disconnected. After this is done, it is safe to remove the iPhone from the USB port of your computer physically. For your iPhone’s safety, always eject the iPhone via software first, before you manually eject it.
Shortcut Key for Ejecting a Device
The eject device shortcut key for ejecting a flash drive on Mac is Command + E. This is a Mac eject shortcut for ejecting a selected drive, not a Windows Eject shortcut. On Windows, you can find the shortcut icon in the taskbar – click on the Safely Remove Hardware icon and then on the device you want to eject.
Conclusion
Hopefully, you now understand the importance of ejection for device safety and data integrity. Always eject your phone from your PC before you remove it physically. This is a simple and straightforward process that will protect your data.







Pretty! This was a really wonderful post. Thank you for your provided information.