Family Sharing is a great way to stay connected and share information between family members. With Family Sharing, family members can easily access each other’s purchases, photos, calendars, and more. It also makes it easy to manage devices and payments for everyone in the family.
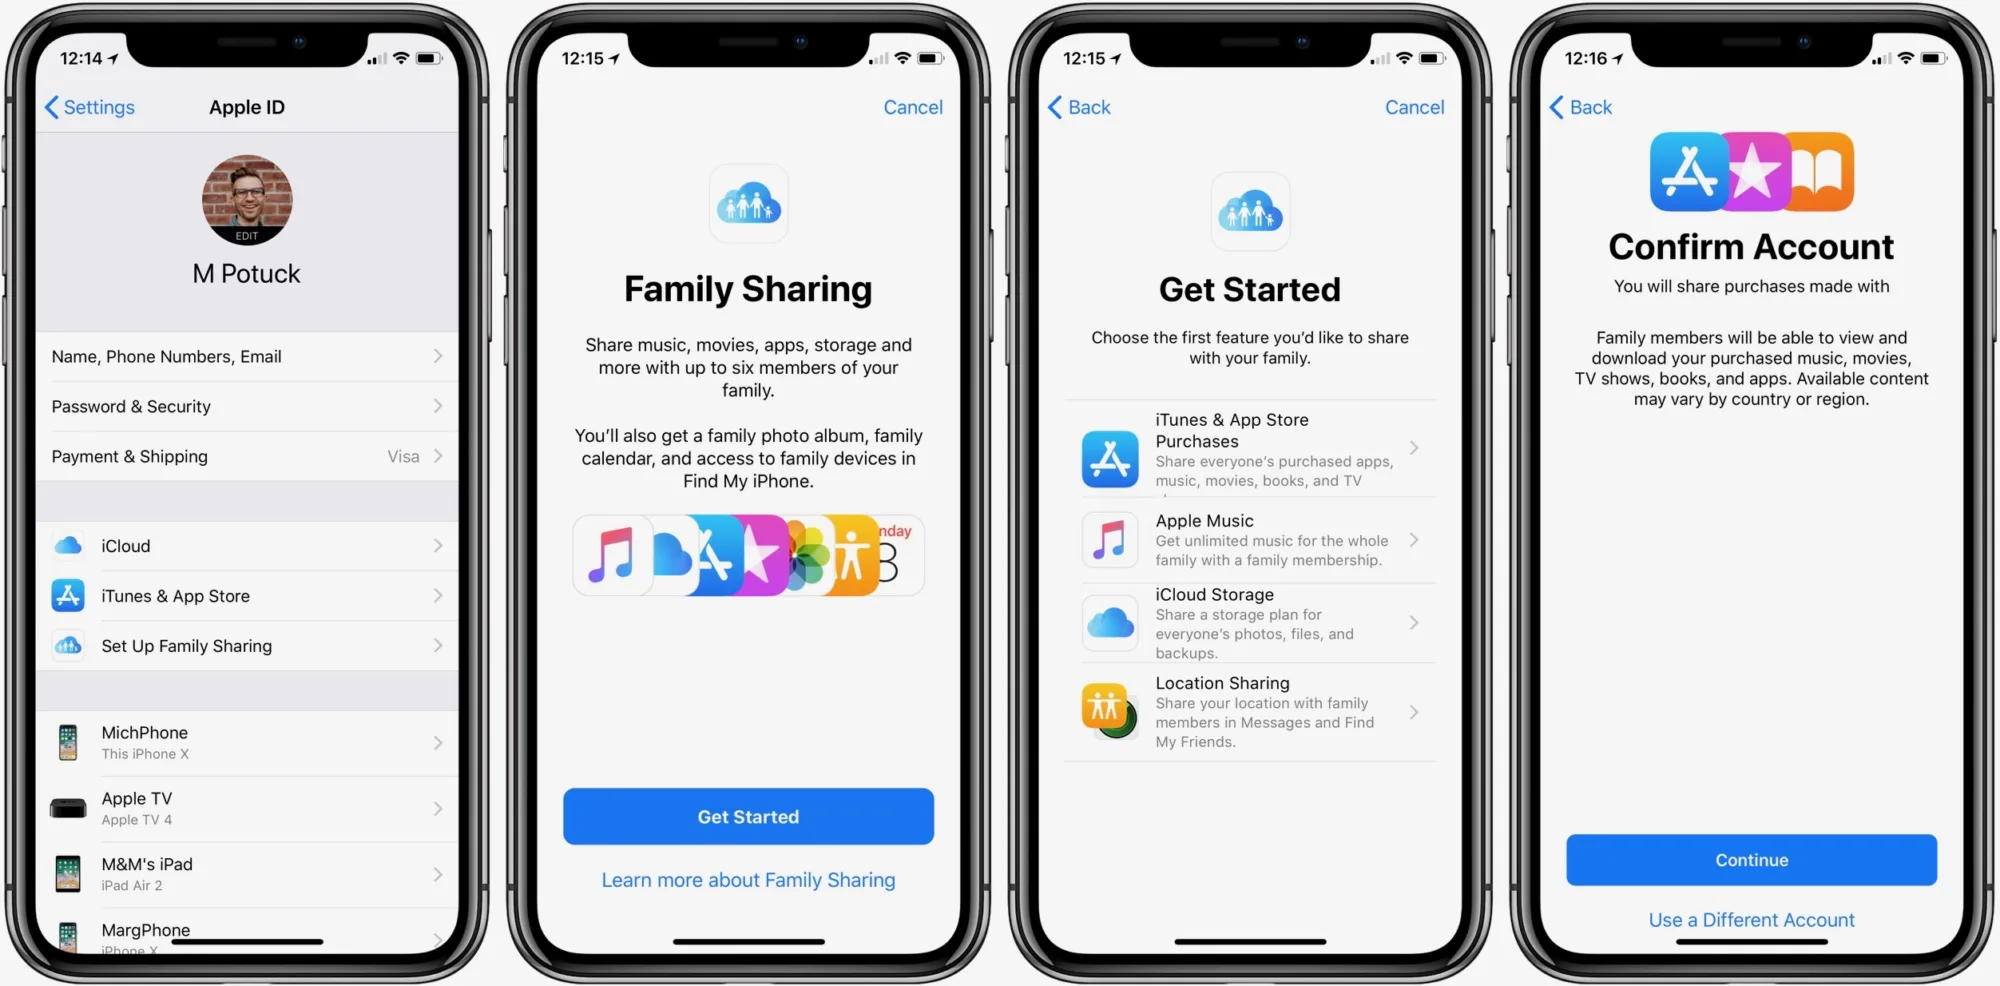
If you have an iPhone, you can use Family Sharing to keep your family connected and make sure everyone is up-to-date with the latest apps and purchases. Here’s how to set up Family Sharing on your iPhone:
1. Open the Settings app on your iPhone.
2. Tap “iCloud” at the top of the screen, then tap “Set Up Family Sharing” at the bottom of the page.
3. You’ll be prompted to invite family members from your contacts list (or add them manually). Once they accept your invitation they will be added to your family sharing group.
4. Once all members have accepted their invitations, you can choose what each person has access to by tapping “Manage Family Members” under iCloud settings or in the App Store app under Account > Family Sharing > Manage Family Members.
Once your family members have been added, you can start managing what they have access to in various ways:
1. Share App Purchases: You can let other family members download apps that you have purchased in the past without having to pay full price for them again (provided they are using the same Apple ID). To do this, simply go into iCloud settings and toggle on “Share My Purchases” for each member of your family sharing group.
2. Share Photos: You can also share albums and photos with other family members by going into iCloud settings and tapping “Share Photos” under the “Family Sharing” options for each member of your group. This will allow them to view any albums or photos that you have shared with them in their own Photos app on their iOS device (or via iCloud on Mac/Windows).
3. Set Child Restrictions: If you want to limit what kinds of content a child in your household has access to when using their own device, simply go into iCloud settings and tap “Family Sharing” then select “Manage Restrictions” for that child’s Apple ID account (you’ll need their password). Here you can set restrictions such as limiting explicit content in music or movies/TV shows as well as restricting certain apps or websites from being accessed by that child alone or restricting access altogether if needed — a great way to ensure safety when children are using their own device!
Family sharing is a great way to stay connected with those closest to you while also managing who has access to certain content that may not be suitable for some age groups or individuals — making it easier for everyone involved!

Editing Family Sharing Settings
To edit your Family Sharing group, first, open the Google Play app. At the top right, tap the profile icon and then tap Settings > Family. Here you can manage family members and make changes to your Family Sharing group. To add a new member, tap Add Member and enter their name or email address. To remove a member, select their name and tap More > Remove Member. You can also change payment methods or upgrade/downgrade your Family Library here.
Changing the Manager of Family Sharing
To change the organizer of Family Sharing, you will need to stop Family Sharing and then restart it with a different person as the initiator. To do this:
1. Have the current organizer sign out of their Apple ID on all devices that share the same family sharing account.
2. Go to Settings > [your name] > Family Sharing and tap Stop Sharing.
3. Have the new organizer sign into their Apple ID on all devices that were previously sharing the same family sharing account.
4. Go to Settings > [your name] > Family Sharing and tap Start Sharing at the top of the screen. The new organizer will be asked to confirm their Apple ID and payment method for any purchases made by family members using Ask to Buy.
Once you’ve completed these steps, the new organizer will be in charge of managing Family Sharing!
Accessing Family Sharing Settings
To access the Family Sharing settings, first open the Google Play Store app. Tap on the menu icon in the top left corner and then select ‘Account’. On this page, you will see an option to ‘Set Up Family Library’. Tap on this option to start setting up your family library. You will need to create a family group that everyone in your family can join. All family members must be at least 13 years old and must live in the same country as you. Once you have created a family group, each member of your family can join it and access their shared content from any device that is connected to Google Play Store. To manage your family’s shared content, select the ‘Family’ option from the Account page to access the Family Sharing settings. Here you can manage your family members, add new members, remove them, or adjust their sharing permissions.
Choosing What to Share Through Family Sharing
Yes, you can choose what to share on Family Sharing. With Family Sharing, you can easily share iTunes and App Store purchases with your family members. You can choose to share music, movies, books, TV shows, and other content that you purchase through iTunes and App Store with up to five other family members. You can also designate one adult in your family as the organizer who will be responsible for managing the shared content.
To access the sharing options on your device, open Settings and select iCloud > Family Sharing. From here, you will be able to turn on Family Sharing and invite other members of your family to join. Once you have added all of your family members, you can then choose which content type – music, movies, books, etc – you would like to share with them by tapping on ‘Shared Purchases’.
The organizer of the group has full control over what is shared but any member of the group can also add new purchases or delete existing ones from the shared list. You are also able to see what each person in the group has purchased so that everyone is aware of their contributions to the shared account.
Changing Age Restrictions on Family Sharing
In order to protect your child’s privacy and safety, Apple requires that any changes to a child’s birth date on Family Sharing be approved by the family organizer. This is to ensure that the information is accurate and to help keep your child’s data secure. By preventing unauthorized changes, Apple is ensuring that your child’s account settings remain private and secure.
Removing a Child Under 13 from Family Sharing on iPhone
If you have a child under 13 in your family sharing group, it can be removed by following these steps:
1. On your iPhone, iPad, or iPod touch, go to Settings.
2. Tap Family. If you don’t see Family, tap your name, then tap Family Sharing.
3. Tap the name of the family member that you want to remove.
4. Tap Remove [your family member’s name] from Family.
5. Confirm that you want to remove the family member by tapping Remove again when prompted.
6. You’ll be asked if you want to keep or delete the data associated with this family member’s Apple ID; choose an option and tap Done to complete the process.
Conclusion
Family Sharing on iPhone is a great way to stay connected with your family members, share purchases, and keep track of each other’s activities. It allows you to easily manage who can access which content and services, as well as control who has access to your credit card information. With Family Sharing, you can also set up an account for children under 13 with parental guidance, so that their activity is monitored and their purchases are approved by an adult. It’s convenient, secure, and easy to use, making it the perfect tool for managing a family’s digital life.


