MacBook is one of the most popular laptops in the world. It’s a powerful machine that can be used for a variety of tasks. One of the great features of a MacBook is its ability to connect to a TV. In this article, we will discuss how to connect your MacBook to your TV.
There are two ways to connect your MacBook to your TV: wirelessly and cabled. Let’s first discuss the wireless method.
Wireless way – AirPlay Mirroring
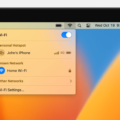
AirPlay Mirroring is a feature that allows you to mirror your MacBook screen wirelessly to your TV. To use AirPlay Mirroring, both your MacBook and TV should be connected to the same Wi-Fi network.
To start, click the Screen Mirroring icon in the Control Center, which can be accessed by swiping down from the upper-right corner of the screen. Then, choose your Apple TV from the list of available devices.
Once you have selected your Apple TV, you can choose whether your desktop matches the size of the Mac screen or the TV screen. To do this, click the AirPlay status icon and then choose either “This Mac” or your Apple TV.
When you are using AirPlay Mirroring, the AirPlay status icon in the menu bar will be blue. This indicates that your MacBook screen is being mirrored to your TV.
Cabled way – HDMI cable
If you don’t have an Apple TV or prefer a cabled connection, you can connect your MacBook to your TV using an HDMI cable. Here is how to do it.
Start your MacBook and TV, then use an HDMI cable to connect them to the HDMI ports on your Mac and TV. On your TV, use your remote control to select the HDMI source that your MacBook is connected to. Once done, your MacBook screen will be mirrored to your TV.
It’s important to note that you may need to adjust the display settings on your MacBook to ensure that the resolution and aspect ratio match your TV. To do this, go to System Preferences > Displays.
Connecting your MacBook to your TV is easy and convenient. With the wireless AirPlay Mirroring or cabled HDMI cable method, you can enjoy your MacBook content on a bigger screen. Whether you are watching a movie, playing a game, or doing work, connecting your MacBook to your TV is a great way to enhance your experience.
Connecting a MacBook Pro to a TV Wirelessly
To connect your MacBook Pro to your TV wirelessly, you can use AirPlay Mirroring. Follow these steps:
1. Make sure your MacBook Pro and Apple TV are connected to the same Wi-Fi network.
2. On your MacBook Pro, open the Control Center by clicking the icon in the top-right corner of the screen.
3. Click the Screen Mirroring icon, which looks like a rectangle with a triangle at the bottom.
4. Choose your Apple TV from the list of available devices.
5. If you want your desktop to match the size of your TV screen, click the AirPlay status icon in the menu bar (it looks like a rectangle with an arrow pointing up) and choose your Apple TV under “Display”.
6. If you want to mirror only a specific app or window, open that app or window and click the AirPlay status icon. Choose your Apple TV under “AirPlay to” and select “Mirror Built-in Display” to enable mirroring.
When you’re using AirPlay Mirroring, the AirPlay status icon in the menu bar will be blue. You can also adjust the sound and video settings on your TV to optimize the viewing experience.
Connecting a MacBook to a TV with HDMI
To connect your MacBook to your TV with HDMI, you will need an HDMI cable and a USB-C to HDMI adapter. Follow these steps:
1. Turn off both your MacBook and TV.
2. Plug one end of the USB-C to HDMI adapter into your MacBook’s USB-C port.
3. Plug one end of the HDMI cable into your TV’s HDMI port.
4. Plug the other end of the HDMI cable into the other end of the USB-C to the HDMI adapter.
5. Turn on your TV.
6. Use your TV remote to select the HDMI input that corresponds to the HDMI port you plugged into.
7. Turn on your MacBook.
8. Click on the Apple menu in the top-left corner of your MacBook screen.
9. Select “System Preferences.”
10. Click on “Displays.”
11. In the “Arrangement” tab, check the box next to “Mirror Displays” to display the same image on both your MacBook and TV screens.
12. Alternatively, you can drag the white bar from your MacBook’s screen to the TV’s screen to use your TV as a second display.
13. To set your TV as the audio source, click on the Apple menu again.
14. Select “System Preferences.”
15. Click on “Sound.”
16. Under the “Output” tab, select your TV’s name from the list of devices.
That’s it! Your MacBook should now be connected to your TV via HDMI.
Connecting a Mac to a TV Without Apple TV
To display your Mac on your TV without using Apple TV, you can use a cabled connection through an HDMI cable. Follow these steps:
1. Start your Mac and TV.
2. Connect an HDMI cable to your Mac and your TV’s HDMI port.
3. On your TV, use the remote control to select the HDMI source that your Mac is connected to.
4. Ensure that the correct source is selected, and your Mac screen will be mirrored to your TV.
Alternatively, you can also use other cables and adapters like VGA, DVI, or DisplayPort, depending on the available ports on your Mac and TV. However, HDMI is the most common and preferred option due to its compatibility and high-quality video output.
By using a cabled connection and selecting the right source on your TV, you can easily display your Mac on your TV without Apple TV.
Conclusion
The Macbook is a powerful and reliable laptop that is popular among professionals and students alike. It offers a sleek design, excellent performance, and a variety of features that make it ideal for both work and play. With its high-quality display, long battery life, and advanced security features, the Macbook is a great investment for anyone looking for a high-end laptop that can handle even the most demanding tasks. Whether you’re a graphic designer, a video editor, or just someone who wants a fast and reliable computer for everyday use, the Macbook is definitely worth considering.

