Keeping your Samsung TV’s channel list up-to-date is essential for accessing the latest available content, whether it’s the newest episodes of your favorite series or breaking news. This process, known as a channel scan or auto-program, is straightforward and vital for both new TVs and when adjustments are made to channel availability in your area.
By scanning for channels, your TV automatically updates to include any new air channels or cable channels that may have become available. This ensures that you always have access to the most current and varied programming without manually searching for new channels yourself.
Step-by-Step Guide
When setting up your Samsung TV to access new channels, the first step is to make sure your TV is powered on and correctly set to the right TV source. This involves adjusting your TV input to “TV,” which might require you to press the “Input” or “Source” button. It’s a crucial step because if your TV is set to any other input—like HDMI or AV—you won’t be able to scan for broadcast channels.
Access the Settings Menu
First, grab your remote and press the Home button.
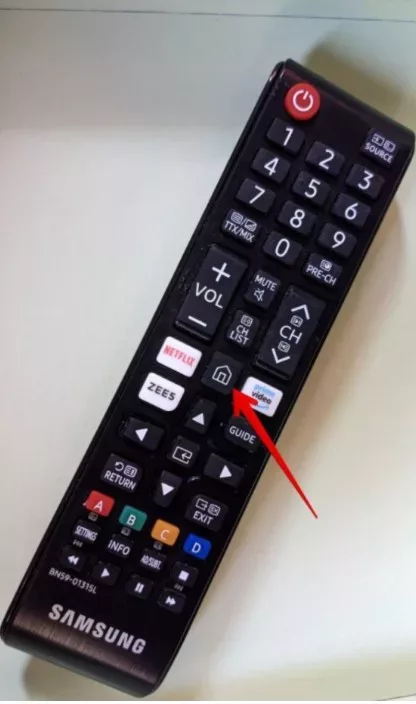
This action brings up the main interface of your TV. From here, look for the Settings menu—sometimes labeled as “All Settings” depending on your TV model—and select it. This is your gateway to adjusting your TV’s functions, including scanning for new channels.
Find the ‘Broadcasting’ Settings
When setting up your Samsung TV to scan for channels, an essential step involves navigating to the broadcasting settings. To do this, start by pressing the ‘Menu’ button to display the primary Settings menu on your TV. From here, you’ll want to scroll through the options until you find “Broadcasting.”
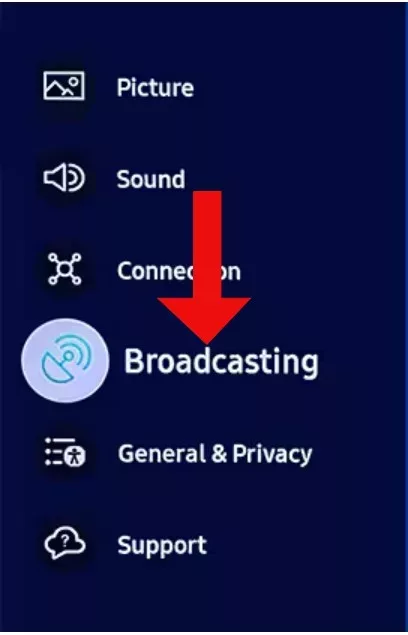
Selecting this will take you to the broadcasting settings, where you can manage your channel scanning and other related preferences. This section is crucial as it allows your TV to locate available digital broadcasts in your area, ensuring you have access to all the latest channels and content.
Initiate ‘Auto Program’
When you’re ready to scan for channels on your Samsung TV, the “Auto Program” feature is your go-to tool. This easy-to-use option kickstarts the auto-tuning process, searching for available digital and analog broadcasts in your area. Simply navigate to the TV’s menu, select “Auto Program,” and let your Samsung do the work.
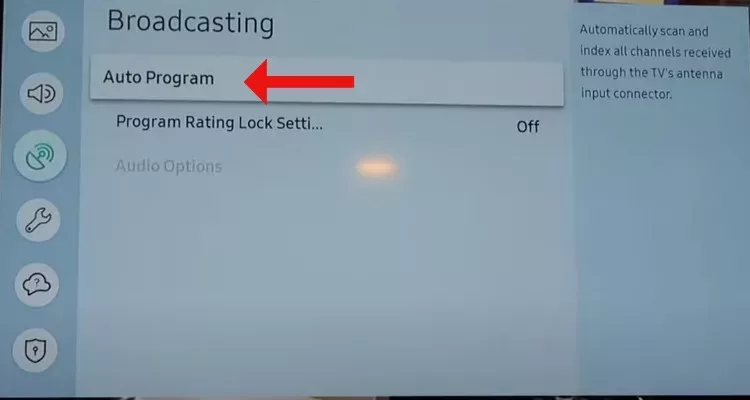
The channel scan begins automatically, efficiently sorting through frequencies to ensure you have access to all available channels.
Choose Scan Source: Air, Cable, or Both
When setting up your Samsung TV to scan for channels, a crucial decision you’ll need to make is selecting the correct scan source.
If you’re using an antenna to catch over-the-air broadcasts, you should select “Air.” This option is ideal for local channel reception and is a great way to access free-to-air TV. On the other hand, if you are connected to a cable TV service, choosing “Cable” as your signal source is the way to go.
This ensures that your TV scans and receives all the channels your cable service provides. Making the right choice here is essential for optimal TV viewing, as it aligns your TV’s scanning capabilities with your actual signal source, ensuring that you don’t miss out on any available content.
Start the Scan
Simply navigate to the channel setup menu and select “Start” to begin the process. Your TV will then search for all available channels. This scan is thorough and can take several minutes, so it is important that you remain patient.
Just like checking every nook and cranny in a large house, your TV is doing its due diligence to ensure no channel is missed. Sit back and let your TV do the work; you’ll be flipping through your new channels in no time.
Scan Complete
Once your Samsung TV completes the scanning process, the screen will display the channel list of all found channels. This list is crucial for tailoring your viewing experience, as some models allow you to customize it by adding or removing channels according to your preferences.
This feature is especially useful if you want to keep your favorite channels easily accessible or declutter the list by hiding those you never watch.
Troubleshooting Samsung TV Channel Scanning Issues
When scanning for channels on your Samsung TV, it’s common to encounter the frustrating issue of finding no channels or missing some expected channels. This hiccup often stems from a few solvable problems.
First, ensure your TV’s input is set correctly—your TV should be set to “TV” and not “HDMI” or any other input. Next, check your antenna or cable connection; loose or improper connections can prevent your TV from receiving broadcast signals effectively.
If these steps don’t resolve the issue, adjusting the antenna to face the direction of the broadcast tower might help, as signal strength varies with location and obstacles. Remember, scanning should be done during clear weather, as bad weather can affect signal reception.
Check Connections
When troubleshooting channel scanning issues on your Samsung TV, an essential first step is to check connections. This ensures that all antenna or cable connections are secure, which is vital for receiving clear and stable channel signals.
To start, gently examine the connection points. Make sure each connector is tightly fastened and not loose. A loose connection can lead to poor signal quality or prevent certain channels from appearing.
Signal Strength
Ensuring a strong signal strength is crucial. If you’re experiencing signal issues, first assess whether the signal is strong by realigning your antenna if necessary. This adjustment can significantly improve reception, helping your TV locate more channels.
Moreover, keeping your TV’s software or firmware current is important. Companies frequently issue firmware updates to improve device functionality and resolve scanning issues. Verify the availability of new updates for your Samsung TV and apply them to maintain peak performance.
Hardware issues
Encountering hardware problems can be frustrating. This typically involves issues with the TV’s internal components, like the tuner or antenna connection, preventing it from effectively detecting broadcast signals.
Should typical troubleshooting efforts prove ineffective, considering expert help could be the next option. Reaching out to Samsung support is a wise step—they can provide guidance specific to your model or dispatch a service technician to help if necessary.
Conclusion
Keeping your Samsung TV updated with the latest channels is a breeze, ensuring you always have access to the freshest content and entertainment options. By regularly scanning for channels on your Samsung TV, you’re maximising your device’s capabilities and enhancing your viewing experience.
This process is straightforward and can be crucial when you move to a new area or when your channel provider changes their lineup, such as adding or removing channels. Remember, staying current with your channel scan ensures that you never miss out on new offerings and can fully enjoy the dynamic range of programming for which Samsung TVs are known.


