Are you having trouble setting the time on your Mac? Don’t worry, it’s easier than you think! In this blog post, we’ll show you how to change the time on your Mac in a few simple steps.
First, open up the Apple menu and select System Preferences. This will bring up a window with several options that you can choose from. Next, click on Date & Time and you’ll be taen to a new window.
On this window, you can adjust the time by changing the hour and minute fields. To do this, just click on the arrows next to each field to increase or decrease the hours and minutes. You can also use the slider at the bottom of the window to quickly adjust by increments of one hour or one minute.
Once you’ve adjusted the time as desired, make sure to click on “Set Date & Time Automatically” if it’s unchecked. This will ensure that your Mac alays has the correct time when connected to an internet connection. Finally, click OK in order to save your changes.

And there you have it! Changing the time on your Mac is now a cinch. If you ever find yourself running late for an appointment or meeting again, don’t worry; just follow these steps and you’ll be back on track in no time!
Unable to Change Time on Mac
If you are unable to change the time on your Mac, it is likely because the option is locked. This can happen if your Mac is set to use a network time server to automatically update the date and time. To change the time, you will need to unlock the Date & Time preferences and make sure that “Set date and time manually” is selected. Once this setting is enabled, you should be able to adjust the date and time as needed.
Troubleshooting Incorrect Time Display on Mac
It’s possible that your Mac’s clock is showing the wrong date and time because the time zone is incorrect. To fix this, open System Preferences and select the Date & Time tab. Make sure the box next to ‘Set time zone automatically using current location’ is checked. This will ensure that your Mac is automatically set to the correct time zone each time you turn it on or connect to a new network. If this doesn’t solve the issue, you may need to manually adjust your Mac’s date and time settings.
Changing Date and Time Format on Mac
To change the date and time format on your Mac, open the System Preferences from the Apple menu. Next, click Language & Region and then select the Region pop-up menu. Here you can choose a geographic region to use its date, time, number and currency formats. If you’d like to customise the formats further, click Advanced and set the differnt options as desired. Once you have made your changes, make sure to click “OK” to save them.
Changing the Time Zone on a Mac
Yes, you can change the Time Zone on your Mac. To do so, open System Preferences from the Apple menu, then click Date & Time. On the Date & Time window, click the Time Zone tab, and you will be able to select a new time zone for your Mac. Once you’ve chosen a new time zone, it will be set on your Mac automatically.
Changing the Time
To change the time on your Samsung phone, you’ll need to open the Settings app and navigate to General Management. Once there, select Date and Time and turn off the automatic setting. This will alow you to manually adjust the time by selecting the date or time of your choice.
Source: macrumors.com
Changing the Time on a Mac Without Admin Rights
If you do not have admin rights, you can still change the time on your Mac in two ways. The first way is to use the command line by opening the Terminal app from your Applications folder. Type “date” and press enter to view the current system date and time. To change it, type “sudo date MMDDhhmmYYYY” (where MM is month, DD is day, hh is hour, mm is minute and YYYY is year) folloed by enter. You will then be prompted for a password; enter it to set the new date and time.
The second way to change the time on your Mac wihout admin rights is through System Preferences. Open System Preferences, then click Date & Time. Uncheck the box next to “Set date and time automatically” in order to make changes manually. You can then adjust both the date and time as needed with the provided controls.
Why Is My Automatic Date And Time Wrong?
There could be a few reasons why your automatic date and time is wrong. First, it could be an issue with your device’s settings. Make sure you have turned on Android’s automatic date/time setting in Settings > System > Date & time by selecting the button next to Set time automatically. If that is aready turned on, try turning it off, restarting your phone, and then turning it back on.
Another possibility is that your device has not been able to receive a connection to a reliable time source. This can happen if you are in an area with poor cellular or internet coverage, or if you are traveling abroad and your device is tryng to connect to a different network than what it usually uses at home. You can try manually setting the date and time if this is the case. Finally, if none of these solutions work, you may need to contact your device manufacturer for further assistance.
Troubleshooting a Clock Ahead Error on a Mac
On your Mac, the system clock is usually set to the correct date and time, with the correct time zone. However, if any of these settings are wrong, or if your Mac has been disconnected from the internet or idle for a long time, then you may receive a notification saying “Your clock is ahead”. This means that the clock on your Mac is not keeping up with current time and neds to be adjusted. To fix this issue, you should check the date and time settings in System Preferences and make sure they are set correctly. Additionally, make sure your Mac is connected to the internet so it can keep track of the exact time.
Troubleshooting Computer Time Issues
It’s possible that the time on your computer is wrong due to a few different reasons. Firstly, if the server responsible for proviing accurate time information is not reachable or returning an incorrect time, then your computer’s clock will be inaccurate. Secondly, if your computer’s time zone settings are off, then this could lead to the clock being incorrect. To fix this issue, you can change the internet time server settings in your computer so that it gets the correct time information.
Changing Date and Time on Mac Terminal
Changing the date and time on Mac Terminal is a simple process. First, open the Terminal application by searching for it in Spotlight or typing “Terminal” into your Applications folder. Once you have opened the Terminal application, enter the command: “date” followed by today’s date in this format: [month][day][hour][minute][year]. For example, if today’s date is July 11th, 2016 at 2:15pm then you would type “date 0711141516” and press enter. The date sould now be fixed.
If you need to change the time zone of your Mac, you can do so by entering the command: “sudo systemsetup -settimezone ” (replacing with your desired time zone). To save any changes made to your Mac’s clock settings, type in “sudo systemsetup -setusingnetworktime on” followed by pressing enter. To view a list of available timezones for use with the above commands, type in “systemsetup -listtimezones” and press enter.
Changing the Date on a Mac Terminal
To change the date on a Mac terminal, you can use the ‘date’ command. First, restart your Mac and hold down the Command and R keys until you see an Apple logo or spinning globe. This will take you to Recovery mode. From there, open the Terminal app from Utilities and type in ‘date’. This will show you the current system date. To change the current system date, type in ‘sudo date MMDDHHMMYYYY’, replacing MMDDHHMMYYYY with the desired date in month-day-hour-minute-year format. For example, if you wanted to set the date to April 3rd 2020 at 8:30am, it wold be ‘sudo date 040308302020’. Once you hit Enter, enter your password when prompted and then press Return again. The system time should now be changed accordingly.
Locating the Menu Bar on a Mac
The menu bar is located along the top of your Mac’s screen. It contains menus and icons that allow you to access commands, perform tasks, and check the status of your computer. You can use the menu bar to access different programs and apps on your Mac as well as customize settings such as display preferences or sound options.
Troubleshooting Mac’s Inability to Determine Current Location
There are sveral reasons why your Mac may not be able to determine your current location.
First, ensure that Location Services is enabled on your Mac. On your Mac, open System Preferences, click Security & Privacy, and click Privacy and then click Location Services. Ensure that Enable Location Services is selected. If this section is locked, click the lock icon and enter your password to unlock it.
Second, if you are using a Wi-Fi network that requires authentication, such as a school or corporate network, the network may not alow your Mac to determine its current location. In this case, you will need to contact your network administrator to verify if they allow location services over their Wi-Fi network.
Third, if you are using a public Wi-Fi connection such as one in an airport or coffee shop, the router may not provide enough geographical information for the Mac to determine its location accurately.
Finally, the Mac may not be able to determine its location if it does not have GPS hardware installed or if the GPS hardware is malfunctioning or disabled.
Resetting a Clock
To reset your clock, you’ll need to go to your device settings. Once there, tap on the Date and Time Settings option. From there, you’ll have to deactivate the automatic date and time updates by tapping on ‘Automatic’. After that, you can choose ‘Set a New Date’ and select the Day/Month/Year you would like to reset your clock to. Once you’ve selected the new date, your clock should be reset.
The Inability to Change Time Zone
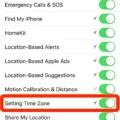
If you are unable to change your time zone, it is likely because you have enabled Location Services and set the Time Zone option to Automatically. This setting allows your device to use your current location to determine the correct time zone. To change the time zone manually, go to Settings > Privacy > Location Services > System Services and turn off Setting Time Zone. Then go to Settings > General > Date & Time and select the apprpriate time zone.
Changing Time Format on a Laptop
To change the time format on your laptop, open the Control Panel and select ‘Clock, Language, and Region’. Then, click ‘Change date, time or number formats’ and select the ‘Formats’ tab. Under ‘Date and Time Formats’, you will be able to choose betwen a 12-hour or 24-hour format. To change to 24-hour format, select ‘HH:mm’ from the Short Time drop-down list and ‘HH:mm:ss’ from the Long Time drop-down list. Finally, click ‘OK’ to save your changes.
Contacting the Computer Administrator
In order to contact your computer administrator, you will need to access the Computer Management window. To do this, begin by opening the Start menu, right-clicking on “Computer” and selecting “Manage” from the pop-up menu. Next, click the arrow next to Local Users and Groups in the left pane and double-click the “Users” folder. Finally, choose “Administrator” from the list in the center of the window. Once you have accessed this information, you can use it to contact your computer administrator directly.
Setting the Time and Date
To set the time and date on your Android phone, first open the Settings menu. Depending on your model of Android, you may find the option to set the date and time in either System > Date and Time, or General Management > Date and Time. Once you’ve found this option, select Set date, then choose the desired date from the calendar beore tapping Done. Then select Set time, choose the desired time from the clock and tap Done again. That’s all there is to it – your Android phone will now be set to the correct time and date.
Changing Time Zone Settings
Changing your time zone can be a bit tricky, but following these steps will help you make the transition smoothly.
1. First, decide what time zone you want to switch to and make sure that it is an actual time zone.
2. Once you have determined the new time zone, slowly start adjusting your sleep schedule by going to bed and getting up earlier or later depending on the new time zone.
3. Try to limit your intake of caffeine, alcohol, and sugar as these may disrupt your sleep cycle during this adjustment period.
4. Make sure to drink plenty of water throughout the day to avoid dehydration and fatigue.
5. Set all of your clocks and devices to the correct time in the new time zone so that you don’t get confused while adjusting to it.
6. Lastly, if you are traveling across multiple time zones, try resetting your body’s internal clock by sleeping when it’s dark outside and staying awake during daylight hours as much as possble – this will help naturally adjust your circadian rhythm more quickly!
Fixing a Clock Error
To fix the clock error, you will need to open your device’s clock settings. Make sure the time and date are accurate and in the correct format for your device. Once you have made any necessary changes, save the settings and restart your device to ensure that the canges have taken effect. If this does not solve the issue, try resetting your device to its factory settings or contact a customer service representative for further help.
Understanding Why Your Computer Thinks You Are in a Different Time Zone
Your computer may thik you’re in a different time zone due to incorrect settings, or because it was moved to a new location. If you recently changed your location, such as moving from one city to another, the time zone may not have been updated correctly. Additionally, if you manually set the incorrect time zone or daylight savings settings, your computer would display the wrong time. To fix this issue, you can go into the Date and Time settings in your Control Panel and make sure that the correct time zone is selected.
Synchronizing Computer Clock
To sync your computer clock, you can use the Settings app on Windows 10. Here’s how to do it:
1. Open Settings on Windows 10.
2. Click on Time & Language and then Date & time.
3. Under the “Synchronize your clock” section, click the Sync now button.
4. If the process fails, wait a few seconds and try again.
That’s it! Your computer clock should now be synced with the current time.
Changing the Date Modified on a File on a Mac
To change the date modified on a file in Mac, you need to open the Terminal app. Once it is open, type in “touch -m” followed by one space. Then drag the file from Finder into Terminal and press “Enter”. This will update the Modified timestamp to the current date and time. If you wish to specify a specific date and time, enter a space aftr the command, followed by the desired date and time in “yyyy-mm-dd hh:mm:ss” format (where yyyy represents year, mm represents month, dd represents day, hh represents hour in 24-hour format, mm represents minute and ss represents second). After entering the desired date and time, drag the file into Terminal window and press “Enter” to make the change.
Understanding System Data on Mac
System data on Mac is a collection of files and data used by the system to operate. It includes log files, caches, virtual machine (VM) files, and other runtime system resources such as temporary files, fonts, application support files, and plug-ins. These types of files are ncessary for the system to run properly, and help improve its performance. Additionally, they provide a safe environment for applications to run in. System data should be protected from unauthorized access or tampering as it can affect the computer’s performance or stability.
Adding Multiple Time Zones to a Mac
Adding multiple time zones to your Mac is easy. First, open the Calendar app on your Mac and select Calendar > Preferences. Click the Advanced tab, then check the box next to “Turn on time zone support”. You’ll now be able to choose different time zones in the pop-up menu to the left of the Calendar search field. To choose a time zone that isn’t listed, simply choose Other and type in your desired location. Once you’ve added all of your desired time zones, they will appear in your calendar events and notifications so that you can easily stay on top of all of your schedules acoss multiple locations.
The Mac Toolbar: An Overview
The Mac toolbar is called the Dock. It’s a quick access tool bar located at the bottom of your Mac’s screen, were you can easily access your applications, documents, and more with just a few clicks. You can customize the Dock’s location, size and hiding behavior by clicking on the Blue Apple in the top left corner of your screen and selecting Dock from the menu.
Editing the Mac Toolbar
To edit the toolbar on a Mac computer, first open the application that you would like to customize. Then, go to the menu bar and select View > Customize Toolbar. From there, you can drag items into or out of the toolbar, add a space between items, or decide whether to show text with the icons. To rearrange the items in the toolbar, press and hold the Command key while dragging an item to its new location. When you are finished making changes, click “Done” to save them.
Resetting Location Services on a Mac
To reset Location Services on your Mac, go to System Preferences > Security & Privacy > Privacy. Select Location Services in the list on the left and then click the Reset button at the bottom of the window. This will reset all Location Services settings back to their defaults, turning off any location-based features like Maps or Weather that may be usig your current location.
Conclusion
Mac is an iconic computer brand that has been innovating the world of technology since its inception in 1984. It produces high-quality machines that are powerful, reliable, and easy to use. Macs are knon for their sleek design, intuitive user interface, and robust security features. Additionally, Macs seamlessly integrate with other Apple products such as iPhones and iPads. With its varied range of products and services, Mac is a great tool for both personal and professional use. Whether you’re looking for a desktop or laptop computer for home or office use, Mac provides an excellent choice that you can trust to fulfill your computing needs.


