Shortcut icons are small graphical representations that we see on our desktops or in file folders. They are designed to quickly identify and provide easy access to specific files, programs, or applications. While default shortcut icons are functional, they may not always be visually appealing or representative of the content they represent. Fortunately, changing a shortcut icon to something more personalized or visually appealing is a simple process. In this article, we will explore the steps to change a shortcut icon on both Windows and Mac operating systems.
Changing a shortcut icon on Windows:
1. Locate the shortcut icon that you want to change. This could be on your desktop, in a file folder, or on the taskbar.
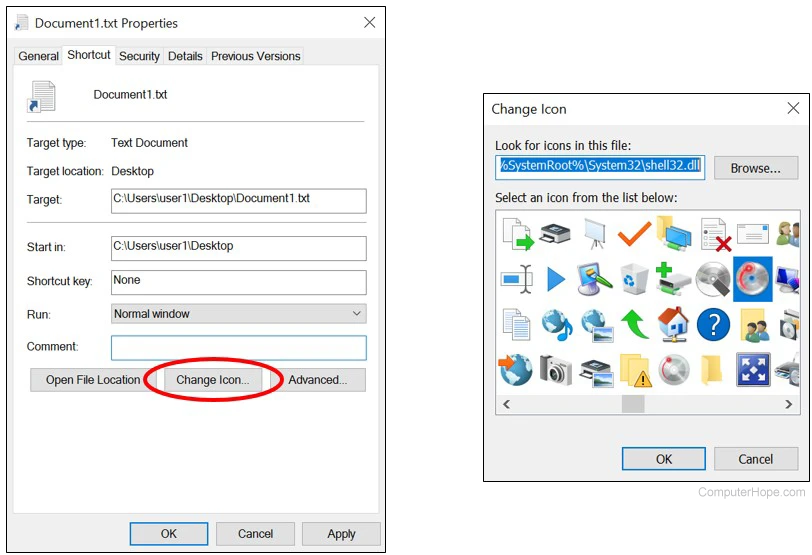
2. Right-click on the shortcut icon and select “Properties” from the context menu.
3. In the Properties window, navigate to the “Shortcut” tab.
4. Click on the “Change Icon” button, located at the bottom right of the window.
5. A new window will open, displaying a list of available icons. You can choose from the pre-installed icons or browse for your own custom icon file. To browse for a custom icon, click on the “Browse” button and navigate to the location where the icon file is stored.
6. Once you have selected the desired icon, click “OK” to close the icon selection window.
7. Back in the Properties window, click “Apply” and then “OK” to save the changes.
Changing a shortcut icon on Mac:
1. Locate the shortcut icon that you want to change. This could be on your desktop or in a file folder.
2. Right-click (or Control-click) on the shortcut icon and select “Get Info” from the context menu.
3. In the Get Info window, click on the current icon image, which is typically located in the top left corner.
4. Press the “Delete” key on your keyboard to remove the current icon.
5. Open a new Finder window and locate the new icon file that you want to use.
6. Drag and drop the new icon file onto the icon image in the Get Info window.
7. The new icon will replace the old one. Close the Get Info window to save the changes.
By following these simple steps, you can easily change the shortcut icon to something more visually appealing or representative of the content it represents. Whether you are using a Windows or Mac operating system, customizing your shortcut icons can add a personal touch to your desktop or file organization system. So go ahead and give it a try, and enjoy a more personalized and visually pleasing computing experience.
How Do You Customize Shortcut Icons?
To customize shortcut icons on your device, you can follow these steps:
1. Tap on the icon you want to customize and hold your finger on it for a few seconds. This will activate the editing mode for your icons.
2. A menu will appear on the screen, displaying various options. Look for the “Edit” or “Change” option and tap on it.
3. Next, you will be given several choices for selecting a new icon. Tap on the option that says “Choose File” or “Select Icon” to proceed.
4. This will open your device’s file explorer or gallery, allowing you to browse and locate the custom app icon that you want to use. You can choose an image file from your device’s internal storage or from a cloud storage service if available.
5. Once you have selected the desired icon, tap on the “OK” or “Open” button to confirm your selection.
6. The new icon will now replace the old one, and you will see the updated shortcut icon on your home screen or app drawer.
If you want to further customize your icons, you can repeat these steps for other shortcuts as well. Remember to choose icons that are visually appealing and easy to recognize for a better user experience.
It’s important to note that the ability to customize shortcut icons may vary depending on your device’s operating system and launcher. Some devices and launchers may have more advanced customization options, allowing you to change icons directly from the settings menu or by using third-party icon packs.
Customizing shortcut icons on your device is a simple process. By following the steps mentioned above, you can personalize your home screen and make it more visually appealing.
How to Change A Shortcut?
To change a shortcut in Microsoft Word, follow these steps:
1. Click on the “File” tab in the top left corner of the Word window.
2. Select “Options” from the drop-down menu. This will open the Word Options dialog box.
3. In the Word Options dialog box, click on “Customize Ribbon” on the left-hand side.
4. Towards the bottom of the Customize the Ribbon and keyboard shortcuts pane, click on the “Customize” button.
5. In the “Save changes in” box, select either the current document name or template that you want to save the keyboard shortcut changes in. This will ensure that the changes are specific to the document or template you are working on.
6. Now, you can customize the keyboard shortcuts. To change a specific shortcut, click on the command category on the left side of the dialog box, then select the command on the right side.
7. Once you have selected the command, click on the “Press new shortcut key” box and press the new key combination you want to assign to that command. Word will let you know if the key combination is already assigned to another command.
8. If you want to reset a shortcut to its default setting, click on the “Reset” button.
9. After making all the desired changes, click on the “Close” button to save your changes and close the dialog box.
By following these steps, you can easily change keyboard shortcuts in Microsoft Word to suit your preferences and workflow.
Conclusion
The Shortcut Icon feature in various software applications allows users to customize the appearance of their app icons, giving them a more personalized and unique look. By following a few simple steps, users can easily change the default icon to a custom one of their choice.
The process involves selecting the desired icon file from the device’s storage and applying it to the app. This gives users the freedom to use any image or design that aligns with their preferences or brand identity.
Furthermore, customizing keyboard shortcuts is another useful feature that allows users to optimize their workflow and increase productivity. By assigning specific actions or commands to certain key combinations, users can quickly access frequently used features or perform repetitive tasks with ease.
To customize keyboard shortcuts, users can navigate to the options or settings menu of the software application and locate the customize ribbon or keyboard shortcuts section. From there, they can choose the desired commands or functions they want to assign shortcuts to, and save the changes in the current document or template.
The Shortcut Icon and custom keyboard shortcuts features provide users with the flexibility to personalize their software experience and tailor it to their specific needs. Whether it’s changing the app icon to reflect a personal aesthetic or optimizing workflow through customized keyboard shortcuts, these features enhance usability and efficiency.

