If you’ve ever found yourself in the unfortunate situation of haing your iPhone locked and unable to access it, then you know how frustrating it can be. Fortunately, there is a way to backup your locked iPhone if you still have access to the device. This blog post will provide detailed instructions on how to back up a locked iPhone so that you don’t lose any of your important data.
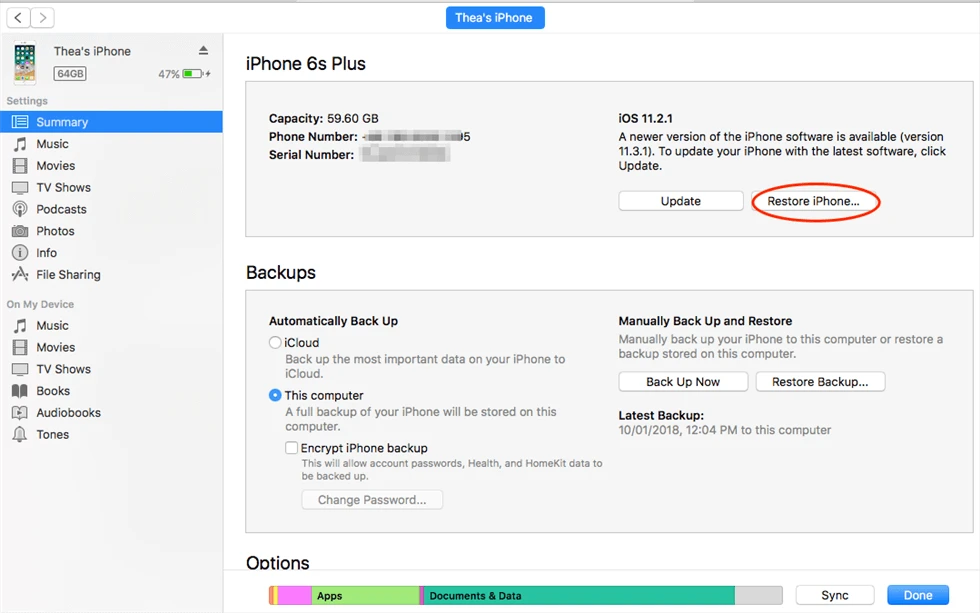
First, connect your iPhone to the computer with which it is synced. Once connected, open iTunes (or Finder if using MacOS Catalina or later) and select your device in the sidebar. Next, click on the “Backup” button to initiate the backup process. You can choose ether “This Computer” or “iCloud” as your backup destination; both options will back up all data from your phone, including photos, contacts, messages, and more.
Once the backup has been initiated, wait for it to finish before disconnecting your phone from the computer. It may take some time for the backup process to complete depending on how much data is stored on your device. After backing up your phone, disconnect it from the computer and set up a passcode for future access.
It is important to note that if you are using an older version of iOS (11 or earlier), then an encrypted backup must be used in order to include passwords saved on your device; otherwise only non-password data will be backed up. If you are running iOS 12 or later however, an encrypted backup is not required as passwords are automatically included in backups created with these versions of iOS.
We hope this guide has helped provide some information on how to back up a locked iPhone and protect all of its valuable data – even when you cannot get past its lock screen!
Backing Up a Locked iPhone
Yes, you can take a backup of your locked iPhone with iCloud. Go to Settings > [your name] > iCloud > iCloud Backup and turn on iCloud Backup. Your iPhone will then automatically back up daily when it is connected to power, locked, and connected to a Wi-Fi network. Additionally, depending on the model of your iPhone and your carrier, you may have the option to back up using your cellular network.
Restoring an iPhone from a Locked Backup
Restoring your iPhone from a locked backup is easy, but it requires you to have access to the computer that you used to back up your device. First, locate your iPhone in the Finder or in iTunes on the computer. Next, select Restore when prompted. After this, wait for the restoration process to finish. Finally, disconnect your iPhone from the computer and set up and use your device as usual.
Backing Up an iPhone Without Accessing the Phone
Backing up your iPhone without accessing your phone is possible through a process called iCloud backup. To do this, you will need an Apple ID and access to Wi-Fi or a cellular data connection.
First, make sure that iCloud Backup is enabled on your device. To do this, go to Settings > [your name] > iCloud > iCloud Backup and turn it on.
Once enabled, your device will automatically back up when connected to Wi-Fi and the battery is charged above 50%. You can also manually back up by ging to Settings > [your name] > iCloud > iCloud Backup and tapping Back Up Now.
You may want to check the backup size before you start the process by going to Settings > [your name] > iCloud > Manage Storage. This will show you how much storage space you have used and what apps are taking up the most space on your device.
Your backups will be stored in iCloud unil you delete them manually. To view your backups, go to Settings > [your name] > iCloud and tap Storage & Backup at the bottom of the screen. Here, you can select one of the backup files listed under Backups and choose which files or folders you would like to restore from that file.
Backing Up a Locked iPhone Without iTunes
Backing up your locked iPhone wihout iTunes can be done quickly and securely with FoneDog iOS Data Backup & Restore. This tool is easy to use and allows you to back up all the data on your device in three simple steps.
Step 1: Connect your iPhone to the computer usng a USB cable and launch FoneDog iOS Data Backup & Restore.
Step 2: Select the files that you want to back up and click “Backup”.
Step 3: Wait for the process to complete, then disconnect your iPhone from the computer.
That’s it! Your data will now be backed up in a secure location on your computer, so you can access it anytime you need it. With FoneDog iOS Data Backup & Restore, you don’t need to worry about losing any of your data or havng iTunes lock out your phone during a backup attempt.
Consequences of Interrupting an IPhone Backup
If you interrupt an iPhone backup while it is in progress, it could lead to permanent data loss. When the backup is interrupted, any data that has not been backed up will not be saved, leaving your device in a potentially unstable state. Additionally, if you are backing up to iCloud, interrupting the process will delete the existing iCloud backup data, but won’t affect the photos currently stored on your camera. To avoid any potential data loss, make sure you have completed a full backup before disconnecting your device from power or Wi-Fi.
Conclusion
In conclusion, backing up a locked iPhone is possible and can be done by enabling iCloud Backup in the iPhone settings. It is important to note that the device nees to be connected to power, locked, and connected to Wi-Fi for this process to work properly. Additionally, it is necessary to have enough space in iCloud to store the backup. Restoring an iPhone from a backup can then be done using either Finder or iTunes on the computer that it’s connected to. Once the process is finished, users can disconnect their device and set up and use their iPhone as usual.


