Have you ever encountered the frustrating “self-assigned IP address” error on your Mac? If so, you’re not alone. This common issue can cause your internet connection to fail, leaving you unable to browse the web or access online services. But fear not, as there are several steps you can take to fix this problem and get your Mac back online.
1. Reset your network preferences: Sometimes, network settings can become corrupted, leading to the self-assigned IP address error. To fix this, you can reset your network preferences by following these steps:
– Click on the Apple logo in the menu bar and select “System Preferences.”
– Find and go to the “Network” settings.
– Select your Wi-Fi or Ethernet connection, if it’s not selected automatically.
– Click on the “Advanced” button.
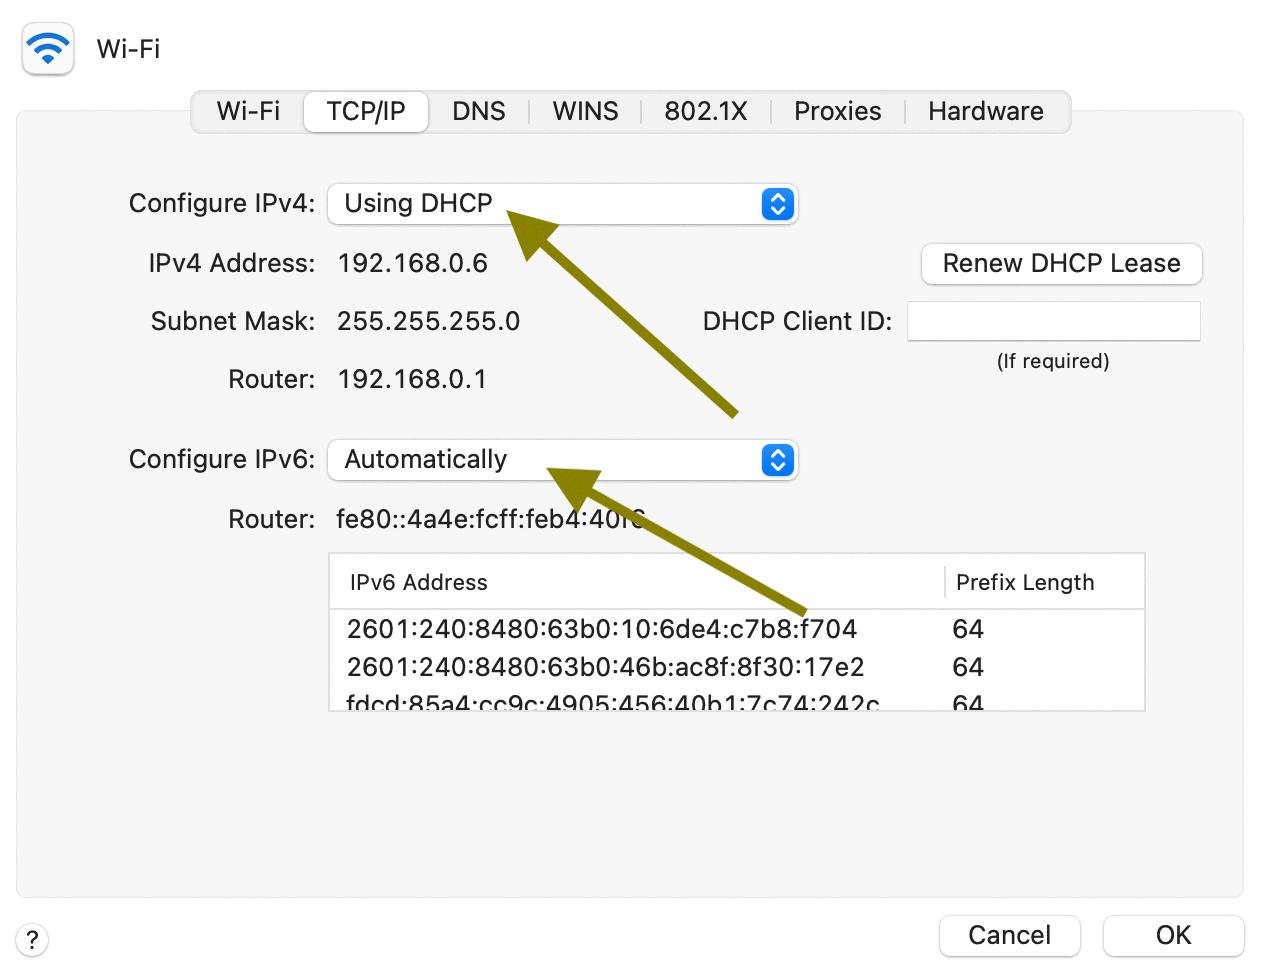
– Go to the “TCP/IP” tab.
– Click on the “Renew DHCP Lease” button.
– Restart your Mac and check if the issue is resolved.
2. Create a new network location: If resetting your network preferences didn’t work, you can try creating a new network location. This will create a fresh set of network settings, which may help resolve the self-assigned IP address error. Here’s how to do it:
– Open the “Network” settings as mentioned above.
– Click on the “Location” drop-down menu and select “Edit Locations.”
– Click on the “+” icon to create a new location.
– Give it a name (e.g., “New Location”) and click “Done.”
– Select your new location from the drop-down menu and apply the changes.
– Restart your Mac and check if the issue is resolved.
3. Reset the firewall on your Mac: In some cases, the firewall settings on your Mac can interfere with the network connection and cause the self-assigned IP address error. To reset the firewall, follow these steps:
– Open “System Preferences” and go to the “Security & Privacy” settings.
– Click on the “Firewall” tab.
– Click on the lock icon and enter your administrator password.
– Click on the “Turn Off Firewall” button.
– Restart your Mac and check if the issue is resolved.
4. Set Service Order from Mac’s Network settings: Another potential solution is to change the service order of your network connections. Here’s how to do it:
– Open the “Network” settings.
– Click on the gear icon and select “Set Service Order.”
– Drag your Wi-Fi or Ethernet connection to the top of the list.
– Click “OK” and apply the changes.
– Restart your Mac and check if the issue is resolved.
5. Change DNS servers on macOS: DNS (Domain Name System) servers translate domain names into IP addresses, allowing your Mac to connect to websites. Sometimes, changing the DNS servers can help resolve the self-assigned IP address error. Here’s how:
– Open the “Network” settings.
– Select your Wi-Fi or Ethernet connection.
– Click on the “Advanced” button.
– Go to the “DNS” tab.
– Click on the “+” icon to add a new DNS server.
– Enter the following DNS server addresses: 8.8.8.8 and 8.8.4.4 (these are Google’s public DNS servers).
– Click “OK” and apply the changes.
– Restart your Mac and check if the issue is resolved.
By following these steps, you should be able to fix the self-assigned IP address error on your Mac and regain your internet connection. However, if the problem persists, it may be worth contacting your internet service provider or seeking further assistance from a professional technician.
How Do You Stop Your Mac From Self Assigning IP Address?
To fix the self-assigned IP error on your Mac, follow these steps:
1. Reset your network preferences on Mac:
– Open the “System Preferences” on your Mac.
– Click on “Network.”
– On the left-hand side, select the network connection you are using (e.g., Wi-Fi or Ethernet).
– Click on the minus (-) button to remove the connection.
– Confirm the action by clicking on “Apply” or “OK.”
– Restart your Mac.
2. Renew DHCP lease on macOS:
– Go to “System Preferences” and click on “Network.”
– Select the network connection you are using (e.g., Wi-Fi or Ethernet).
– Click on the “Advanced” button.
– Go to the “TCP/IP” tab.
– Click on the “Renew DHCP Lease” button.
– Close the window and restart your Mac.
3. Create a new network location:
– Open “System Preferences” and click on “Network.”
– Select the network connection you are using (e.g., Wi-Fi or Ethernet).
– Click on the “Location” drop-down menu and choose “Edit Locations.”
– Click on the plus (+) button to create a new location.
– Name the new location and click “Done.”
– Apply the changes and restart your Mac.
4. Reset the firewall on your Mac:
– Open “System Preferences” and click on “Security & Privacy.”
– Go to the “Firewall” tab.
– Click on the lock icon and enter your administrator password.
– Click on the “Firewall Options” button.
– Click on “Restore Defaults” or “Allow incoming connections.”
– Apply the changes and restart your Mac.
5. Set Service Order from Mac’s Network settings:
– Open “System Preferences” and click on “Network.”
– Click on the gear icon and select “Set Service Order.”
– Drag the network connection you are using (e.g., Wi-Fi or Ethernet) to the top of the list.
– Close the window and restart your Mac.
6. Change DNS servers on macOS:
– Open “System Preferences” and click on “Network.”
– Select the network connection you are using (e.g., Wi-Fi or Ethernet).
– Click on the “Advanced” button.
– Go to the “DNS” tab.
– Remove any existing DNS servers by clicking on the minus (-) button.
– Add new DNS servers by clicking on the plus (+) button and entering the server addresses (e.g., 8.8.8.8, 8.8.4.4 for Google DNS).
– Click “OK” and apply the changes.
By following these steps, you should be able to resolve the self-assigned IP error on your Mac and establish a proper network connection.

How Do You Fix Your Self-Assigned IP Address On Your Mac Ethernet?
To fix a self-assigned IP address issue on your Mac Ethernet, you can follow these steps:
1. Click on the Apple logo in the menu bar and go to “System Preferences.”
2. In the “System Preferences” window, find and click on “Network.”
3. From the list of network connections on the left side, select your Ethernet connection.
4. Make sure that the Ethernet connection is selected and click on the “Advanced” button.
5. In the “Advanced” settings, go to the “TCP/IP” tab.
6. If the “Configure IPv4” dropdown menu is set to “Using DHCP,” change it to “Manually.”
7. Now, click on the “Renew DHCP Lease” button to release the current IP address.
8. After that, click on the “Apply” button to save the changes.
9. If you want to use specific DNS servers, go to the “DNS” tab and click on the “+” icon.
10. Add the desired DNS server addresses, such as 8.8.8.8 and 8.8.4.4, and click on “OK.”
11. click on the “Apply” button again to save the DNS server changes.
By following these steps, you should be able to fix the self-assigned IP address issue on your Mac Ethernet connection.
What Are The Self Assigned IP Address Ranges?
Self-assigned IP addresses, also known as Automatic Private IP Addressing (APIPA), are utilized by client computers when they are unable to obtain an IP address from a DHCP server. In such cases, the client computer will automatically assign itself an IP address from a specific range of addresses known as the APIPA range.
The self-assigned IP address ranges are as follows:
– 169.254.0.0 to 169.254.255.255
When a client computer activates APIPA and is unable to connect to a DHCP server, it will randomly select an IP address from this predefined range. It does this to ensure that it can still communicate on the local network, even without a valid IP address assigned by a DHCP server.
It is important to note that self-assigned IP addresses are only meant for local network communication and cannot be used for internet connectivity. These addresses are not routable on the internet, hence they are primarily used as a temporary solution until the client computer can obtain a valid IP address from a DHCP server.
The self-assigned IP address ranges are from 169.254.0.0 to 169.254.255.255, and they are automatically assigned by client computers when they are unable to obtain an IP address from a DHCP server.
Conclusion
A self-assigned IP address, typically in the range of 169.254.x.x, is an indication that your device, in this case, a Mac computer, was unable to obtain an IP address from the router or DHCP server. This issue can prevent your device from connecting to the internet or communicating with other devices on your network.
To fix this problem, there are several troubleshooting steps you can follow. Firstly, resetting your network preferences can help resolve any configuration issues that may be causing the self-assigned IP address problem. Renewing the DHCP lease is another option, as it forces your Mac to request a new IP address from the router.
If these initial steps don’t work, creating a new network location can help by resetting all network settings to their default values. Resetting the firewall on your Mac can also be beneficial, as it may be blocking the necessary network connections.
Additionally, adjusting the service order in the network settings can ensure that your Mac prioritizes the correct network connection. Changing the DNS servers can also be helpful, as sometimes incorrect DNS settings can lead to self-assigned IP address issues.
By following these troubleshooting steps, you should be able to resolve the self-assigned IP address error on your Mac and regain normal network connectivity. Remember to consult the specific instructions for your macOS version for accurate guidance.


