In our busy lives, it’s easy to forget important tasks or items. That’s where checklists come in handy. A checklist is a simple yet effective tool that helps us stay organized and ensures that nothing slips through the cracks. Whether you’re planning a trip, organizing a project, or just trying to remember your daily to-dos, a checklist can be a lifesaver. In this article, we will explore the benefits of using checklists and how to create one using the Notes app on your Android phone or tablet.
Benefits of Using Checklists
Checklists offer several advantages, making them an essential tool for productivity and organization. Here are some benefits of using checklists:
1. Increased efficiency: By having a clear list of tasks or items, you can work through them systematically, avoiding duplication or missing important steps.
2. Improved focus: A checklist helps you stay focused on one task at a time, reducing distractions and increasing productivity.
3. Reduced stress: With a checklist, you can alleviate the mental burden of trying to remember everything. You can trust your checklist to guide you through your tasks.
4. Enhanced organization: Checklists provide a visual representation of your progress, helping you prioritize tasks and track your accomplishments.
Creating a Checklist in Notes
Now, let’s dive into how you can create a checklist using the Notes app on your Android device. Follow these simple steps:
1. Open the Notes app on your Android phone or tablet.
2. Tap the “Compose” button to create a new note.
3. Enter a title for your checklist, such as “Grocery Shopping” or “Project Tasks.”
4. Tap the “Checklist” button, usually represented by a checkbox icon, to start the list.
5. Each time you tap the return key, a new item will be added to the checklist.
6. To mark an item as complete, simply tap the empty circle next to it. This will provide a visual indication of your progress.
7. If you want to sort your checked items, go to Settings > Notes, tap “Sort Checked Items,” and choose between manual or automatic sorting options.
8. As you complete tasks or items, check them off on your checklist. If you want to start over, you can uncheck all items.
Using Checklists Effectively
To make the most out of your checklists, here are a few tips:
1. Be specific: Clearly define each task or item on your checklist to avoid confusion or ambiguity.
2. Prioritize tasks: Arrange your checklist in order of importance or urgency to ensure you focus on the most critical items first.
3. Regularly review and update: Checklists are dynamic tools that should be regularly reviewed and updated. Add or remove items as necessary to keep your checklist relevant.
4. Customize your checklist: Tailor your checklist to suit your needs. You can add additional details or subtasks to each item if necessary.
Checklists are powerful tools that can improve your productivity, organization, and overall efficiency. By following the steps outlined above, you can create and utilize checklists using the Notes app on your Android device. Remember to be specific, prioritize tasks, and regularly review your checklist to ensure its effectiveness. With checklists at your disposal, you can stay on top of your tasks, reduce stress, and accomplish more in your day-to-day life.

How Do You Make a Checklist in Notes?
To make a checklist in the Google Keep app, follow these steps:
1. Open the Google Keep app on your Android phone or tablet.
2. Look for the “Take a note” option and tap on it.
3. Next, you will see a toolbar at the top of the screen. Among the options, find and tap on the “New list” button. This will create a new checklist for you to fill in.
4. Enter a title for your checklist by tapping on the “Title” field and typing the desired text.
5. To add items to your checklist, tap on the “Add item” field below the title. Type the first item and press Enter/Return to create a new line for the next item.
6. Repeat the previous step to add as many items as you need to your checklist.
7. To mark an item as completed, tap on the empty circle to the left of the item. A checkmark will appear, indicating that the task is complete.
8. If you want to delete an item from the checklist, swipe it to the left or right, and a red trash bin icon will appear. Tap on the icon to remove the item.
9. To rearrange the order of items in your checklist, tap and hold on an item, then drag it up or down to the desired position.
10. Once you have finished creating and organizing your checklist, tap the “Back” button to save it.
You now have a checklist in your Google Keep app, which you can refer to and update as needed.
How Do You Create a Checklist in Notes On iPhone?
To create a checklist in the Notes app on your iPhone, follow these steps:
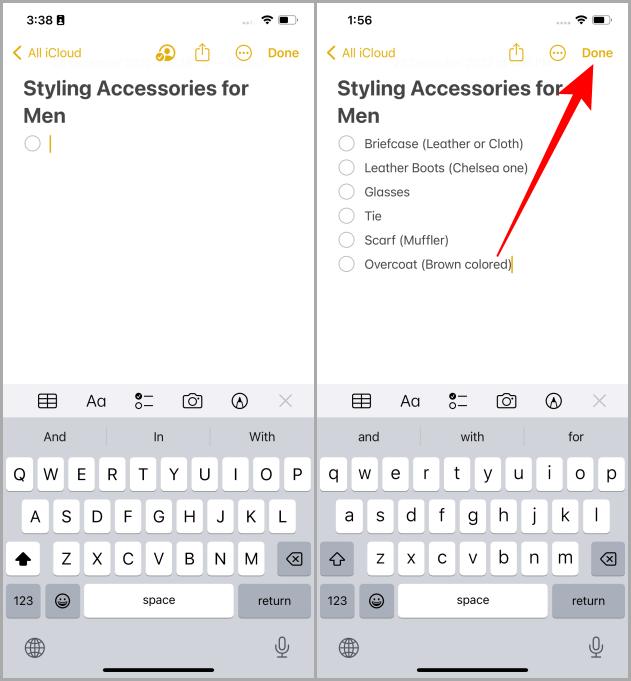
1. Open the Notes app on your iPhone. You can find it on your home screen or by swiping down and using the search bar.
2. Tap the Compose button, which looks like a square with a pencil inside, to create a new note.
3. Once you’re inside the new note, enter a title for your checklist. You can do this by tapping on the blank space at the top of the note and typing in your desired title. After you’ve typed the title, tap the return key on the keyboard.
4. Now, tap the Checklist button. It is located in the toolbar above the keyboard, and it looks like a circle with a checkmark inside. Tapping this button will activate the checklist feature.
5. You can now start creating your checklist. Each time you tap the return key on the keyboard, a new item will be added to the list. You can continue adding items by tapping return after each one.
6. To mark an item as complete, simply tap the empty circle to the left of the item. When you mark an item as complete, the circle will be filled with a checkmark.
7. If you want to remove an item from the checklist, you can tap the empty circle again to unmark it. Alternatively, you can delete the item by deleting the text associated with it.
That’s it! You have successfully created a checklist in the Notes app on your iPhone. You can now use this checklist to keep track of tasks, make to-do lists, or organize your thoughts.
Does Apple Notes Have a Checklist?
Apple Notes does have a checklist feature. To access it, you need to go to the Settings within the Notes app. Once you are in the Settings, you can find the option to enable the checklist feature.
To do this, follow these steps:
1. Open the Apple Notes app on your device.
2. Tap on the “Settings” option, usually located in the lower-right corner of the screen.
3. In the Settings menu, you will see various options. Look for the one that says “Notes” and tap on it.
4. Within the Notes settings, you will find the “Sort Checked Items” option. Tap on it.
5. Here, you can choose between two options: “Manually” or “Automatically”. Select the one that suits your preference.
– If you choose “Manually”, you will have to manually check or uncheck items as you complete them.
– If you choose “Automatically”, the checked items will be sorted automatically based on their completion status.
6. Once you have selected your preferred option, you can start using the checklist feature in Apple Notes.
To use the checklist feature, simply create a new note or open an existing one. Then, you can add items to the checklist by tapping on the checkbox icon in the formatting toolbar. As you complete each item, you can check it off by tapping on the checkbox. If you want to start over, you can uncheck all items by tapping on the checkbox icon again.
Using the checklist feature in Apple Notes can help you stay organized and keep track of your tasks or to-do lists.
How Do You Create a Checklist In Notes On a Mac?
To create a checklist in Notes on a Mac, follow these steps:
1. Open the Notes app on your Mac.
2. Create a new note or open an existing note.
3. Position your cursor where you want to add the checklist.
4. Click on the “Format” menu in the menu bar at the top of the screen.
5. From the dropdown menu, select “Checklist” or use the keyboard shortcut Shift + Command + L.
6. A checkbox will appear at the beginning of the line. Type your checklist item next to the checkbox.
7. Press Return to add a new checklist item. The checkbox will automatically appear for each new item.
8. Continue adding items to your checklist by pressing Return after each item.
9. To mark an item as completed, click the checkbox next to the item. The checkbox will be checked.
10. To uncheck a completed item, click the checkbox again.
That’s it! You have successfully created a checklist in Notes on your Mac. You can use this feature to stay organized, keep track of tasks, or create to-do lists.
Conclusion
Checklists are incredibly useful tools for staying organized and ensuring that important tasks are completed. Whether you are creating a simple to-do list or a complex project plan, checklists provide a clear and concise way to outline and track your progress.
By creating a checklist, you have the ability to break down larger tasks into smaller, more manageable steps. This not only helps to prevent overwhelm, but also allows you to prioritize and allocate your time effectively. With each item checked off, you can see your progress and feel a sense of accomplishment.
Checklists also serve as a valuable reference tool, ensuring that nothing is forgotten or overlooked. By having all of your tasks and requirements listed in one place, you can easily refer back to your checklist and avoid unnecessary mistakes or delays.
Additionally, checklists promote consistency and accuracy. By following a set of predetermined steps or guidelines, you can ensure that tasks are completed in the same manner each time, reducing the risk of errors or inconsistencies.
Checklists are an invaluable tool for improving productivity, reducing stress, and maintaining organization. Whether you use a digital app or a pen and paper, incorporating checklists into your daily routine can greatly enhance your efficiency and effectiveness. So start creating your own checklists today and experience the benefits firsthand.


