The Weather app on our smartphones has become an essential tool for keeping track of the ever-changing weather conditions. It provides us with real-time updates on temperature, precipitation, and even severe weather alerts. However, as time goes on, our list of cities in the app can become cluttered, making it difficult to find the information we need quickly. Fortunately, there are simple steps we can take to edit and delete cities from the Weather app, ensuring a more streamlined and personalized experience.
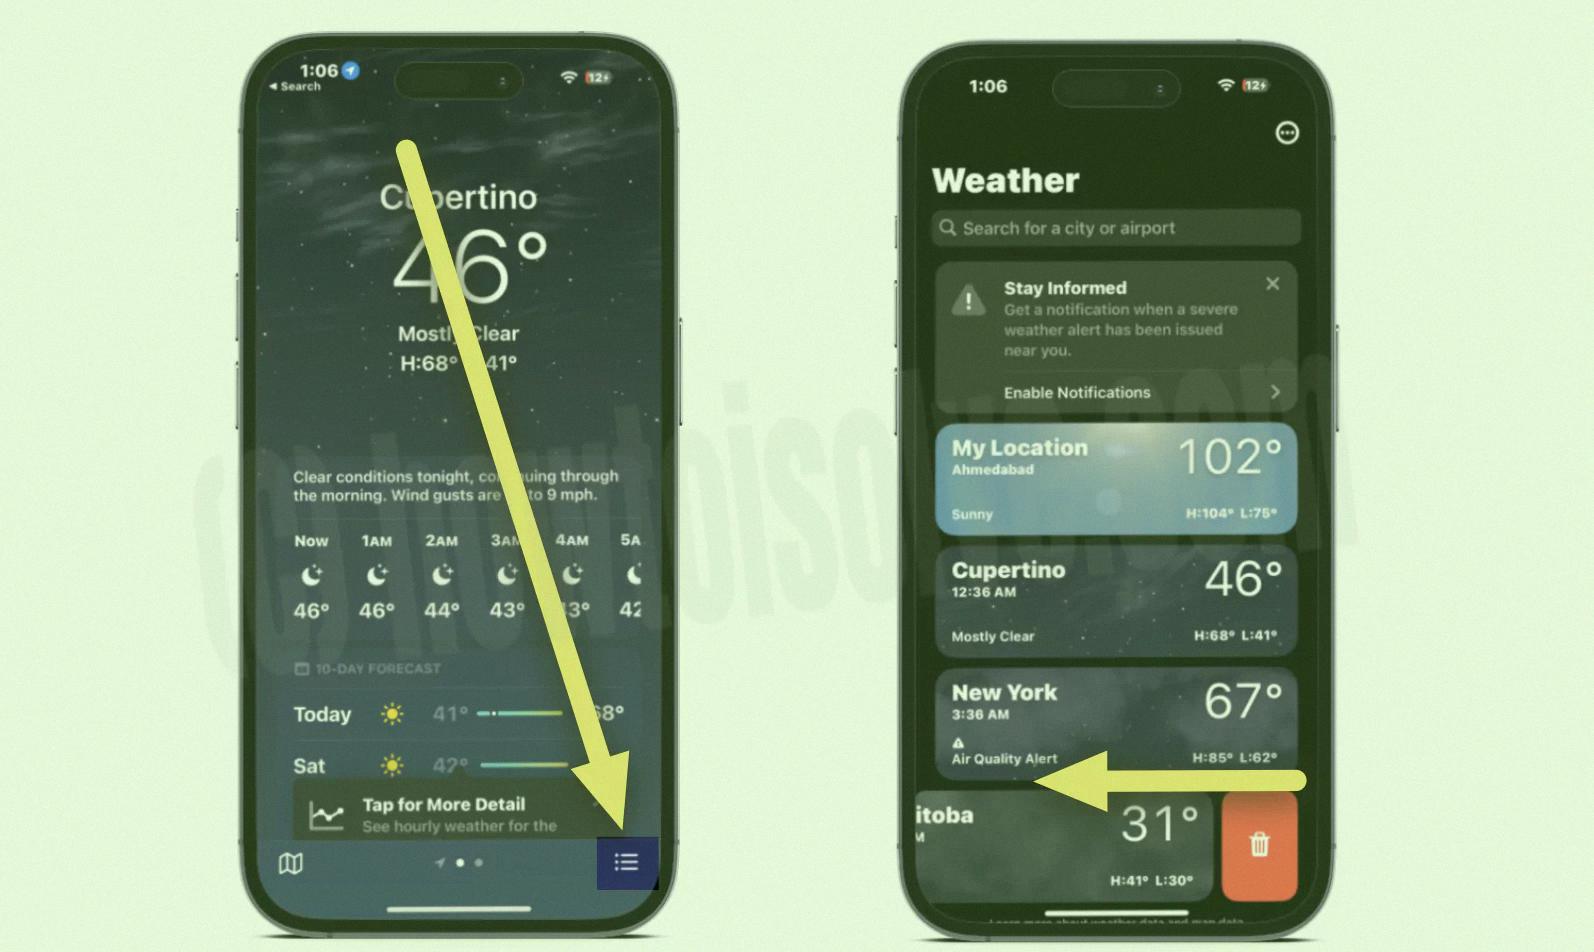
For iPhone users, editing the Weather app is a breeze. To get started, open the app and locate the building icon in the top right corner. Tap on it, and a list of your saved cities will appear. To delete a city, simply swipe right or left until you find the city you wish to remove. Once you’ve found it, swipe left on the city’s name, and a red “Delete” button will appear. Tap on it, and voila! The city is now removed from your Weather app.
But what if you want to go a step further and rearrange the order of your cities? No worries, the Weather app has got you covered. To reorder your cities, tap on the “More” button located at the bottom right corner of the app. Next, tap on “Edit List.” Now, you can simply drag and drop your cities into the desired order. Once you’re satisfied with the arrangement, tap “Done,” and the new order will be saved.
For Apple Watch users, deleting a city from the Weather app is also a straightforward process. On your Apple Watch, open the Weather app and swipe left on the city you want to remove. A red “X” button will appear. Tap on it, and the city will be deleted from your list.
It’s worth noting that if you’re experiencing any issues with the Weather app, such as glitches or incorrect data, clearing the cache and data might help resolve the problem. To do this, go to your phone’s settings, scroll down to the Weather app, and tap on it. From there, you can clear the cache and data, which will essentially reset the app to its default settings. Keep in mind that clearing the cache and data will remove all saved cities and any personalized settings, so you’ll need to set them up again.
Customizing and managing the cities in your Weather app is a simple and intuitive process. Whether you’re deleting unwanted cities or rearranging the order to suit your preferences, the Weather app allows for a personalized and efficient weather tracking experience. So, why not take a few moments to declutter and optimize your Weather app today? The power to tailor your weather updates is right at your fingertips.

How Do You Remove Cities From The Weather App?
To remove cities from the weather app, follow these steps:
1. Open the weather app on your device.
2. Look for the building icon located on the top right corner of the screen and tap on it.
3. Once you tap on the building icon, you will enter the city management section of the app.
4. To remove a city, swipe right or left to navigate through the list of cities you have added.
5. When you find the city you want to delete, swipe it to the left or right.
6. A delete or remove option should appear on the screen. Tap on it to remove the city from your weather app.
7. Repeat these steps for any additional cities you wish to remove.
If you encounter any issues or the above steps don’t work, you can try clearing the cache and data of the weather app. This can be done by going to your device’s settings, finding the app manager or applications section, locating the weather app, and then selecting the options to clear cache and data.
By following these steps, you should be able to easily remove cities from your weather app and have a more streamlined and personalized experience.
How Do You Edit The Weather App On iPhone?
To edit the Weather app on your iPhone, you can make various customizations to suit your preferences. Here’s a step-by-step guide:
1. Reorder Cities:
– Open the Weather app on your iPhone.
– Tap on the “More” button, usually represented by three horizontal lines or dots.
– From the list of cities, select “Edit List.”
– You can now rearrange the order by tapping and holding on a city, then dragging it to the desired position.
– Once you’re done, tap “Done” to save the changes.
2. Change Text Size (iOS 15 and up):
– Go to the “Settings” app on your iPhone.
– Scroll down and select “Accessibility.”
– Tap on “Per-App Settings.”
– Tap “Add App” and choose the “Weather” app from the list.
– Now, you can adjust the text size by moving the slider under “Text Size.”
– You can also enable “Larger Accessibility Sizes” to have more options for text size adjustments.
By following these steps, you can easily customize the Weather app on your iPhone according to your liking.
Conclusion
The Weather app on both Android and iPhone devices provides users with a convenient and customizable way to stay informed about the weather conditions in various cities. With the ability to add and remove cities, reorder the list, and even adjust the text size for better accessibility, the app caters to the individual preferences and needs of users.
The process of deleting a city is straightforward and can be done with a simple swipe and tap. By accessing the app’s settings, users can easily remove any unwanted cities from their list, decluttering their interface and ensuring that they only see the weather information that is relevant to them.
Furthermore, the Weather app’s ability to clear cache and data can help resolve any potential issues or glitches that may arise. This feature ensures that the app runs smoothly and provides accurate weather information to users.
The Weather app is a valuable tool for anyone looking to stay updated on the weather conditions in different cities. Its intuitive interface, customization options, and reliable weather data make it a go-to app for many users. Whether you’re planning a trip, checking the weather for your daily activities, or simply curious about the conditions in other locations, the Weather app is a reliable and user-friendly choice.


