The Domain Name System (DNS) is a crucial component of the internet infrastructure that translates human-readable domain names into the numerical IP addresses that computers use to identify each other. This process happens behind the scenes every time you visit a website or use an app on your iPhone. However, the default DNS servers provided by your internet service provider (ISP) may not always be the fastest or most reliable. Thankfully, changing DNS servers on your iPhone is a simple and effective way to potentially improve your internet speed and security.
To change DNS servers on your iPhone, follow these steps:
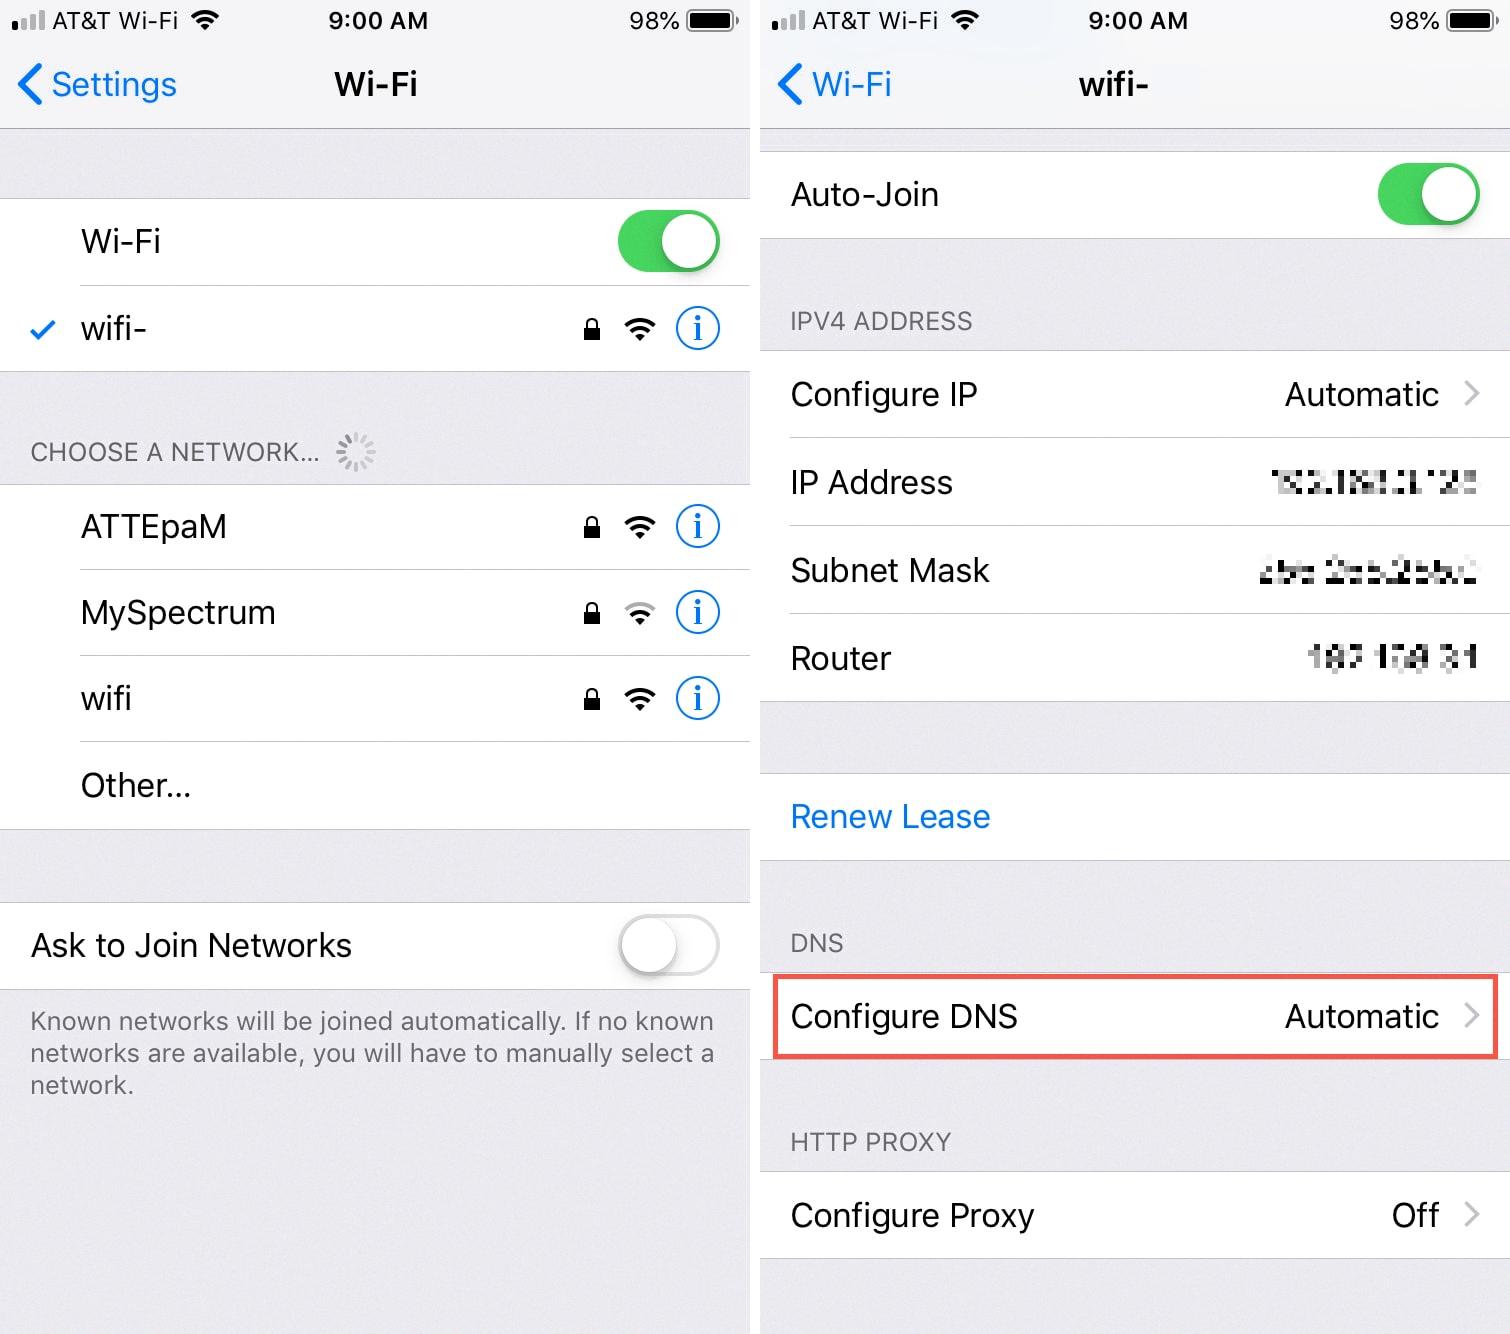
1. Open the Settings app on your iPhone and tap on Wi-Fi.
2. Find the Wi-Fi network you are currently connected to and tap on the “i” icon next to it.
3. Scroll down to the DNS section and tap on “Configure DNS.”
4. By default, your iPhone is likely set to “Automatic.” Tap on “Manual” to manually configure DNS servers.
5. You will see a list of existing DNS servers. You can remove them by tapping on the red minus (“-“) icon next to each server.
6. To add new DNS servers, tap on “Add Server” and enter the IP addresses of the servers you want to use.
There are several DNS servers you can choose from, but one popular option is Google’s Public DNS. You can use the following IP addresses for Google’s DNS servers:
– For IPv4: 8.8.8.8 and/or 8.8.4.4
– For IPv6: 2001:4860:4860::8888 and/or 2001:4860:4860::8844
After adding the desired DNS servers, tap on “Save” to apply the changes. Your iPhone will now use the new DNS servers for all internet connections made through Wi-Fi.
Changing DNS servers can have a noticeable impact on your browsing experience. By using faster and more reliable DNS servers, you may experience faster website loading times and reduced buffering when streaming media. Additionally, some alternative DNS servers, like those provided by Cloudflare (1.1.1.1), offer enhanced privacy and security features.
It’s worth noting that changing DNS servers on your iPhone only affects Wi-Fi connections. If you want to change the DNS servers used by your cellular data connection, you will need to contact your mobile carrier or use a VPN service that offers DNS server customization.
Changing DNS servers on your iPhone is a simple yet powerful way to potentially improve your internet speed and security. By using faster and more reliable DNS servers, you can enhance your browsing experience and protect your privacy. Give it a try and see how it impacts your internet usage on your iPhone.
How Do You Change Your DNS To 8.8 8.8 On Your iPhone?
To change your DNS to 8.8.8.8 on your iPhone, follow these steps:
1. Open the Settings app on your iPhone.
2. Scroll down and tap on “Wi-Fi”.
3. Find the Wi-Fi network that you want to change the DNS settings for and tap on the small “i” icon next to it.
4. Scroll down to the bottom of the Wi-Fi network settings page and locate the “DNS” section.
5. Tap on “Configure DNS”.
6. Select “Manual” to enter the DNS server addresses manually.
7. If there are any existing DNS addresses listed, tap on the red minus (-) icon next to each one to remove them.
8. Tap on the “+ Add Server” option.
9. Enter the DNS server address “8.8.8.8” and tap on “Save”.
10. You can also add another DNS server address by tapping on the “+ Add Server” option again and entering “8.8.4.4”.
By following these steps, you will have successfully changed your DNS to 8.8.8.8 on your iPhone.
How Do You Change Your DNS to 1.1 1.1 On Your iPhone?
To change your DNS to 1.1.1.1 on your iPhone, follow these steps:
1. Go to your iPhone’s Settings.
2. Tap on “Wi-Fi” settings.
3. Look for the Wi-Fi network you are currently connected to and tap on the “i” icon next to it.
4. Scroll down and find the “Configure DNS” option.
5. By default, it is set to “Automatic.” Tap on it to change the configuration to “Manual.”
6. You will now see the option to “Add Server.” Tap on it.
7. Now, you need to enter the DNS address. For IPv4, you can use one of the following DNS addresses:
– 1.1.1.1
– 1.0.0.1
8. After entering the DNS address, tap on “Save” or “Done” to save the changes.
9. You have successfully changed your DNS settings to 1.1.1.1.
Keep in mind that changing your DNS settings can affect how your device connects to the internet, so make sure you are aware of the potential implications before making any changes.
What Does Changing DNS Servers On iPhone Do?
Changing DNS servers on an iPhone allows you to control how your device connects to the internet. DNS stands for Domain Name System, and it acts as a translator between the human-readable website addresses (like www.example.com) and the numerical IP addresses that computers use to connect to websites. By default, your iPhone uses the DNS servers provided by your internet service provider (ISP).
Here are some key things that changing DNS servers on your iPhone can do:
1. Improved speed: By using faster and more reliable DNS servers, you can experience faster browsing speeds and reduced latency. This is because some DNS servers are optimized to provide quicker responses, resulting in faster website loading times.
2. Enhanced security: Changing DNS servers can also help improve your online security. Some DNS servers offer additional security features like malware blocking, phishing protection, and content filtering, which can help protect you from malicious websites and online threats.
3. Bypassing censorship: In certain countries or networks, access to certain websites or services may be restricted or blocked. By using alternative DNS servers, you can potentially bypass these restrictions and access blocked content.
4. Customization and control: Changing DNS servers allows you to have more control over your internet experience. You can choose DNS servers that prioritize privacy, offer parental controls, or provide specific features based on your preferences.
To change DNS servers on your iPhone, you can follow these steps:
1. Open the “Settings” app on your iPhone.
2. Tap on “Wi-Fi” or “Cellular,” depending on your internet connection.
3. Find and select the network you are connected to.
4. Tap on the “DNS” field, which usually displays “Automatic.”
5. Enter the IP addresses of the DNS servers you want to use. You can use public DNS servers like Google (8.8.8.8 and 8.8.4.4) or Cloudflare (1.1.1.1 and 1.0.0.1), or you can set up your own custom DNS servers if you have specific preferences.
6. Tap “Save” to apply the changes.
It’s important to note that changing DNS servers may not always result in noticeable improvements, as it depends on various factors such as your internet connection, the location of the DNS servers, and the specific websites or services you access. However, it’s worth experimenting with different DNS servers to find the ones that work best for you.
How Do You Change Your DNS To Unblock a Website On Your iPhone?
To change your DNS settings on your iPhone or iPad running iOS 12 and unblock a website, follow these steps:
1. Open the Settings application on your device.
2. Scroll down and tap on “Wi-Fi” to access your Wi-Fi settings.
3. Find the network that you are currently connected to and tap on it.
4. In the network settings, you will see an option called “Configure DNS.” Tap on it.
5. By default, it is set to “Automatic.” However, we need to change it to “Manual.” Tap on “Manual.”
6. You will see a list of DNS addresses. If there are any existing addresses, tap on the red (-) minus icon next to each address to delete them.
7. Now, tap on the “Add Server” option to add a new DNS address.
8. Enter the DNS address provided by Unblock-Us or any other DNS service you prefer.
9. Tap on “Save” to save the changes.
10. You can add additional DNS addresses by tapping on “Add Server” again and entering the new address.
11. Once you have added the desired DNS addresses, tap on “Save” to finalize the changes.
By changing your DNS settings to the provided Unblock-Us DNS or any other DNS service, you will be able to unblock websites that may have been restricted in your location. Remember to reconnect to the Wi-Fi network for the changes to take effect.
Conclusion
Changing the DNS servers on your iPhone can have a significant impact on the speed and performance of your device. By manually configuring the DNS settings, you can improve the browsing experience and enhance the functionality of various apps that rely on an internet connection.
Whether you choose to use Google’s DNS servers (8.8.8.8 and/or 8.8.4.4) or the 1.1.1.1 DNS servers provided by Cloudflare, the process of changing the DNS settings on your iPhone is relatively straightforward.
By going into the Settings app and navigating to the Wi-Fi section, you can access the specific network you are connected to and configure the DNS settings. By selecting the “Manual” option and adding the desired DNS server addresses, you can override the default DNS settings and use the servers of your choice.
It is important to note that changing DNS settings may have varying effects on different networks and internet service providers. While it can improve speed and performance in some cases, it may not have a noticeable impact in others. Additionally, it is always a good idea to have a backup of the original DNS settings in case you encounter any issues or need to revert back to the default configuration.
Taking control of your DNS settings on your iPhone can be a powerful tool to optimize your internet experience. It can help improve browsing speed, enhance app functionality, and provide additional security features. So, if you’re looking to boost your internet performance on your iPhone, don’t hesitate to explore the world of DNS configuration.

