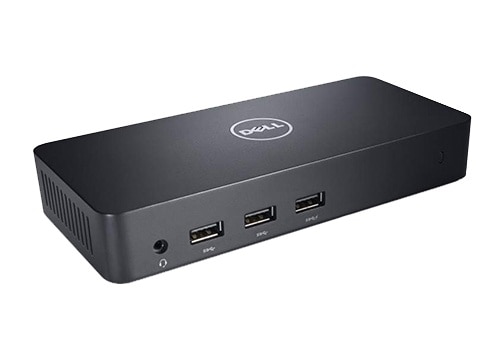
Dell Docking Station is a useful accessory for laptop users who need to connect multiple peripherals on their desks without cluttering the workspace. The docking station allows users to connect additional monitors, keyboards, mice, printers, and other USB devices to their laptops through a single cable, making it a convenient solution for professionals who work from home or the office.
Setting up Dell Docking Station is a simple process that requires a few steps. Firstly, you need to connect the keyboard and mouse to the docking station’s USB ports. Then, connect the external monitor or monitors to the docking station’s HDMI or DisplayPort connectors. If you’re using USB-C monitors, connect them to the dock via USB-C, and then connect the dock to the laptop.
Next, connect the Ethernet cable to the docking station to enable a wired internet connection. Additionally, you can connect other external USB devices such as printers, external webcams, or USB drives to the docking station’s USB ports.
Once you’ve connected all the peripherals, connect the power cable to the docking station and power it on. Browse to System Configuration, then to USB-Configuration, and select the options to Enable USB Boot Support and Enable External USB Port. Browse to Dell Type-C Dock Configuration and select Always Allow Dell Docks.
By following these steps, you can set up your Dell Docking Station quickly and easily. The docking station is a practical solution for users who require a larger workspace without sacrificing mobility. It allows you to connect multiple devices to your laptop, eliminating the need for multiple cables and adapters. Whether you’re working from home or in the office, Dell Docking Station can help you stay productive by providing a convenient and clutter-free workspace.

Connecting a Dell Laptop to a Docking Station
To get your Dell laptop to recognize your docking station, you need to follow these steps:
1. Connect the keyboard and mouse: Plug the keyboard and mouse into the docking station’s USB ports.
2. Connect the external monitor/s: Connect the external monitor/s to the docking station’s video ports. Make sure that the monitor is turned on and set to the correct input.
3. Connect the Ethernet cable: Connect the Ethernet cable to the docking station’s Ethernet port. This will allow you to connect to the internet or your company’s network.
4. Connect other external USB devices: You can also connect other external USB devices, such as printers, external webcams, USB drives, and so on, to the docking station’s USB ports.
5. Connect the power cable: Connect the power cable to the docking station and plug it into an electrical outlet.
6. Power on the docking station: Press the power button on the docking station to turn it on.
Once you have followed these steps, your Dell laptop should recognize the docking station and automatically configure the settings for the connected devices. If you encounter any issues, you may need to install the drivers for the docking station from the Dell website or contact Dell support for further assistance.
Connecting a Docking Station
To connect your docking station, you will need to follow a few simple steps. First, locate the HDMI or DisplayPort cable of your monitor and insert it into the corresponding connector on the docking station. If you are using a USB-C monitor, connect it to the dock via USB-C instead.
Next, connect the dock to your laptop using the appropriate cable. This could be a USB-C cable, Thunderbolt cable, or other proprietary cable depending on the type of dock and laptop you have. Make sure the connection is secure and snug.
Once the dock is connected to your laptop, it should automatically detect and configure the external monitor. If it doesn’t, you may need to adjust your display settings manually. You can do this by going to your computer’s settings or control panel and selecting “display” or “screen resolution.”
Connecting your docking station involves plugging in your monitor and then connecting the dock to your laptop using the appropriate cable. Once connected, your dock should automatically detect and configure the external monitor.
Enabling Dell Docking Station
Enabling the Dell docking station can be done by accessing the system configuration and USB configuration settings. Here are the steps to follow:
1. First, access the System Configuration settings on your Dell laptop or desktop computer.
2. Next, navigate to the USB-Configuration option.
3. In the USB-Configuration menu, you will find options to enable USB Boot Support and Enable the External USB Port. Make sure both of these options are enabled.
4. After enabling these options, navigate to the Dell Type-C Dock Configuration menu.
5. In the Dell Type-C Dock Configuration menu, select the option to Always Allow Dell Docks.
6. Once you have enabled these settings, your Dell docking station should be ready to use.
In summary, to enable a Dell docking station, you need to enable USB Boot Support and External USB Port in the USB-Configuration settings and Always Allow Dell Docks in Dell Type-C Dock Configuration.
Conclusion
A Dell Docking Station is an extremely useful tool for anyone who needs to connect multiple external devices to their laptop or computer. With a docking station, you can easily connect your keyboard, mouse, external monitor, Ethernet cable, and various other USB devices to your laptop, all at once. This can save you time and effort, as you won’t need to constantly plug and unplug different devices. Additionally, Dell docking stations are easy to set up and use, and they offer a range of connectivity options, including HDMI, DisplayPort, and USB-C. Whether you’re a professional who needs to work on multiple screens or a student who needs to connect various devices to their laptop, a Dell Docking Station can make your life a lot easier. So, if you’re looking for a reliable and efficient way to connect your devices, consider investing in a Dell Docking Station today.


