Printing in color is something that many Mac users take for granted, but it’s actually quite a complex process. From selecting the right printer settings to choosing the right type of paper and ink, there are several things to consider when printing in color with a Mac.
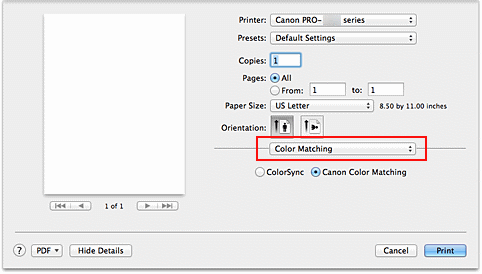
First, you need to select the proper printer settings. This includes setting your software to “Printer Manages Color” and accessing the Print dialog box by clicking on File and then selecting ‘Print’ from inside the application being printed from. Once you’re in the Print dialog box, go to Color Matching and choose your printer’s Color Controls.
Next, it’s important to select the right type of paper for your printouts. Generally speaking, glossy or semi-gloss paper works best for color printing as it helps prevent smudging and allows for brighter colors. Depending on your printer model and what type of output you want, you may also need to adjust your printer settings accordingly; this could include changing from standard paper mode to photo or glossy mode.
Finally, it’s essential that you use high-quality ink cartridges for your prints. Inferior ink cartridges can cause smudging, fading, and other issues that can ruin a good print job. It’s also important to check how much ink is left in each cartridge before printing so that you don’t run out while printing in color.
Overall, printing in color on a Mac requires some thought and planning but can yield great results if done properly. By following these steps and using quality materials such as paper and ink cartridges, you will be able to get beautiful prints every time!

Troubleshooting Color Printing Issues on Mac
The most likely cause of your issue is that your printer’s color settings are not properly configured. To correct this, you’ll need to go into the print menu of your software and set it to “Printer Manages Color” or the equivalent. Then click “Print Settings” or the equivalent to get into the Print dialog. In the Print dialog, go to Color Matching and choose your printer’s Color Controls. This should resolve any issues you’re having with printing in color on your Mac.
Turning Off Grayscale Printing on Mac
To turn off grayscale printing on a Mac, open the Print dialog box by clicking File and then selecting ‘Print’ from inside the application you are printing from. Next, select ‘Quality & Media’ from the pop-up menu. This will display various print options. Uncheck the ‘Grayscale Printing’ checkbox to disable grayscale printing. Finally, click ‘Print’ to confirm your changes and begin printing in color.
Troubleshooting Color Printing Issues in Microsoft Word
The word may not be giving you the option to print in color because you have not enabled the color printing option. To do this, go to the Print options section of the Options menu and check the box for “Print background image and color”. This will allow Word to print documents in color. Additionally, make sure that your printer is properly connected and that it has enough ink or toner for printing in color.
Printing in Color with an HP Printer on a Mac
To get your HP printer to print in color on your Mac, first open the printer’s settings window by clicking the settings icon or selecting Print Settings from the print options menu. In the Color or Black & White setting, make sure that Print in Color is enabled. If you need further customization, you can also access color options through the Presets menu. Once you’ve made your selections, click OK to save your changes and begin printing in color.
Changing Print Mode on a Mac
To change the Print mode on a Mac, you’ll need to access the System Preferences. First, click on the Apple menu or the Dock, then select System Preferences. From there, choose Print & Fax, Print & Scan, or Printers & Scanners and select your product. Finally, select Options & Supplies and select Driver or Options. On the screen that appears next, you’ll be able to select from any of the available printing preferences and click OK to save your changes.
Changing Print Settings on Mac
To change your print settings on Mac, first, open the System Preferences window. Click on the Apple icon in the upper left corner of your screen, then select System Preferences from the drop-down menu. In the window that appears, click on Printers & Scanners in the sidebar.
On this page, you can make changes to your default printer, add new printers, and adjust other settings like paper size and type, color options, resolution, and more. You can also set a variety of options for each printer you have added. To adjust specific settings for each printer you can select it from the list and then click Options & Supplies to make changes.
Once you’ve adjusted all of your settings just click Apply to save them. You’re now ready to start printing!
Conclusion
In conclusion, printing in color on a Mac computer is easy and straightforward. By setting the printer to “Printer Manages Color” or the equivalent and going into the Print dialog, users can easily select their printer’s Color Controls. Furthermore, users can also disable grayscale printing by opening the Print dialog box, selecting Quality & Media, unchecking ‘Grayscale Printing’, and clicking Print. Lastly, Windows users have to go to the Manage your device screen and choose either Color or Black and White from the Color Mode dropdown. With these few simple steps, Mac users will be able to print in color without any difficulty.


