If you’re an iPhone user, you may have noticed that your device saves the Wi-Fi networks you use. This makes it easy to quickly connect to your favorite hotspots without having to type in a password each time. But did you know that you can also manage these saved networks?

Fortunately, managing your saved Wi-Fi networks on your iPhone is easy and straightforward. All it takes is a few taps and you’ll be able to delete old networks, add new ones, or even share them with other Apple devices.
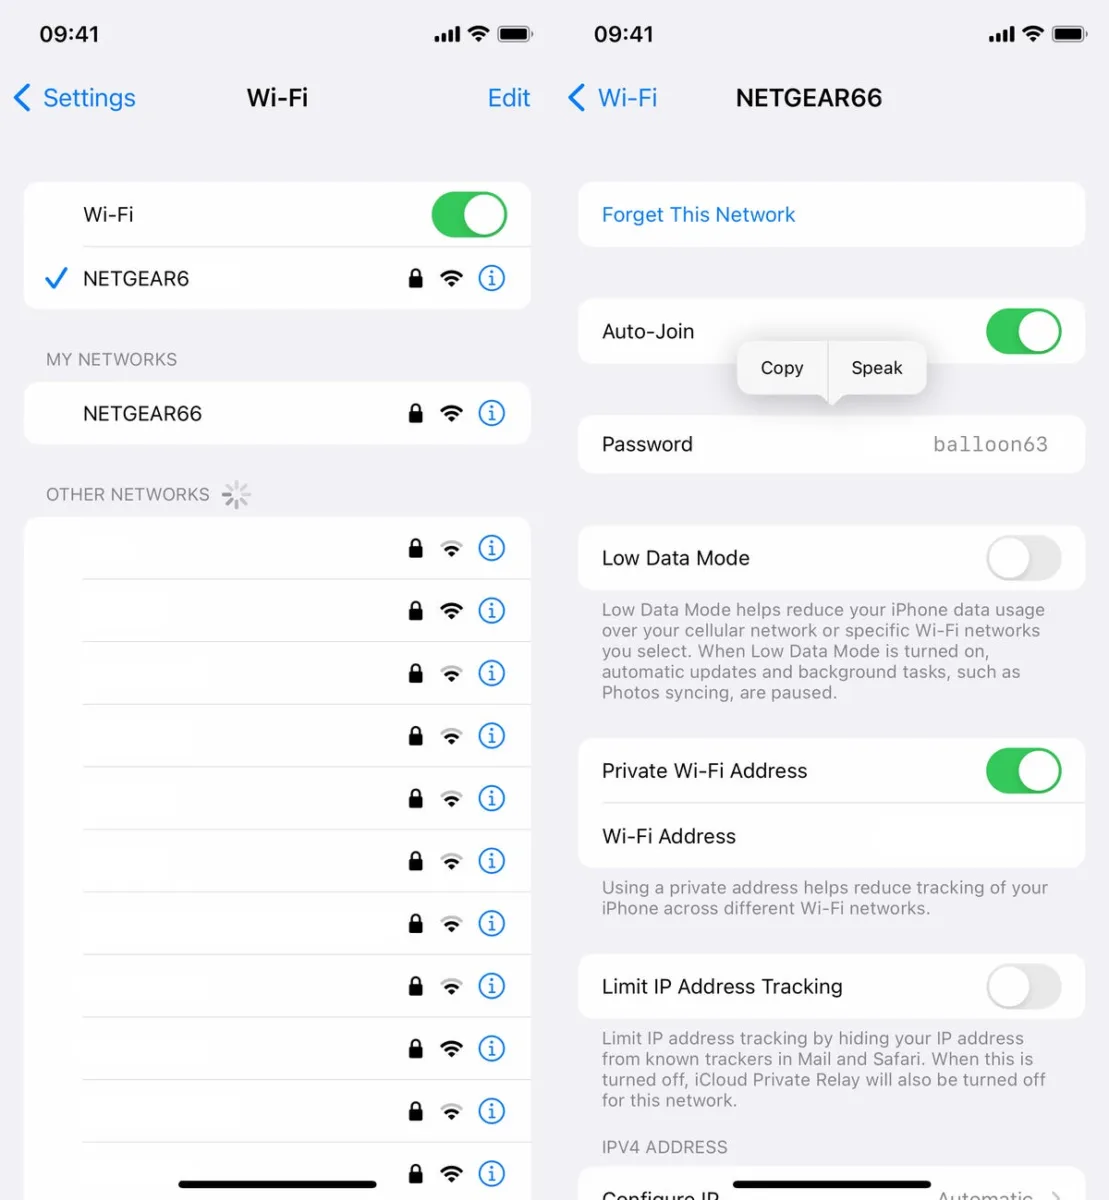
Here’s how to manage the Wi-Fi networks on your iPhone:
1. Open the Settings app on your iPhone and tap Wi-Fi.
2. Tap the Edit button in the top right corner of the screen, then authenticate yourself using Face ID, Touch ID, or your passcode.
3. You’ll now see a list of Known Networks – all of the hotspots you’ve saved to your iPhone or iCloud Keychain from other Apple devices.
4. To delete a network, simply swipe left on its name and tap Delete.
5. To add a new network, tap Add Network in the top left corner of the screen and enter its name along with its password when prompted.
6. To share a network with another Apple device, swipe left on its name and tap Share Network – you can then choose which device or account should receive it from the list that appears below it.
7. Finally, tap Done in the top right corner of the screen when all changes are complete and your Wi-Fi networks will be updated accordingly!
With these simple steps, managing your saved Wi-Fi networks is no longer something that needs to take up time or energy — just open up Settings and get started!
See Also: The Best iPhone Accessories to Enhance Your Everyday Life for our top rated list of accessories!
Viewing Saved Wi-Fi Networks on an iPhone
Yes, you can see saved Wi-Fi networks on your iPhone. From the Wi-Fi settings, you can tap the new “Edit” button and authenticate yourself using Face ID, Touch ID, or your passcode. Once authenticated, you’ll be able to view a list of Known Networks, which are all of the hotspots that you have previously saved to your iPhone or iCloud Keychain from other Apple devices.
Where Are Wi-Fi Profiles Stored on an iPhone?
Wi-Fi profiles are stored in the iPhone’s Settings app. To view and manage your Wi-Fi profiles, go to Settings > Wi-Fi. Here, you will see a list of all the Wi-Fi networks your iPhone has been connected to. You can add new networks by tapping the “Add Network” button at the bottom of the list. To remove a network from the list, just tap on the network name and then tap “Forget This Network”.
What Wi-Fi Networks Does My iPhone Have Save?
Your iPhone remembers any Wi-Fi networks that you have previously connected to. To view the list, go to Settings > Wi-Fi and tap Edit in the corner of the screen. The list of known networks will appear, showing the name of each network and whether or not it is currently connected. If a network is grayed out, this means your device isn’t currently connected to that network.
Managing Saved Wi-Fi Networks
To manage saved Wi-Fi networks on your device, open the Settings app and select Network & Internet. From there, select Wi-Fi, which will list all available networks in range that you can connect to. To view or edit the settings for a saved network, tap on its name. To make changes to a network’s settings, such as its name or password, tap the Edit button. To add a new network to the list of saved networks, tap Add Network and enter the necessary information. To delete a saved network from your device, tap and hold its name until you see an option to forget it.
Forgetting a WiFi Network on an iPhone
Unfortunately, you cannot forget a WiFi network from your iPhone until you have connected to it. This is because the iPhone stores a list of networks that you have connected to in the past, and this list is used to automatically connect you to those networks when they are in range. To forget a network, you must first connect to it and then go into Settings > Wi-Fi and tap on the small ‘i’ icon beside the network name. Then tap “Forget this Network” at the top of the page.
Forgetting a WiFi Network
To force a WiFi network to forget, you will need to remove the saved connection from your list of wireless networks. To do this, first, open the Network and Sharing Center by right-clicking the WiFi icon in the lower-right-hand corner of your screen. In the Tasks pane, click Manage wireless networks. Right-click the connection you want to delete, and then click Remove network. Once you have removed it from your list of wireless networks, it will no longer be available to connect to on your device.
Deleting Saved Networks
To delete saved networks on Android (using Google Marshmallow), you’ll need to open the Settings app on your device and tap the WiFi icon to access WiFi network options. From there, tap and hold the network you want to delete, then select Forget Network from the menu that appears. Once you’ve done this, the selected WiFi network will be removed from your list of saved networks.
Deleting Unwanted Wi-Fi Networks
Yes, you can delete unwanted Wi-Fi networks. On Android, open ‘Settings’ and select ‘Wi-Fi’. Tap and hold the network you want to remove and select ‘Forget network’. This will delete the connection from your device, so if you want to reconnect to that network, you’ll need to re-enter your username and password.
Conclusion
In conclusion, the saved Wi-Fi networks on your iPhone can be easily managed and edited. You can view all of the known networks in the Wi-Fi settings and access them using Face ID, Touch ID, or your passcode. You can also delete profiles and all associated settings, apps, and data from Settings > General > VPN & Device Management. To change a network’s settings, tap the network in Settings > Network & Internet> Internet. With these easy steps, you can quickly and efficiently manage the Wi-Fi networks on your iPhone.


