Welcome to the Mac users’ guide on how to edit autofill settings! Autofill is a great feature that can save you time and effort when browsing the web. It remembers your personal information and enters it into forms whenever you visit a website. But, sometimes it can be hard to remember all of your information, or you may need to update it as your details change over time. That’s why editing your autofill settings on Mac is so important.
In this blog post, we’ll walk you through the steps of editing your autofill settings on Mac, including how to add new info and delete existing info. Let’s get started!
First, open Safari on your Mac and click on the “Safari” tab in the top left corner of the browser window. Then select “Preferences…” from the drop-down menu that appears. This will take you to a new window with various settings options for Safari.
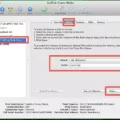
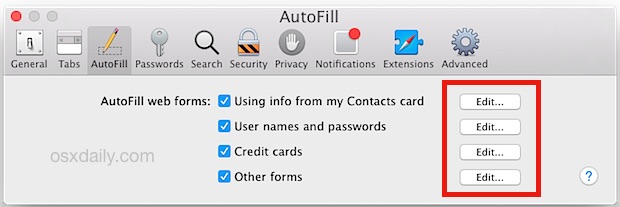
From here, choose the “AutoFill” tab at the top of the window. You will now see a list of information that Safari will automatically enter for you when visiting websites, such as name and address fields or credit card numbers. To add new information, simply click “Add…” at the bottom of this list and fill in the required fields (e.g., name, address). When finished, click “Save” at the bottom riht corner of this screen.
If you need to delete existing information from Safari’s autofill list, simply select it from this list and click “Remove…” at the bottom right corner of this screen. You can also edit existing information by selecting it from this list and clicking “Edit…” at the bottom right corner of this screen; then make any necessary changs before saving them with “Save” at the bottom right corner once again.
That covers everything there is to know about editing autofill settings on Mac! We hope this blog post has been helpful in guiding you through managing your personal data on Safari for Mac computers so that you can get back out there and continue browsing with ease!
Deleting AutoFill Information on Mac
To delete AutoFill information on Mac, open the Safari browser and click Safari from the menu. Then select Reset Safari from the drop-down list. This will open a dialog box. Deselect the “Remove Other AutoFill Form Text” check box and then click Reset. This will erase any previously entered AutoFill information.
Managing AutoFill Passwords on Mac
To manage AutoFill passwords on Mac, first open the Safari browser and click on the ‘Settings’ tab. Then, click on ‘AutoFill’ and make sure that ‘User names and passwords’ is selected. If you don’t want your passwords to be savd for a particular website, you can click on ‘Passwords’, unlock your passwords, then select the website you want to delete and hit the ‘Delete’ button. You can also add a new password by clicking on the ‘Add Password’ button. Finally, make sure to keep your Mac secure by regularly updating your software and using a strong password or passcode.
Deleting Items from AutoFill
To delete items from AutoFill in Chrome, follow these steps:
1. Open Chrome and click the three dots at the top right of the screen.
2. Select Settings from the menu that appears.
3. In the “Autofill” section, expand the area for which you want to delete entries.
4. Click on each entry you want to delete, then click the ‘x’ icon to remove it from your list of AutoFill entries.
5. Once all desired entries have been removed, click on Done and your changes will be saved automatically.
Removing Incorrect Autofill
To get rid of incorrect AutoFill data, you can clear your browsing data in your browser settings. Here’s how:
1. Open your browser and click on the three dots icon to open the Settings menu.
2. Select the “Privacy & Security” tab on the left side of the page.
3. Scroll down to “Clear Browsing Data” and select “Choose What to Clear.”
4. Select “Autofill data (includes forms and cards)” and click the “Clear” button.
This will delete all of your stored autofill data, including any incorrect information that may have been saved previously.
Changing AutoFill Email on Mac
To change the AutoFill email address on your Mac, open the Safari app and click ‘Safari’ in the menu bar. Then click ‘Preferences’. In the window that appears, click ‘AutoFill’. From here, you can select whih information you want to be automatically filled in. To change your email address, select ‘Using info from my Contacts card’ and make sure that ‘Email’ is checked. Click on the drop-down menu beside ‘Email’ and select your updated address. Once you have selected your new email address, click ‘Done’ to save your settings.
AutoFilling Addresses on a Mac
To AutoFill addresses on a Mac, you’ll need to enable the AutoFill feature in Safari. To do this, open the Safari app and go to Safari > Settings. In the Settings window, click ‘AutoFill’ and make sure ‘Using information from my contacts’ is selected. Once enabled, you can fill in websites or forms with address information saved in your Contacts app. All you have to do is start typing an address into the form—Safari will recognize it and fill it in automatically.
Removing a Website from AutoFill in Safari on Mac
To remove a website from Autofill in Safari Mac, open the Safari browser and go to the Action menu. Click on Preferences, then select AutoFill and deselect the “Using info from my Address Book card” and “Other forms” options. To remove a website individually, click Edit next to Other forms, select the website you wish to remove and click Remove. Alternatively, you can click Remove All to clear all saved AutoFill information.
Deleting AutoFill Usernames
Deleting AutoFill usernames is easy and can be done in a few simple steps. First, open the Chrome browser, then click on the three dots in the top right-hand corner of the window. Select Settings from the drop-down menu that appears. Now, click on Privacy and security on the left-hand side of the Chrome Settings window. Next, click Clear browsing data from the new list in the middle. In the popup pane, select Advanced at the top. Checkmark both Passwords and othr sign-in data and Autofill form data boxes. Then, choose All time from the Time range drop-down menu to ensure all usernames are deleted. Finally, click Clear Data to remove all AutoFill usernames from your browser history.
Changing AutoFill Passwords
To change your AutoFill passwords, you’ll first need to open your device’s Settings app. Once that’s open, tap Google and select the Manage Your Google Account option. At the top, scroll right and select Security. Scroll down to Signing in to oher sites and select the Password Manager option. Here you’ll see a list of saved passwords that can be edited or deleted. To edit a password, simply tap on it and enter in the new credentials. You can also turn Offer to save passwords on or off if you want to opt out of having your passwords automatically saved.
Locating AutoFill Settings
Your AutoFill settings can be found in your Google Chrome browser. To access your AutoFill settings, tap the three dots icon either to the riht of the address bar (on Android) or the bottom-left corner of the screen (on iPhone). Then, select Settings from the drop-down menu. From there, you’ll be able to find and adjust your AutoFill settings. To turn on and off saving and filling out addresses, simply toggle the “Save and fill addresses” switch.


