If you’re an iPhone user, you know how frustrating it can be when your phone locks automatically afer a period of inactivity. Fortunately, there is a way to turn off this auto-lock feature so that your screen stays on for as long as you need it to. Here’s how to turn off auto-lock on your iPhone:
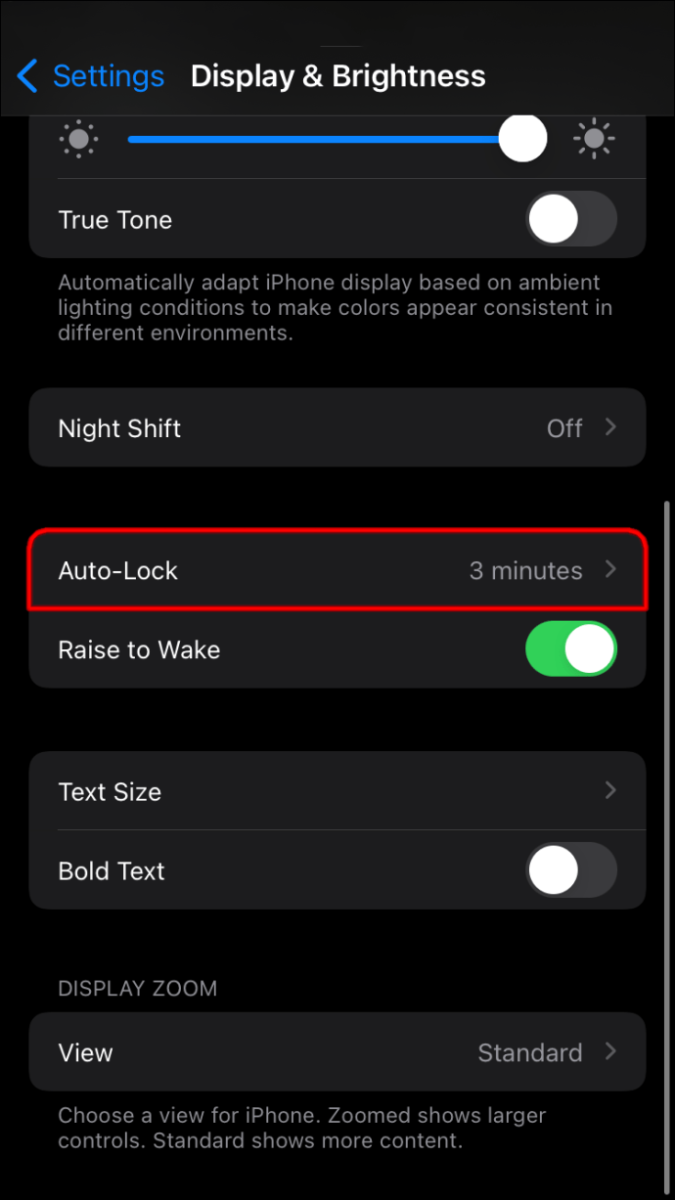
1. Open the Settings app and tap “Display & Brightness”.
2. Scroll down and select “Auto-Lock”.
3. Choose the amount of time you want your screen to stay on after you last touch your iPhone. Your options are 30 Seconds, anywhere from one to five minutes, and Never.
4. Once you’ve selected the desired time setting, exit out of the Settings app and enjoy your new settings!
Now that you know how to turn off auto-lock on your iPhone, you can rest assured knowing that your device won’t lock itself when you don’t want it to. This feature can be especally helpful if you’re using your phone for a lengthy task or presentation, or if you just want more control over when and how often your phone locks itself. So go ahead—give it a try and enjoy the freedom!

Stopping an iPhone from Auto-Locking
To prevent your iPhone from auto-locking, you’ll need to adjust the Auto-Lock settings in the Displays & Brightness section of your phone’s Settings. Once you’ve opened the Settings app, select Displays & Brightness, and then choose Auto-Lock. From there, you can select Never from the list of options to ensure that your phone screen never times out or locks automatically.
Turning Off Auto Lock
To turn your auto lock off on an Android tablet, open your Settings. Then, tap the applicable menu options such as Security or Security & location > Security. Locate and tap Screen lock and select None. This will turn off the auto lock on your Android tablet.
Enabling Auto Lock on an iPhone
To turn on Auto Lock on your iPhone, open the Settings app and navigate to the Display & Brightness menu. Tap the Auto-Lock tab, then choose the amount of time you want your screen to stay on afer you last touch your iPhone. Your options are 30 Seconds, anywhere from one to five minutes, and Never. Once you’ve made your selection, Auto Lock will be enabled and will lock your screen after the amount of time you chose has passed since you last interacted with it.
Unable to Change Auto Lock Setting
If you are unable to change your auto-lock setting, it is likely because your iPhone is in Low Power Mode. When this mode is enabled, the auto-lock setting is restricted to 30 seconds in order to help conserve power. To disable Low Power Mode and regain the ability to change your auto-lock setting, go to Settings > Battery and toggle off Low Power Mode.
Understanding Auto Lock Settings on Mobile Phones
It is likly that you cannot change the auto lock on your phone because Low Power Mode is enabled. Low Power Mode will overrule your device’s Auto-Lock setting, so if you want to be able to change the auto lock on your phone, you will need to turn off Low Power Mode. To do this, go to Settings > Battery and toggle off the switch next to Low Power Mode.
Preventing iPhone Timeouts
To prevent your iPhone from timing out, you’ll need to adjust the Auto-Lock settings. To do this, open the Settings app and select the Display & Brightness option. Then, at the bottom of the list, select Never for the Auto-Lock setting. This will prevent your iPhone’s screen from timing out after a set period of time.


