If you’re looking for a way to add a bit of atmosphere and blur to your photos, then you’ve come to the right place. Blurring pictures is a great way to add depth and mystery to an image, as well as drawing focus to your subject. Whether you’re a professional photographer or just an amateur looking for some creative tools, learning how to blur pictures can be a great skill.
The good news is that blurring pictures doesn’t have to be complicated or time consuming. There are many easy and effective ways to blur photos with both digital and traditional methods. We’ll walk you though the various ways of blurring photos, so you can find the best method for your needs and start creating beautiful images!
One of the easiest and most popular ways to blur photos is with photo editing software like Adobe Photoshop or GIMP. When using these programs, all you have to do is select an area of your photo that you want blurred, adjust the level of blur until it suits your liking, and then save your image. It’s an easy process that only takes a few minutes but can add depth and atmosphere to any picture.
For those who prefer more traditional methods of blurring photos, there are also some great techniques that don’t involve any software at all! For instance, if you want a subtle blur effect for portrait shots, all you need is two pieces of paper or thin cardboard cut into circles slightly larger than the lens size on your camera lens. Place one sheet over the lens, adjust it until it’s centered over the camera’s lens, then move it back and forth while taking multiple shots until you get the desired effect. This method works especially well with landscapes too!
Another option when blurring images is using apps specifically designed for this task. There are plenty of apps available both on Android and iOS that allow users to easily adjust their image blur levels in seconds. From basic circle-shaped blurs up to full-blown motion blurs – these apps make it simpler than ever before for anyone who wants a quick way of achieving impressive results with minimal effort!
Finally, if you’re looking for something unique when it comes to blurring photos – why not try doing it yourself? All it takes is a steady hand and some patience; simply hold up two fingers in front of your camera lens while taking shots untl they reach the desired level of blurriness! This method might take longer than editing in software or using apps but will give your images an even more personal touch by adding something completely unique!
Blurring pictures can be great fun – whether you’re looking for subtle atmospheric effects or dramatic scenes – so why not give it a go? With our guide covering everything from digital editing software right down to DIY methods – we hope this article has given you enough information about how to blur pictures so that you can get creative with your own photography today!
Blurring a Picture
Blurring a picture is a great way to add a creative, artistic touch to your image. To blur a picture, you first need to upload the image that you want to blur. You can either upload your own image from your photo library or select a stock image from an online library. After selecting your image, open the adjustment menu and choose “blur” from the list of options. You can then adjust the intensity of the blur as well as oher parameters such as feathering and opacity. Once you are satisfied with your blurring effect, save and download the image so that you can use it in different projects.
The Availability of a Blur Tool in Photos
Yes, the Photos app has a blur tool. To access it, open the photo you’d like to edit in the Photos app and tap Edit. Then tap the ‘f’ button at the top left and use the slider to adjust the blur effect. This is especially usefl for photos taken in Portrait mode.
Using Apps to Blur Pictures
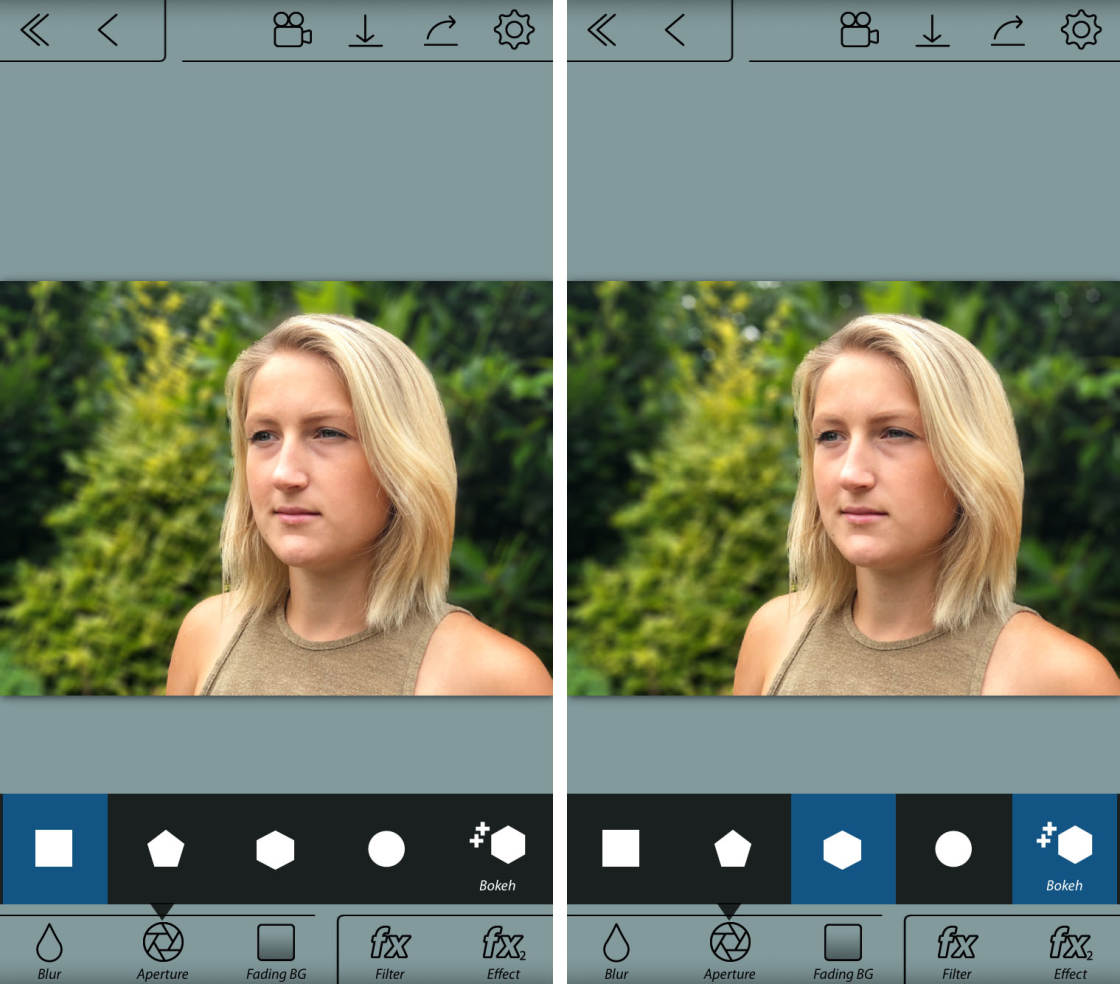
YouCam Perfect: YouCam Perfect is a great app for blurring pictures. It has a range of tools to help you blur backgrounds and create artistic effects with your photos. Its Blur Background feature alows you to choose from a variety of blur options to customize the effect. You can also adjust the intensity of the blur, making it perfect for portrait shots or other images that require a more subtle effect.
Blur Photo Effect Background App: Blur Photo Effect Background App is a simple and easy-to-use app that lets you quickly blur your images. It has an intuitive user interface that makes it easy to apply vrious levels of blurring effects to your photos, allowing you to customize them according to your own preferences. It also has support for masks, so you can easily apply effects only on specific parts of an image.
Photo Unblur, Camera Editor: Photo Unblur, Camera Editor is an effective app for blurring pictures and creating interesting effects with them. It offers a variety of features including auto-detection and manual adjustments to get the perfect level of blur needed for any photo. You can also adjust color saturation and contrast as well as sharpen edges for more realistic results.
Blur Photo App: Blur Photo App is another popular option for blurring pictures on mobile devices. This app alows you to quickly add various levels of blurring effects with just one tap, making it ideal for anyone looking for quick results without having to spend too much time editing their photos. You can also use its masking feature to selectively blur certain parts of the image while keeping others in focus.
FaceTune2 Editor by Lightricks: FaceTune2 Editor by Lightricks is an excellent choice if you’re looking for advanced features when it comes to blurring pictures on your mobile device. This app offers several tools that let you fine-tune the intensity of the blur effect and customize it according to your needs. It also has support for masks so you can easily apply the effect only on specific parts of an image while leaving other parts in focus.
Blurring Photos on an iPhone
Yes, you can easily blur a photo on your iPhone using the Photos app. To do so, open the Photos app, select the portrait photo you wish to edit and tap “Edit” in the upper-right corner. Once you’re in editing mode, tap on the f/number icon at the top-left and use the “Depth control” slider that appears below your photo to adjust the blur strength. You can drag this slider left or rght to increase or decrease the amount of blur on your photo. When you’re satisfied with how your photo looks, tap “Done” at the bottom of your screen to save it.
Free Ways to Blur a Picture
There are several free tools available online that allow you to easily blur a picture. BeFunky is one of the most popular free photo editing tools, and it offers a Blur Tool that can be used to blur any part of your image. To use the Blur Tool, simply open your photo in BeFunky’s Photo Editor, select Blur from the Edit menu, adjust the slider to get the perfect amount of blur, and then hit Apply. Your blurred image can then be saved to your computer or other online storage services. Another great free tool for blurring images is Pixlr X, which also offers an easy-to-use Blur Tool with adjustable sliders for perfect results.
Blurring Part of a JPEG
To blur part of a JPEG, you will need to use an image editing program like Adobe Photoshop. First, open the JPEG in Photoshop. Then, select the Lasso tool from the left-hand toolbar or use the Polygonal Lasso tool to step-by-step select the area you want to blur. Once you have selected the area, go to Filter > Blur and choose Gaussian blur. This will apply a blur effect to your selection only. You can adjust the intensity of the blur by adjusting the radius vale in the Gaussian blur window. When you are happy with your settings, click ‘OK’ and save your file.
Blurring a Picture on an iPhone 11
To blur a picture on an iPhone 11, open the photo in the Photos app. Tap Edit, then tap the Depth Control slider (on supported models). Drag the slider left or rigt to adjust the level of background blur. When you are finished, tap Done to save your changes. You can also adjust the amount of blur while viewing your photo in full screen. Just tap on it and drag the slider left or right to adjust the level of background blur.
Blurring Faces on an iPhone
Yes, you can easily blur faces in iPhone photos with the Blur Photo Effect Background app. To do this, open the app, go to the Editing Tools tab and tap Blur. Then select the photo you want to edit from your photo library. The app will then allow you to blur any parts of the photo including faces. You can also adjust the intensity of the blur effect and save your edited photo when you’re done.
Blurring Part of a Picture on iPhone
To blur part of a picture on an iPhone, you can use a photo blurring app like the Blur Photo Editor. First, open the app and select the photo you’d like to blur. Then, use your fingers to apply the blurring effect to the desired area of your picture. When you’re done, save or share your photo with friends and family. With this app, you can customize the amount of blur and even create artistic effects for a unique look.
Blurring a Face in a Photo
Blurring a face in a photo can be easily done with the help of a blurring app or free photo-editing website. For Android phones, popular blurring apps include ObscuraCam, Android Hide Face, and Pixlr. For iPhones, you can try Touch Blur, Photo Editor, or TADAA. If you prefer usig a website instead of an app, there are many free options available such as PicMonkey, LunaPic, and Photohide. All of these apps and websites allow you to blur out part of an image by selecting the area you want to blur and adjusting the intensity. After the desired amount of blurring has been achieved, simply save your edited image and you’re all set!
Conclusion
In conclusion, blurring pictures is a great way to create interesting visuals for your designs and projects. Blur effects can be used to emphasize certain elements in an image, as well as to create a mysterious or dreamy atmosphere. Blurring can also be used to soften harsh lines and edges, making it perfect for portrait photography. There are several apps available that allow you to blur photos easily on both iPhone and Android devices. With these apps, you can create beautiful blurred backgrounds in just a few minutes.

