The iPhone is an incredibly popular device for taking and sharing photos, videos, and oter media. It has a powerful photo library with many useful features, including the ability to create shared albums with friends and family. In this blog post, we’ll go over how to see shared albums on your iPhone.
First, open the Photos app on your iPhone. You can find it by tapping the Photos icon on your home screen.
Once you’ve opened the Photos app, you’ll need to tap the “Shared” tab at the bottom of the screen. This will bring up a list of all of your shared albums that have been created by you or shared with you by others.
To view a particular album, simply tap it in the list. This will bring up all of its contents including photos and videos that have been added to it by other people. If tere are multiple contributors to an album, you can tap each contributor’s name to view their contributions separately.
You can also add your own media to any shared album from within this view by tapping “Add” at the top-right corner of the screen and selecting either “Photo or Video” from the menu that appears.
Finally, if you want to make changes to a shared album like inviting new members or changing its privacy settings, simply tap “Options” at the top-right corner of the screen and make any necessry adjustments from there.
We hope this blog post has helped you learn how to see shared albums on your iPhone! For more tips and tricks related to usig your iPhone’s photo library features, be sure to read our other posts!

Viewing Shared Albums on iPhone
If you’re not seeing shared albums on your iPhone, it’s likely because you haven’t turned on iCloud Shared Albums or accepted the Shared Album invite. To turn on iCloud Shared Albums, open the Settings app > [your name] > iCloud > Photos, then toggle on Shared Albums. You also need to make sure that iCloud Photos is enabled.
If you’ve already turned on iCloud Shared Albums and still can’t see shared albums, check whether you’ve accepted the Shared Album invite by going to the Photos app and tapping “Shared” at the bottom of the screen. If you don’t see any shared albums listed, tap “Sharing” in the top right corner and follow the instructions to accept any pending invites.
Accessing Shared Albums
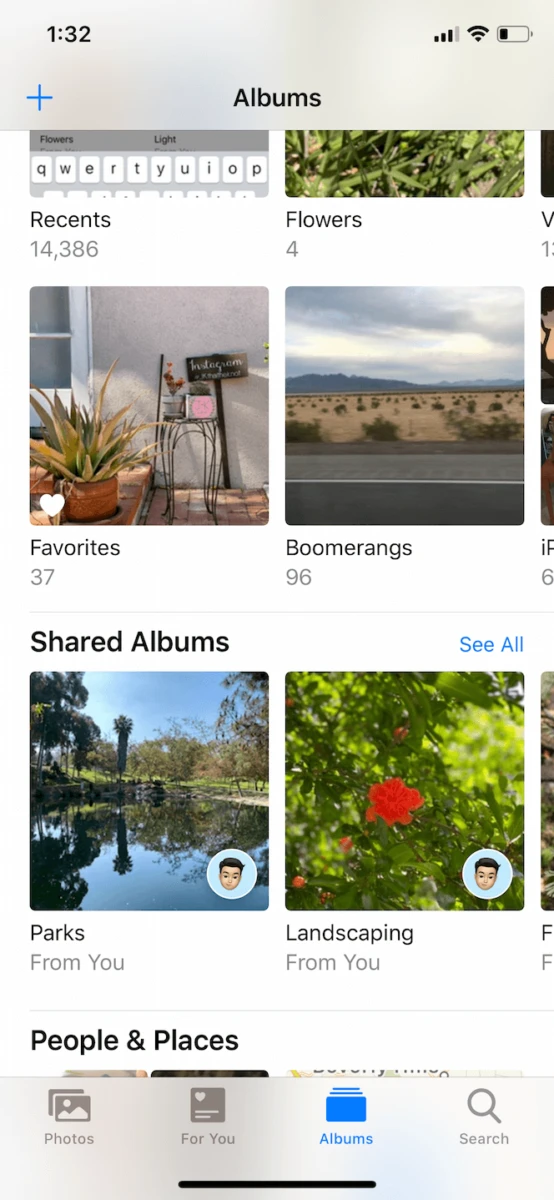
If you’re using an iOS device, accessing your shared albums is easy. First, open the Photos app and tap the Albums tab. Then, tap a Shared Album, and you’ll be taen to the People tab. Here, you can view photos shared by other people and add photos of your own to share with others.
If you’re uing iCloud for Windows on a PC, open iCloud Photos and double-click the Shared Album to open it. Click Options and then select the name of the person who wants to subscribe. Finally, click Resend invitation and then Done.
With either method, it’s easy to access your shared albums from any device – all you need is an active internet connection!
Accepting a Shared Album Invite
To accept a shared album invite, open the Photos app on your device and go to the For You tab. At the top of the list, you should see an invitation to join a shared album. Tap Accept and you will be added to the album. You can now view and share photos from the shared album with anyone who is part of it.
Troubleshooting Issues with Shared Album Invites
It is possible that the person you are trying to send the shared album invite to may not have received it for a few reasons. First, they may not have a Photos app account or the email address you used to send the invite may be incorrect. Additionally, they may have spam filters set up on ther email account that are blocking your invite from entering their inbox. Finally, if they recently changed their email address, then the invite will be sent to their old address. To ensure that your shared album invite is received, double-check the email address you used and ask the person you are sending it to if they can check their spam filter settings.
Troubleshooting Issues with Apple Shared Albums
If your Apple Shared Album isn’t working, it could be for a few diffrent reasons. First, make sure you have enabled Shared Albums in your iCloud settings. On an iPhone, iPad or iPod touch, go to Settings > [your name] > iCloud > Photos and turn on Shared Albums. For Mac users, open System Preferences, select iCloud and click the Options button next to Photos. Then select Shared Albums.
If you’ve already enabled the feature but are still having issues, check that both parties involved have the latest version of iOS or macOS installed. You should also make sure that both parties have sufficient iCloud storage; if not, consider upgrading to a larger storage plan. Additionally, try signing out of iCloud and back in again to reset any connection issues you may be experiencing.
If none of these solutions work, it’s worth contacting Apple Support directly for further assistance.
Viewing a Shared iCloud Album on an iPhone
To view a shared iCloud album on your iPhone, start by goig to the Settings app. Tap your name at the top of the screen and select iCloud. On the next page, tap Photos and make sure Shared Albums is switched on.
Next, open the Photos app on your device. At the bottom of the screen, tap Albums and scroll down to the Shared Albums section. Here you’ll find all albums that have been shared with you by other people. Tap any album to open it and view its contents. You can also add photos to an existing album or create a new one from here.
Accessing a Shared Album on iCloud
To access a shared album on iCloud, firt you’ll need to get the link to the shared album from the person who created it. Once you have the link, go to iCloud.com and paste it in your browser. This will open up the shared album, where you can view all of its contents. Depending on what settings were enabled by the person who created the shared album, you may also be able to upload photos and videos or leave comments.
Viewing Shared Albums on iCloud
Yes, you can view shared albums on iCloud.com! To do this, you must have iCloud for Windows set up on your computer and Shared Albums turned on. Once this is complete, open iCloud.com in a web browser and sign in with your Apple ID. Click the Photos icon and then select Shared Albums to view all of your shared albums. You can also add new photos to an existing album or create a new album to share with friends and family.
Refreshing a Shared Album on an iPhone
To refresh a shared album on your iPhone, you’ll need to first close the Photos app. Then, open the Settings app and select your profile at the top of the page. Tap iCloud and then select Photos. Toggle off iCloud Photo Sharing and wait for a few moments before toggling it back on. After this, open the Photos app again and navigate to the shared album that you want to refresh. Pull down from the top of the screen and release to load any new photos or changes that have been made.
Effects of Turning Off Shared Albums on iPhone
If you turn off shared albums on your iPhone, any photos you’ve previously shared in albums to others will no longer be visible to them. Additionally, any images from other people that have been shared with you and are stored on your iOS or macOS device will be deleted. However, your personal photos stored in your libraries or Camera Roll on the device will not be affected.
Do I Need ICloud Storage for Shared Albums?
No, you do not need an iCloud storage subscription to create or access shared albums. Shared albums are available to anyone with the link, regardless of whether they have an iCloud storage subscription. To create a shared album, simply go to the Photos app on your device and select “Create Shared Album” from the menu. You will then be able to enter a title, add people with whom you wish to share the album, and add photos. Once you have created the album, you can share it with others by sending them a link or entering thir email address.
Conclusion
The iPhone is a revolutionary piece of technology that has revolutionized the way people interact with the world. It has made communication easier, more efficient, and more accessible than ever before. With its easy-to-use interface, it has become one of the most popular devices in the world. The iPhone offers an array of features such as an integrated camera, music player, file storage, web browsing capabilities and access to hundreds of thousands of applications. It also features a range of security options for its users to ensure teir data is kept safe and secure. The iPhone is no longer just a phone but is now a powerful mobile computer that can do almost anything you can imagine.


